
Overview
Office UC provides Users with an application and series of features to enable Unified Communications across one or many devices. The Tablet application will work across Apple iOS iPads as well as Tablets operating Android iOS. This application is available through the following features and add-ons:
The application comes with standard branding.
This application is available on the following WHC technologies:
Centrex Users
Foundation – as an add-on
SIPT Users
Application Description – Office UC Tablet
This application, available on the Mobile User license provides Users with the following:
iPad or Tablet softphone application enabling:
If a User is provided UC Business then the following additional functionality is provided:
Desktop softphone application enabling:
Instant Messaging and Presence (IM&P) from the provided applications
Microsoft Skype for Business Plug-In
If a User is provided UC Team then the following additional functionality is provided:
Personal Audio Conferencing for up to 8 people
Desktop Sharing
Hardware & Software Description
In order to successfully install and use this application, the following installation and licensing requirements should be met:
These applications are running on the following firmware versions. If you are running on a later version we recommend you update to the latest.
|
Device |
Version |
|
Tablet - iPad |
22.6.7 |
|
Tablet - Android |
22.6.7 |
The application supports devices with iOS 10 or later.
This application should run on any iPad 2 and subsequent device using the above operating systems. However, due to network, country and manufacturer variations, we are unable to maintain a full list of validated devices. However we can confirm that the application has been validated on the following reference devices:
The application supports devices with Android 4.4 or later that conform to the hardware requirements set out below.
This application should run on any Android device using the above operating systems. However, due to network, country and manufacturer variations, we are unable to maintain a full list of validated devices. However we can confirm that the application has been validated on the following reference devices:
The following requirements need to be met:
We strongly recommend that you use a known, stable, secure and correctly configured Wireless LAN and use the application over this Wi-Fi connection. If you are unsure please contact your system administrator for advice and assistance.
The application only allows you to make VoIP Calls, even when a SIM card and mobile network is available.
Network and Firewall Requirements
You may need to allow outbound access for the following on your firewall:
|
Application |
Protocol |
Destination |
Destination Port |
|
Application Signaling |
SIP |
uc-bslnws09.yourwhc.co.uk 62.7.201.172 62.7.201.140
bs11lnws13.yourwhc.co.uk 213.120.60.140 213.120.60.204
ipcomms-uc-route62-bs11lnws13.yourwhc.co.uk 62.7.201.177 62.7.201.145
uc-bs12lnws14.yourwhc.co.uk 213.120.60.236 213.120.60.172 ipcomms-uc-route62-bs12lnws14.yourwhc.co.uk 62.7.201.182 62.7.201.150 |
UDP/TCP 5060, 5074, 5075, 8933 |
|
Application Media |
RTP |
62.7.201.132/32 62.7.201.141/32 62.7.201.146/32 62.7.201.164/32 62.7.201.173/32 62.7.201.178/32 213.120.60.132/32 213.120.60.164/32 213.120.60.196/32 213.120.60.228/32 |
UDP 32767 to 65535 |
|
Office UC Smartphone and Tablet Downloads |
n/a |
Apple Store Google Play Store
|
n/a |
|
Office UC Operation |
XSI
|
193.113.10.11 193.113.11.11 |
TCP 443
|
|
Office UC Presence |
XMPP
|
193.113.10.7 193.113.11.7 |
TCP 5222 TCP 1081 TCP 5281 TCP 5269 TCP 443 |
|
Office UC Screenshare |
Proprietary |
193.113.10.8 193.113.11.8 |
TCP 8443 |
Automatic Call Handover between Networks
We do NOT support automatic handover between Wi-Fi and 3G/4G networks for Calls that could be using Data Networks, and vice versa.
The feature that enables this has been switched off within the Core System, due in the main to the time it may take to re-establish a connection (up to 90 seconds) should the device want to switch because of a movement into or out of a particular network type. However there are other scenarios where problems have been seen.
The current behaviour is this:
If an Office UC VoIP call is begun on 4G (i.e. the phone is not in Wi-Fi range) and the phone moves into range and picks up a Wi-Fi connection
Conversely if an Office UC VoIP call is begun on a Wi-Fi connection and the phone moves out of Wi-Fi range
For a) Wi-Fi to Wi-Fi, I.e. movement within a larger network, which may involve changing the access point or use of a Wi-Fi extender that the User is connected to and, b) Wi-Fi to Wi-Fi that is not part of the same network infrastructure with different access circuits, both may work but are NOT supported.
Both scenarios are possible, but from testing, we cannot guarantee that the function will work every time or even at all, due to a number of factors:
All provisioning activity takes place on the Business Zone ordering portal unless explicitly stated. All configuration activity takes place on the Configuration Portal (Business Portal) unless explicitly stated.
This application is an inclusive feature provided with the Mobile User License.
Download & Installation Instructions
Once you have the correct license and the you have received, or are in possession of the welcome email, they can now download the application from the App Store or Google play Store.
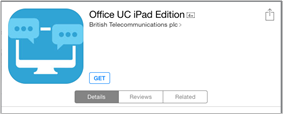
Please ensure you download the version called ‘Office UC’ from BT and NOT the version called ‘UC Office.’ The latter is the version used on WHC 1.0 and not WHC 2.0. For iPad you need to use the search ‘Office UC iPad Edition’, and for Android just ‘Office UC’ as the smartphone and tablet share the same app.
Apple Store Google Store
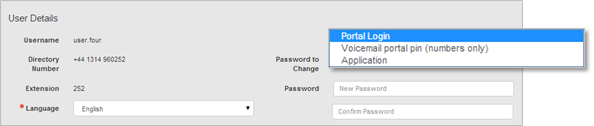
The Welcome Email sent to End Users will guide them to navigate to the Business Portal to download the application and obtain their Username. Please note this Username is the same for all Applications, but is different to the Business Portal credentials. The username can be seen in the Applications tab as shown below:

The password for all applications is not sent to the User and needs to be set in the Business Portal by navigating to My Account,

Operating the Feature – iPad Tablet
Tap the application icon on the device to launch the application.

Once the application has launched, the application presents you with the login screen where you need to provide your user account information. Enter your username and password into the appropriate boxes. Select whether you would like the app to remember your password, and also if you want it to sign you in automatically on subsequent launches. Click Sign-in.

Username and Password Management
You must login to the application with your Application Username and Password, which can be obtained from the Business Portal. The password can also be modified via the Business Portal.
To quit, select Settings followed by Sign out or double-tap the home button on the device to close the application.
When you start the application for the first time, you will land in the Contacts section and your Contacts list will be empty. To add contacts please refer to the Contacts section of this guide.
Within this start-up window view there are a number of tabs, located on the left-hand bar, and in no particular order they are:
The Contacts list in the Contacts tab can contain different types of contacts as follows:
First you need to add a contact using one of the methods described below.
Add Contact from Local or Contact Management Directories
To add contacts from either your local address book or from the Business Portal contact directories you will need to change the Directory option to either
Select Office UC at the top of the page, followed by the option required.
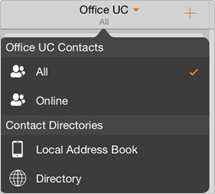
The local address book will show all local contacts. For the main directory you can then use the search field to find people and add them to your Contacts list. Once you locate a contact, select the information icon next to their name followed by the + symbol next to the parameter ‘Add to Contacts’.
After you have done this, you can change the setting back to just show you’re Office UC Contacts and you have the choice of displaying:
Contacts can also be added manually by tapping the ‘+’ button, followed by Add Contact.
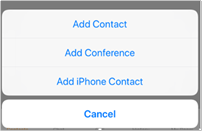
In the Add Contact screen, enter the contact’s information and then select Done. By default, your presence information is always shared with a new contact if an IM Address is provided. In the IM address the following will need to be typed in:
The username is the name of the other user as built on the WHC service, and the username must be entered all in lowercase, this will then send a Presence request, which you can decline or accept it. If you decline the request, you can always share your presence information later by selecting Subscribe from the contact card. Note that the contact must accept your subscription request for you to establish the presence relationship successfully.
A conference number can be saved by adding a new contact, as above, and including the Dial-in Number and Conference ID in the relevant fields. This can then act as a conference contact, to avoid having to remember a PIN code and a conference number, for example, for a recurring conference.
There are four contact filters available from the Contacts tab:
Tap a contact from the Contacts list to open a contact card. This is the same for presence-enable and non-presence-enabled contacts.
Presence (UC Business & Team only)
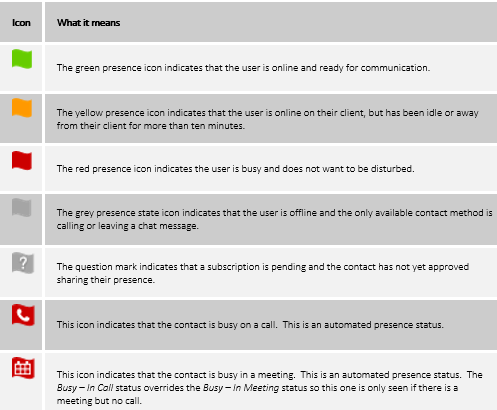
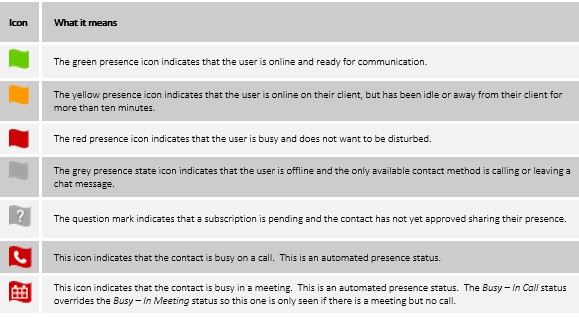
For each contact to which you have subscribed, you can see their presence. Similarly, your contacts can see your presence on their Contacts list. Presence means that your friends are able to see whether you are available, for example, “I’m available” or “I’m busy”.
The list of presence flags are as follows:
You can manually set your own presence by tapping on the Presence icon from the status bar, top left hand side.

Followed by pressing anywhere in the blue/grey screen.
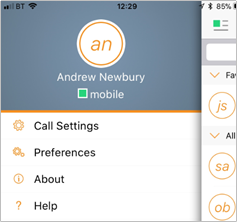
This will open the My Status screen where you can change your avatar, personal message, and presence status.
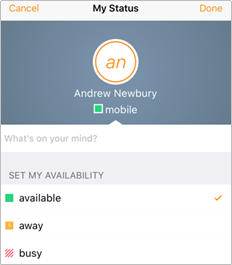
Your avatar is the picture that represents you in your friends’ Contacts list and in chat screens.
Tapping on an avatar opens a dialog with options to select an existing image, to take a new one with your phone camera, or to clear your avatar. You can enter a status message in the area next to the avatar. This status text is shown in your friends’ Contacts list.
If you see the error message, “Chat Unavailable”, under any tab, it means that the XMPP connectivity has been lost for chat and presence; however, you can still make calls. In this case, you should contact your service provider. The presence update is only triggered by appointments and meetings that are either accepted by the user or made by them. Note that all-day meetings do not trigger a presence change to Busy – In Meeting.
For contacts that have a listed email address, you are able to click the email icon (envelope) next to the users address. This will then use the clients default email application and open up a new message, with the contacts email address already inserted into the ‘To’ address.
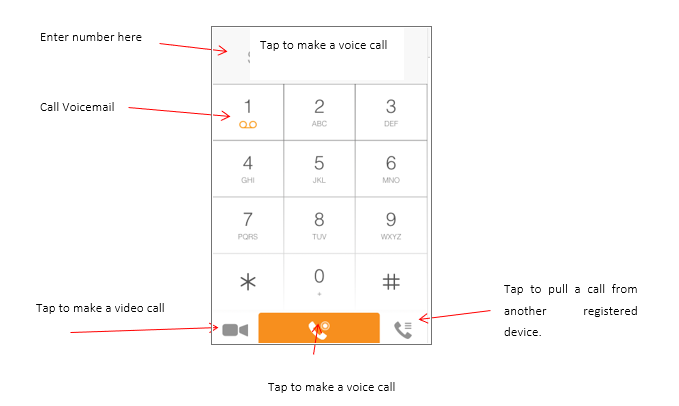
The Dial pad tab displays a dial pad and a text field used to enter numbers. The dial pad is one of the options used to make audio or video calls. There are three buttons below the dial pad: Video call, Audio Call, and Call Move. The top text field also has a delete button that, when pressed, deletes one character at a time.
A badge notification appears on the Dial pad tab when there are messages in the voicemail box. A long press on the “1” digit connects you to the voicemail box. When there is no voicemail in your voicemail box, no notification badge is shown.
The dial pad menu also contains the option to Pull a Call from a Shared Call Appearance device or Call Director number.
You can make an audio or video call using one of the following methods:
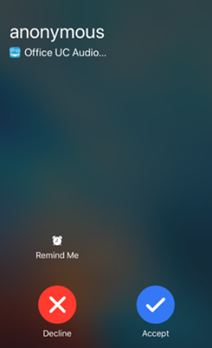
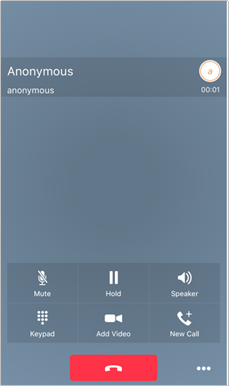
An incoming call is indicated with a ringtone. There are two options on the incoming call screen: Accept and Decline. If you decline the call, it causes the line to sound busy at the caller’s end and they know that you rejected the call.
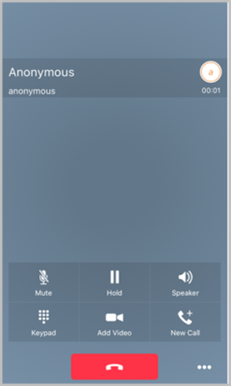
From the In Call screen, you can perform the following actions:
The application can be run in the background, whilst the tablet is locked and will still receive calls and notifications.
When you miss a call, the notification bar on the device shows a numerical note on the Call and History badge icon. It will also show on the devices notification pop-ups if enabled, clicking on the notification will take you to the Call history in the app.
Voicemail is also accessible with a long press of the dial pad “1” key (similar to how it is on a regular mobile dial pad). If voicemail messages are available, then the “1” key changes color. In addition, a voicemail notification is displayed as a badge on the Call tab icon.
Contact Name Lookup for Incoming Calls and Call Logs
Whenever an incoming call does not have a calling name associated with it, the device performs a local contact search. If the number matches one of the contacts on the devices Contacts list, the name is shown on the incoming Call screen along with the alert.
When a user retrieves their call logs/history and the call log does not have a calling name associated with it, the client does a lookup in the local contacts and populates the name if a match is found.
You can have one active call at any one time if you receive a new incoming call and accept it. The existing call is put on hold and you can change between these two calls by using the Hold and Unhold buttons.
The client supports starting a new call while in an ongoing call. The steps are as follows:
The client supports transferring VoIP calls to another party. Two modes of transfer are supported:
Call Move can be used in scenarios where a user has Shared Call Appearance or Call Director. For instance, if the user has an active call on the desk phone, this can be transferred seamlessly to the smartphone via the Call Pull button. Depending on the application, dialing settings, and service configuration, the call can be pulled as a VoIP or circuit-switched call to the mobile phone. There is no interruption to the voice call.
The application supports the use of Bluetooth headset for incoming and outgoing calls. The following headsets have been tested, although other devices should also work:
Note that the application supports switching the audio source within the application between the Bluetooth device and the phone microphone and speaker. However, answering a call, hang up, mute, and adjusting the volume from the Bluetooth device are not supported.
Chat (UC Business & Team only)
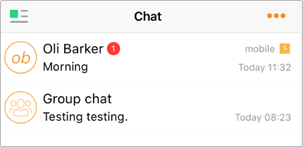
The Chat tab shows the list of recent chats since the last login. Chats are listed so that the newest one is always at the top. Chats are not in alphabetical order and are always listed with the most recent first. If User A chats with User B multiple times, their discussions appear as one item in the list. New incoming messages are indicated with a notification badge to the right of the name. The icon remains next to the name until the message is read.
You can chat with a contact by using any of the methods below:
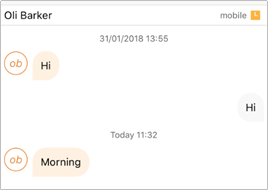
When you initiate a chat, the Chat screen opens. Chatting with a contact is possible only when you are both online. If your contact initiates a chat, you see a notification badge on the Chat tab and the entry appears at the top of the Chat History list. Once a chat opens, the name of the recipient is on the top bar and there is a presence icon flag before the name. The recipient’s messages are presented in the light orange background and the user is presented in the light grey background.
During a chat the orange bar at the top provides the following different options:

Start a group chat using one of the following methods:
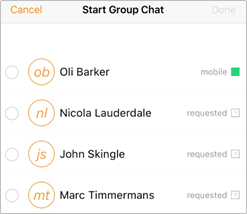
When you initiate a group chat, the Chat screen opens. More participants can be added later to the chat using the add participant icon. Anyone in the group chat can add participants. However, removing participants is currently not supported.
A group chat works the same way as a one-on-one chat. All messages from any participant are sent to everyone else. All contacts need to be online to be able to participate in a group chat. You cannot invite an offline contact. A group chat history is saved and is available to view later from the Chat tab.
A user can leave a group chat by selecting the 3 dots button followed by the Leave chat option. The chat is marked as “offline” and the user no longer receives messages from the chat. When tapping on the “offline” chat, the user re-joins the room and starts receiving messages. However, the user does not receive the messages that were sent in the chat while the user was outside of the room.
The Clear History menu item behaves the same way as the corresponding option in the one-on-one chat and removes the local history. The View Participants button opens a dialog that shows the list of participants in the group chat. Note that deleting a chat room is not supported.
Call history can be accessed from the History tab. The application saves a call history for placed, received, and missed calls. Call history makes it easy for you to redial and call back when you miss a call or when you want to dial a contact with whom you have recently spoken with.
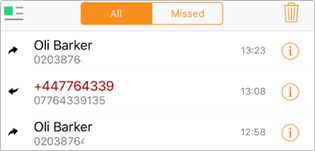
You can filter by All (all calls), or filter by Missed calls to make it clearer. Likewise you can choose to select the dustbin icon to delete all call history.

An incoming call is indicated by an arrow to the left, and if answered the number is grey/black. If unanswered the number will be red. An outgoing call is indicated an arrow to the right and if answered the number is grey/black.

Selecting the information icon also allows further controls such as video call.
My Room is an always available and a permanent room that you can use to chat with anyone that joins. My Room is accessible using the My Room icon in the Tab bar or by selecting My Room from the Conversations menu bar.
You can add more participants using the add participants icon or they can join your room from your contact card. Once participants join the chat room, they can tap on the Call button of that screen to automatically join the conference.
My Room uses your permanent chat room and a conference bridge (audio or video). All My Room sessions start as chats but a call can be added to the session while in progress. Others join your room by clicking your name on their Contacts list and selecting Join Room from the contact card.
My Room Audio Conferencing 8 provides Personal Audio Conferences for up to 8 attendees per conference. It is included in the chargeable UC Team Add-On that can be applied to Users. It is a personal, reservation less audio conferencing service that can be accessed from any phone.
My Room Audio Conferencing requires a My Room Bridge to be added at the Site level. If the bridge exists, a user conference is automatically created for the user with default settings. If the bridge does not yet exist, no conference will be created. The required My Room Conferencing 8 conference will then be automatically added when the Site’s My Room Bridge is created from the Business Portal.
The default settings for the conference can be changed from the user’s Business Portal under “My Room” in their Feature Settings. The user can also see their conference ID and PIN from this page. If the user conference does not exist (meaning the bridge does not exist), the user is informed to contact the system administrator.
For security reasons, only the user can reset the PINs associated to his conference. This is achieved by deleting and re-adding the conference (options are transferred to the new conference automatically).
Contacts outside of the Company can attend Audio Conferences by being sent the access details within an email invitation.
Screenshot of My Room Feature Settings page in the Business Portal:

The Side Navigation bar is accessed by swiping from left to right on the main screen, and it contains the following items:

You can set your own presence by tapping on your personal status from the side navigation. It opens the My status screen where you can change your avatar, personal message, and presence status.
Your avatar is the picture that represents you in your friends’ Contacts lists and in chat screens. Tapping on an avatar opens a dialog with options to select an existing image, to take a new one with your device’s camera, or to clear your avatar.
You can enter a status message into the area next to the avatar. This status text is shown in your friends’ Contacts lists.
If you see the error message “Chat Unavailable” under any tab, it means that XMPP connectivity has been lost for chat and presence; however, you can still make calls.
The client supports the following service management features, allowing supplementary services to be viewed or updated using the native client Preferences window:
Call Options
Call Forwarding
Do Not Disturb
Incoming Calls
Office UC
|
Option |
Description |
|
Call Options |
Block My caller ID - You can hide or display your number when calling or communicating with other parties or contacts. To hide your number, set to “Enable”. To show your number, set to “Disable”. Dialing Service - Choose between:
|
|
Call Forwarding |
By tapping on a different Call Forward option, you can enter a number to forward your calls to in the event of any of the following:
|
|
Do Not Disturb |
When you activate this service, all calls are blocked and sent to voicemail, where voicemail is available. |
|
Incoming Calls |
Simultaneous Ring Personal - This feature allows you to set up to ten phone numbers that would ring in addition to the primary phone number when you receive a call. |
|
Office UC |
Remote Office - This service allows the use of any phone as the office phone from a charging and numbering perspective. For instance, a hotel room phone can be used as the office phone. Enable Remote Office and specify a phone number to be used as the Remote Office number. Call Director - This service allows users to enable their mobile phones to behave as if the phones were an extension of their telephone number. Locations, numbers assigned to a mobile, can be added and the activated/deactivated at any time. Likewise when click-to-dial is enabled, the user can choose to notify all devices or just the primary device. Click on the Add Location button, enter the number of the phone that you wish to use, along with a brief description, followed by Active. The following options are then available:
|
Preferences
The client supports the following preferences:
Language
You can change the language of the application from this option.
Remember Password
Allow the application to remember the password to make signing in easier.
Troubleshooting
The application requires a User to enter the correct Username and Password and have the correct features assigned. If the Username and/or Password are incorrect or the User does not have the required features then an appropriate error message will be displayed at the login process. If you are sure that the provisioning, login and licensing is correct then please check network connectivity, and the Requirements section of this document including Network and Firewall Requirements.
If problems still persist, logging can be enabled via the “Troubleshooting” menu within “Settings”. Once enabled, the application will collect information which can be emailed to your support engineers for further diagnostics. Troubleshooting is managed by a menu entry in Settings. It can be accessed from the following place:
Caller ID lookup
Whenever an incoming call does not have a calling name associated with it, the device performs a local contact search. If the number matches one of the contacts on the phone’s Contacts list, the name is shown on the incoming Call screen along with the alert.
Office UC provides support for users with multiple devices. This includes several features:
Operating the Feature – Android Tablet
Tap the application icon on the device to launch the application.

Once the application has launched, the application presents you with the login screen where you need to provide your user account information. Enter your username and password into the appropriate boxes. Select whether you would like the app to remember your password, and also if you want it to sign you in automatically on subsequent launches. Click Sign-in.

Username and Password Management
You must login to the application with your Application Username and Password, which can be obtained from the Business Portal. The password can also be modified via the Business Portal.
To quit, from the Horizontal Menu select Settings followed by Sign out or double-tap the home button on the device to close the application.
When you start the application for the first time, you will land in the Contacts section and your Contacts list will be empty. To add contacts please refer to the Contacts section of this guide.
Within this start-up window view there are a number of tabs, located on the left-hand bar, and in no particular order they are:
The Contacts list in the Contacts tab can contain different types of contacts as follows:
First you need to add a contact using one of the methods described below.
Add Contact from Local or Contact Management Directories
To add contacts from either your local address book or from the Business Portal contact directories you will need to change the Directory option to either
Select Office UC at the top of the page, followed
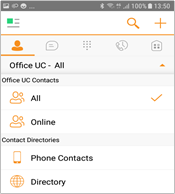
The local address book will show all local contacts. For the main directory you can then use the search field to find people and add them to your Contacts list. Once you locate a contact, select the information icon next to their name followed by the + symbol next to the parameter ‘ADD TO CONTACTS’.
After you have done this, you can change the setting back to just show you’re Office UC Contacts and you have the choice of displaying:
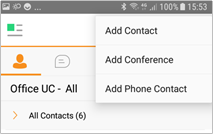
Contacts can also be added manually by tapping the ‘+’ button, followed by Add Contact.
In the Add Contact screen, enter the contact’s information and then select Done. By default, your presence information is always shared with a new contact if an XMPP address is provided.
If you receive a buddy request, you can decline or accept it. If you decline the buddy request, you can always share your presence information later by selecting Subscribe from the buddy contact card. Note that the contact must accept your subscription request for you to establish the presence relationship successfully.
A conference number can be saved by adding a new contact, as above, and including the Dial-in Number and Conference ID in the relevant fields. This can then act as a conference contact, to avoid having to remember a PIN code and a conference number, for example, for a recurring conference.
There are four contact filters available from the Contacts tab:
Tap a contact from the Contacts list to open a contact card. This is the same for presence-enable and non-presence-enabled contacts.
Presence (UC Business & Team online
For each contact to which you have subscribed, you can see their presence. Similarly, your contacts can see your presence on their Contacts list. Presence means that your friends are able to see whether you are available, for example, “I’m available” or “I’m busy”.
The list of presence flags are as follows:
You can manually set your own presence by tapping on the Presence icon from the status bar in all tabs view. Tapping the Presence icon opens the My status screen where you can change your avatar, personal message, and presence status.
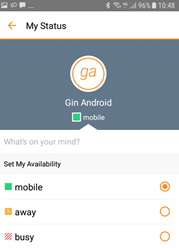
Your avatar is the picture that represents you in your friends’ Contacts list and in chat screens.
You can enter a status message in the area next to the avatar. This status text is shown in your friends’ Contacts list.
If you see the error message, “Chat Unavailable”, under any tab, it means that the XMPP connectivity has been lost for chat and presence; however, you can still make calls. In this case, you should contact your service provider. The presence update is only triggered by appointments and meetings that are either accepted by the user or made by them. Note that all-day meetings do not trigger a presence change to Busy – In Meeting.
For contacts that have a listed email address, you are able to click the email icon (envelope) next to the users address. This will then use the clients default email application and open up a new message, with the contacts email address already inserted into the ‘To’ address
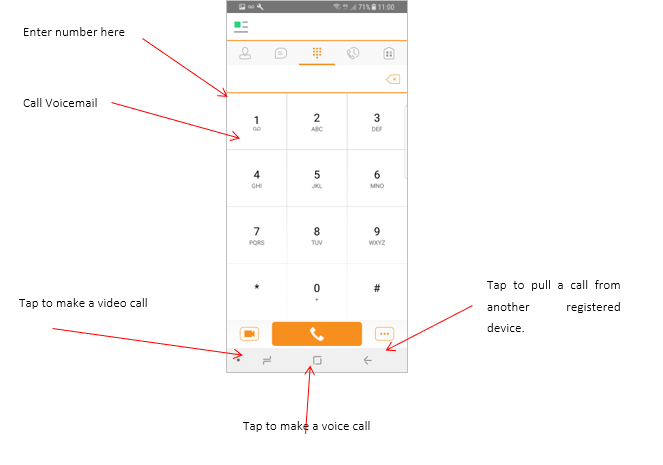
The Dial pad tab displays a dial pad and a text field used to enter numbers. The dial pad is one of the options used to make audio or video calls. There are three buttons below the dial pad: Video call, Audio Call, and Call Move. The top text field also has a delete button that, when pressed, deletes one character at a time.
A badge notification appears on the Dial pad tab when there are messages in the voicemail box. A long press on the “1” digit connects you to the voicemail box. When there is no voicemail in your voicemail box, no notification badge is shown.
The dial pad menu also contains the option to Pull a Call from a Shared Call Appearance device or Call Director number.
You can make an audio or video call using one of the following methods:
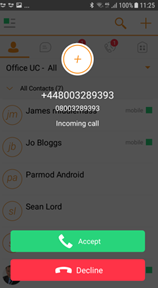
An incoming call is indicated with a ringtone. There are two options on the incoming call screen: Accept and Decline. If you decline the call, it causes the line to sound busy at the caller’s end and they know that you rejected the call.
From the In Call screen, you can perform the following actions:
The application can be run in the background, whilst the tablet is locked and will still receive calls and notifications.
When you miss a call, the notification bar on the device shows a numerical note on the Call and History badge icon. It will also show on the devices notification pop-ups if enabled, clicking on the notification will take you to the Call history in the app.
Voicemail is also accessible with a long press of the dial pad “1” key (similar to how it is on a regular mobile dial pad). If voicemail messages are available, then the “1” key changes color. In addition, a voicemail notification is displayed as a badge on the Call tab icon.
Contact Name Lookup for Incoming Calls and Call Logs
Whenever an incoming call does not have a calling name associated with it, the device performs a local contact search. If the number matches one of the contacts on the devices Contacts list, the name is shown on the incoming Call screen along with the alert.
When a user retrieves their call logs/history and the call log does not have a calling name associated with it, the client does a lookup in the local contacts and populates the name if a match is found.
You can have one active call at any one time if you receive a new incoming call and accept it. The existing call is put on hold and you can change between these two calls by using the Hold and Unhold buttons.
The client supports starting a new call while in an ongoing call. The steps are as follows:
The client supports transferring VoIP calls to another party. Two modes of transfer are supported:
Call Move can be used in scenarios where a user has Shared Call Appearance or Call Director. For instance, if the user has an active call on the desk phone, this can be transferred seamlessly to the smartphone via the Call Pull button. Depending on the application, dialing settings, and service configuration, the call can be pulled as a VoIP or circuit-switched call to the mobile phone. There is no interruption to the voice call.
The application supports the use of Bluetooth headset for incoming and outgoing calls. The following headsets have been tested, although other devices should also work:
Note that the application supports switching the audio source within the application between the Bluetooth device and the phone microphone and speaker. However, answering a call, hang up, mute, and adjusting the volume from the Bluetooth device are not supported.
Chat (UC Business & Team Only)
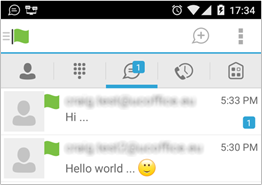
The Chat tab shows the list of recent chats since the last login. If User A chats with User B multiple times, their discussions appear as one item in the list.
Tapping the name from the Chat list opens the Chat view (IM view) in the right pane where new messages can be typed. Old messages are also shown.
New incoming messages are indicated with a notification badge to the right of the name. The icon remains next to the name until the message is read.
Chats are listed so that the newest one is always at the top. Chats are not in alphabetical order and are always listed with the most recent first.
The Overflow menu displays the following options: Start group chart, Mark all as “Read”, About, Settings, and Sign out.
Start a chat using one of the following methods:
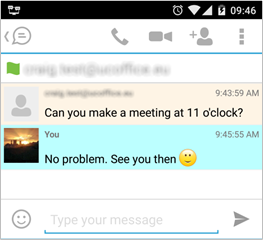
When you initiate a chat, the Chat screen opens. Chatting with a contact is possible only when you are both online. If your contact initiates a chat, you see a notification badge on the Chat tab and the entry appears at the top of the Chat History list.
Once a chat opens, the name of the recipient is on the top bar and there is a presence icon flag before the name. The recipient’s messages are presented in the orange background and the user is presented in the white background.
Smiles can be added to messages by typing the corresponding character codes and by selecting from the smiley icons, (the smiley is displayed graphically in the message area).
Active chat display:
Start a group chat using one of the following methods:
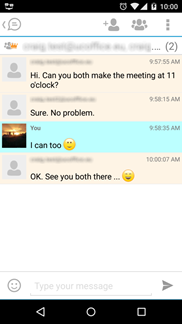
When you initiate a group chat, the Chat screen opens. More participants can be added later to the chat using the add participant icon. Anyone in the group chat can add participants. However, removing participants is currently not supported.
A group chat works the same way as a one-on-one chat. All messages from anyone are sent to everyone else. All contacts need to be online to be able to participate in a group chat. You cannot invite an offline contact.
A group chat history is saved and is available to view later from the Chat tab.
A user can leave a group chat by selecting the Leave chat option. The chat is marked as “offline” and the user no longer receives messages from the chat. When tapping on the “offline” chat, the user re-joins the room and starts receiving messages. However, the user does not receive the messages that were sent in the chat while the user was outside of the room.
The Clear History menu item behaves the same way as the corresponding option in the one-on-one chat and removes the local history.
The View Participants button opens a dialog that shows the list of participants in the group chat. Note that deleting a chat room is not supported.
Group Chat display: Chat participant’s display:

Call history can be accessed from the History tab. The application saves a call history for placed, received, and missed calls. Call history makes it easy for you to redial and call back when you miss a call or when you want to dial a contact with whom you have recently spoken with.

You can filter by All (all calls), or filter by Missed calls to make it clearer. Likewise you can choose to select the dustbin icon to delete all call history.

An incoming call is indicated by an arrow to the left, and if answered the number is grey/black. If unanswered the number will be red. An outgoing call is indicated an arrow to the right and if answered the number is grey/black.

Selecting the information icon also allows further controls such as video call.
My Room is an always available and a permanent room that you can use to chat with anyone that joins. My Room is accessible using the My Room icon in the Tab bar or by selecting My Room from the Conversations menu bar.
You can add more participants using the add participants icon or they can join your room from your contact card. Once participants join the chat room, they can tap on the Call button of that screen to automatically join the conference.
My Room uses your permanent chat room and a conference bridge (audio or video). All My Room sessions start as chats but a call can be added to the session while in progress. Others join your room by clicking your name on their Contacts list and selecting Join Room from the contact card.
My Room Audio Conferencing 8 provides Personal Audio Conferences for up to 8 attendees per conference. It is included in the chargeable UC Team Add-On that can be applied to Users. It is a personal, reservation less audio conferencing service that can be accessed from any phone.
My Room Audio Conferencing requires a My Room Bridge to be added at the Site level. If the bridge exists, a user conference is automatically created for the user with default settings. If the bridge does not yet exist, no conference will be created. The required My Room Conferencing 8 conference will then be automatically added when the Site’s My Room Bridge is created from the Business Portal.
The default settings for the conference can be changed from the user’s Business Portal under “My Room” in their Feature Settings. The user can also see their conference ID and PIN from this page. If the user conference does not exist (meaning the bridge does not exist), the user is informed to contact the system administrator.
For security reasons, only the user can reset the PINs associated to his conference. This is achieved by deleting and re-adding the conference (options are transferred to the new conference automatically).
Contacts outside of the Company can attend Audio Conferences by being sent the access details within an email invitation.
Screenshot of My Room Feature Settings page in the Business Portal:

The Settings page is accessed by clicking on the settings icon in the bottom left hand of the application. It contains the following items:
The client supports the following service management features, allowing supplementary services to be viewed or updated using the native client Preferences window:
Call Options
Call Forwarding
Do Not Disturb
Incoming Calls
Office UC
|
Option |
Description |
|
Call Options |
Dialing Service - Choose between:
Caller ID Blocking - You can hide or display your number when calling or communicating with other parties or contacts. To hide your number, set to “Enable”. To show your number, set to “Disable”. |
|
Call Forwarding |
By tapping on a different Call Forward option, you can enter a number to forward your calls to against the following criteria:
|
|
Do Not Disturb |
When you activate this service, all calls are blocked and sent to voicemail, where voicemail is available. |
|
Incoming Calls |
Simultaneous Ring Personal - This feature allows you to set upto ten phone numbers that would ring in addition to the primary phone number when you receive a call. |
|
Office UC |
Call Director - This service allows users to enable their mobile phones to behave as if the phones were an extension of their telephone number. Locations, numbers assigned to a mobile, can be added and the activated/deactivated at any time. Likewise when click-to-dial is enabled, the user can choose to notify all devices or just the primary device. Once added the following can be set:
Remote Office - This service allows the use of any phone as the office phone from a charging and numbering perspective. For instance, a hotel room phone can be used as the office phone. Enable Remote Office and specify a phone number to be used as the Remote Office number. |
Please note that the ‘MY TELEPHONE NUMBER’ option in the ‘Call Settings’ section is not currently being used. Entering and saving a phone number here will have no effect on the operation of this application.
The client supports the following preferences:
Language
You can change the language of the application from this option.
Remember Password
Allow the application to remember the password to make singing in easier.
Sign in Automatically
The user can choose to sign in automatically when the client is started.
Caller ID lookup
Whenever an incoming call does not have a calling name associated with it, the device performs a local contact search. If the number matches one of the contacts on the phone’s Contacts list, the name is shown on the incoming Call screen along with the alert.
Troubleshooting
The application requires a User to enter the correct Username and Password and have the correct features assigned. If the Username and/or Password are incorrect or the User does not have the required features then an appropriate error message will be displayed at the login process. If you are sure that the provisioning, login and licensing is correct then please check network connectivity, and the Requirements section of this document including Network and Firewall Requirements.
If problems still persist, logging can be enabled via the “Troubleshooting” menu within “Settings”. Once enabled, the application will collect information which can be emailed to your support engineers for further diagnostics. Troubleshooting is managed by a menu entry in Settings. It can be accessed from the following place:
Office UC provides support for users with multiple devices. This includes several features:
Article ID: 229
Created: Wed, May 8, 2019
Last Updated: Wed, May 8, 2019
Author: Keira Tait
Online URL: https://kb2.ic.uk/article.php?id=229