
The following document type provides a comprehensive user guide on how to use BTW WHC features. Where appropriate the guide will be backed up by screenshots to support the recipient of this guide.
It provides a number of features within the WHC proposition which are split into three categories:
Most of which can be configured by any of the following means:
Administrators can make changes based on their profile using the portals/methods detailed below:
This document describes the basic functionality of each Site Feature and provides an explanation of how the Feature is used and configured by administrators. If a Site feature is predominantly an application then it will be briefly described in here but referred out to a specific document.
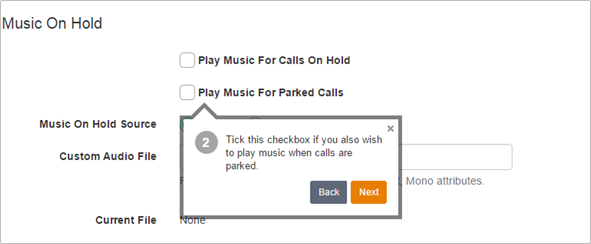
This functionality is deployed on the Business Portal and provides a guided tour to all users on how to configure Company, Site and User features. It does this by providing an ‘Assistance’ button located in the top right-hand side of ea
ch feature.
When the assistance button is clicked on it will guide the user, step by step, on how to configure that particular feature.
It does this by providing onscreen pop-ups against each of the key parameters with key written information. It also enables the user to move to the next step, go back to the previous step or exit the tour.
The Account Code Feature allows the Users to assign certain calls outside of the Site a specified Account Code for tracking and auditing purposes. For example, if you want to track long distance calls in order to charge them to certain internal customer accounts, you can create a different account code for each internal customer and each type of call.
You can configure the feature so that it forces Users to enter Account Codes before they make certain types of calls, (for example, long-distance calls), referred to as ‘Mandatory Account Codes’. Alternatively you can configure the feature so that it gives Users the option to use a Feature Access Code, (FAC), and to enter an Account Code when they make certain types of calls. This is referred to as ‘Feature Access Code based Account Codes’.
Mandatory or Feature Access Code based Account Codes can be used on a Site at the same time. However, a User must be assigned to either the Mandatory Account Codes or the Feature Access Code based Account Codes.
The Account Codes feature does not validate the codes that are entered, so calls are not blocked if a User enters a non-configured Account Code.
Description - Mandatory Account Codes
Users assigned the Mandatory Account Codes feature are prompted to enter an Account Code every time they make a call outside of the Site.
Function - Mandatory Account Codes
When prompted to enter an Account Code, the User dials the applicable digit string, after which the call set up resumes normally. The Account Code is captured in the associated Call Detail Records, (CDRs), generated for that call.
The Group or Company Administrator can elect to have Account Codes apply only to long distance calls. In this case, Users are not prompted for an Account Code when making a local or Freephone calls.
Account Codes are a fixed length configured by the Group or Company Administrator. When prompted for an Account Code, the User is informed of the required number of digits to enter.
When an employee makes a call for which an Account Code is required, the call processing sequence is as follows:
Description - Feature Access Code-Based Account Codes
Function - Feature Access Code-Based Account Codes
When a User chooses to use the Feature Access Code before beginning a call, the User will be prompted for an Account Code. The User then dials the Account Code, receives confirmation, and then proceeds with the call as usual.
The sequence is as follows:
The User can choose to enter an Account Code during a call.
The User flashes the switch hook, or presses the hold key, (depending on the device being used), during the call and enters the Feature Access Code (for example, *XX). The User will be prompted for an Account Code, dials the code, and then resumes the call.
The sequence is as follows:
NOTE: A User can enter an Account Code before beginning a call and can enter an Account Code during the call multiple times. The final Account Code to be entered is the one that is captured in the CDR, (Call Detail Record), generated for that call.
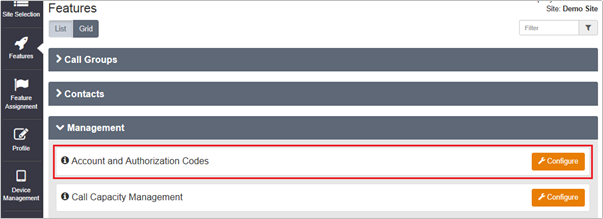
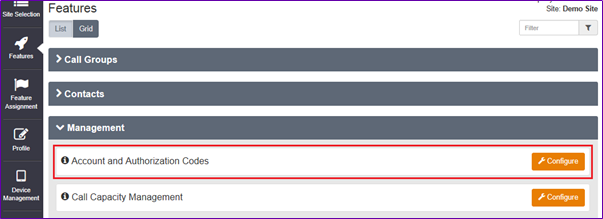
The Group or Company Administrator configures the Account Code feature through the Business Portal on the Site Features page.
When configuring the feature, the Group or Company Administrator:
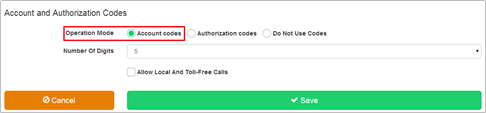
Either Mandatory Account Codes or Feature Access Code based Account Codes
Ticking this box will allow these calls to proceed without an Account Code entered.

The new code is displayed in the list
NOTE: The system does not do a validation check against the list of Account Codes configured by the Site or Company Administrator when the User enters the Account Code when prompted.
The User can enter any digit sequence of the correct length.
Calls are not blocked by this feature.
This will enable ‘Mandatory Account Codes’.
This will enable Feature Access Code based Account Codes

Limiting Conditions
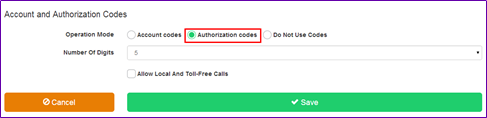
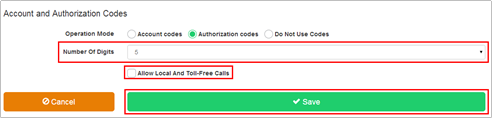
If Authorization Codes, (see below), are required, Account Codes cannot be enabled. The two features are mutually exclusive and cannot be configured in conjunction with each other on the same Site.
A User cannot be a member of both the Mandatory Account Code list and the Feature Access Code based Account Code list.
The Authorization Code Feature allows the Group or Company Administrator to select specific Users who must enter a valid Authorization Code, when making a call outside the Site.
Calls will not proceed if the Authorization Code is not valid.
Use the Authorization Codes feature if you want Users to enter a valid Authorization Code each time they make a call or only each time they make a long-distance call.
The Group or Company Administrator can choose to have Authorization Codes apply to all external calls or to long-distance calls only. If Authorization Codes apply to long distance calls only, Users are not prompted for a code when they place local or toll-free calls.
Users assigned to the Authorization Code list are prompted to enter a valid Authorization Code when making a call outside of the Site. Unlike Account Codes, Authorization Codes entered by a User must match one of the valid codes previously configured by the Group or Company Administrator.
When a User dials a number for which an Authorization Code is required, WHC prompts the User for a valid code. The User then dials the Authorization Code followed by the (#), or waits for the inter-digit timeout.
NOTE: The system does a validation check against the list of Authorization Codes configured by the Group or Company Administrator when the User enters the Authorization Code when prompted.
Calls are blocked by this feature if an invalid code is entered.
The Site or Company Administrator configures the Authorization Code feature through the Business Portal on the Site Features page.
Navigate to: - Sites (select Site) > Features > Management > Account and Authorization Codes
When configuring the feature, the Group or Company Administrator:
To Activate the Authorization Code feature:-

The new code is displayed in the list
NOTE: The system performs a validation check when the User enters an Authorization Code against the list of Authorization Codes created by the Group Administrator.
Calls will be blocked by this feature if the User does not enter a valid Authorization Code.


This will enable Feature Access Code based Account Codes
The Authorization Code Feature allows the Group or Company Administrator to select specific Users who must enter a valid Authorization Code, when making a call outside the Site.
Calls will not proceed if the Authorization Code is not valid.
Use the Authorization Codes feature if you want Users to enter a valid Authorization Code each time they make a call or only each time they make a long-distance call.
The Group or Company Administrator can choose to have Authorization Codes apply to all external calls or to long-distance calls only. If Authorization Codes apply to long distance calls only, Users are not prompted for a code when they place local or toll-free calls.
Users assigned to the Authorization Code list are prompted to enter a valid Authorization Code when making a call outside of the Site. Unlike Account Codes, Authorization Codes entered by a User must match one of the valid codes previously configured by the Group or Company Administrator.
When a User dials a number for which an Authorization Code is required, WHC prompts the User for a valid code. The User then dials the Authorization Code followed by the (#), or waits for the inter-digit timeout.
NOTE: The system does a validation check against the list of Authorization Codes configured by the Group or Company Administrator when the User enters the Authorization Code when prompted.
Calls are blocked by this feature if an invalid code is entered.
The Site or Company Administrator configures the Authorization Code feature through the Business Portal on the Site Features page.
Navigate to: - Sites (select Site) > Features > Management > Account and Authorization Codes

When configuring the feature, the Group or Company Administrator:
To Activate the Authorization Code feature:-


The new code is displayed in the list
NOTE: The system performs a validation check when the User enters an Authorization Code against the list of Authorization Codes created by the Group Administrator.
Calls will be blocked by this feature if the User does not enter a valid Authorization Code.

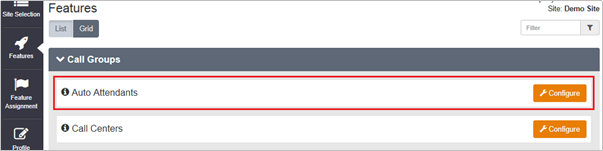
A 1 level Auto Attendant is available as standard for every Site created and if an additional layer is required, then an add-on can be ordered by a CP Administrator in Business Zones.
The Auto Attendant feature serves as an automated receptionist that callers can reach by dialling a specific phone number or extension. Once connected to an Auto Attendant, the caller is played a greeting that provides a menu of options used to complete the routing of the call. Callers have the option to connect to the operator, dial by name or extension, or connect to configurable extensions that may be other Auto Attendants, Hunt Groups, Call Centres or Users.
The Auto Attendant is reached by the incoming caller by dialling an advertised phone number. From within the Site, Users can call the Auto Attendant or blind transfer a call to the Auto Attendant by dialling its extension number. Once answered by the Auto Attendant, the caller is played a greeting that provides a menu of options allowing the caller to select the final destination for their call.
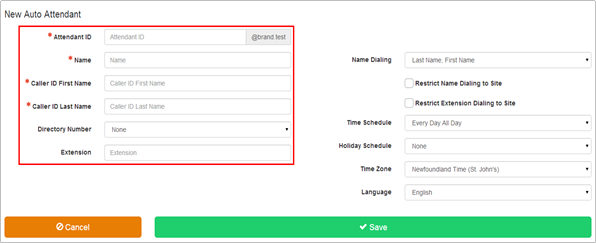
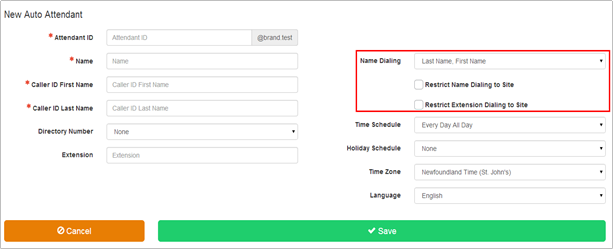
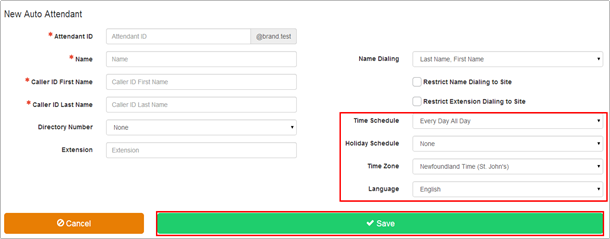
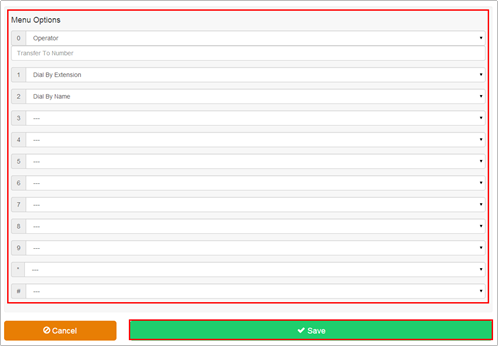
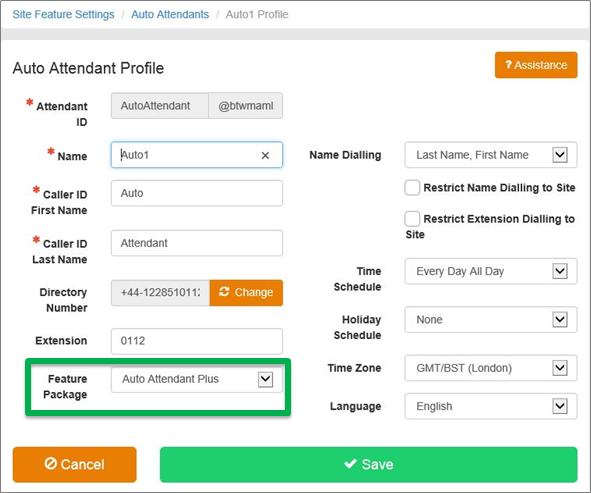
The Group or Company Administrator can also configure each Auto Attendant so that it behaves differently during business hours and non-business hours. For example, by presenting a different greeting that includes different menu options to callers or by allowing callers to dial extensions directly. The menu, which is configured by a Group or Company Administrator, can provide up to 11 options to the caller, and set the following against each option:
An Auto Attendant can differentiate between business and non-business hours by creating and applying a specific Time Schedule to the Auto Attendant profile. Likewise if the office is closed on specific dates over a given period, you can create and apply a Holiday Schedule so that the Auto Attendant’s non-business hour’s behaviour is used on these dates. As part of these schedules you can also choose to use standard system greetings containing the default options or to upload custom greetings for a customer’s specific options stored in Audio (WAV) format files.
If you intend to apply specific schedules to an Auto Attendant, you may find it most convenient to define these schedules first within the Time Schedules and Holiday Schedules features on the Business Portal. Then when you create the Auto Attendant you can simply select and apply them or you can come back at anytime and apply to existing ones.
If required, the Group or Company Administrator can use multiple Auto Attendants for a single Site or combine Auto Attendants to create a seamless, multi-level call distribution platform. The Group or Company Administrator configures the Auto Attendant through the Site Feature Settings page on the Business Portal.
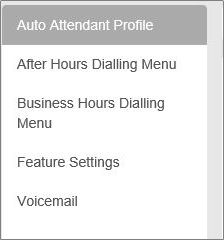
The related Site Features that may need to be configured are dependent upon the desired functionality of the Auto Attendant and may include:
Configuration specific to an Auto Attendant is dealt with in this section. The configuration of the related features, Holiday schedules, Time Schedules, Group Calling Line ID etc. will be dealt with under the relevant Feature’s section of this document.
You will also need the Personal Greetings for each Auto Attendant in the following format:
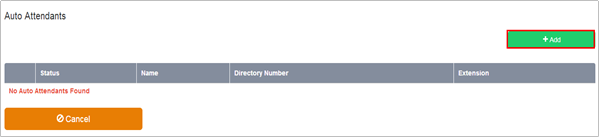
To create a basic Auto Attendant or manage an existing one in the Business Portal, navigate to: Sites (select Site) > Features > Call Groups > Auto Attendant.
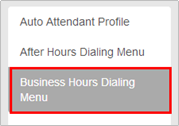
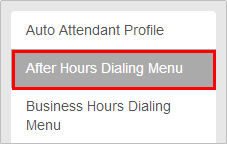
Business Hours Dialling Menu
To create a Business Hours dialing menu, navigate to: Sites (select Site) > Features > Auto Attendant.
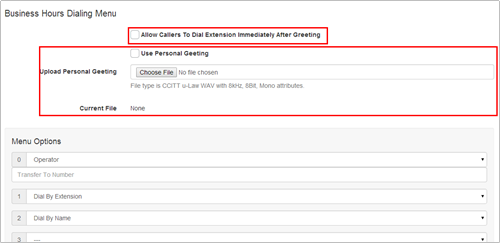
The available Menu options are as follows:
Auto Attendant Plus adds enhanced call forwarding functions when applied to the selected Auto Attendants through the Business Portal.
The enhanced functionality allows greater flexibility in how an Auto Attendant can be deployed by providing the following advanced call forwarding functionality:
Configure the Settings
Clicking on the Feature Settings option will allow the administrator to then see and configure the feature settings:
Alternate Numbers
Allows an Auto Attendant to accept incoming calls from up to 10 other incoming numbers not already assigned to another user or feature. This is ideal for when an Auto Attendant is advertising different geographic numbers in different regions, all pointing to the same team managing the Auto Attendant. There is a choice of 4 Distinctive Ring Patterns that can be assigned to each Alternate Number to assist Auto Attendant Users in distinguishing audibly between the Alternate Numbers being dialled. Please note, all calls made to an Alternate Number will be seen in the CDR’s.
Call Forwarding Always
Useful for important numbers where Disaster Recovery scenarios are important. The Reseller or a Group Administrator can access the Business Portal to divert the Auto Attendant to another number and/or location.
Call Forwarding Selective
Allows granular call forwarding based on either or Holiday and Time Schedules, as well as a telephone number. Forward calls based on a Holiday and/or Time Schedule to another destination, which is very useful if your customer requires after hours calls to be handled by on call personnel. Alternatively, forward VIPs based on their incoming CLI to another group or a supervisor.
Alternatively, forward VIPs based on their incoming CLI to another group or a supervisor.
Do Not Disturb
Do Not Disturb can be set on the selected Auto Attendant which will block all inbound calls and play a busy tone back to the caller. Do Not Disturb will take precedence and override any other call forwarding feature or other Auto Attendant settings.
Please note, the Play A Short Ring When A Call Is Blocked feature is not active within a Auto Attendant so please do not select.
Selective Call Acceptance
Using the incoming CLI of the caller and the Time Schedule, if one is applied, Selective Call Acceptance determines which incoming numbers are allowed to call the Auto Attendant.
Only numbers in the list will be answered by the Auto Attendant users. Callers from all other numbers will be presented with a system announcement informing them that the number they are trying to reach is not accepting calls.
A Time Schedule can be applied to only accept calls during certain time periods.
Combine CLI and Time Schedules to create granular rules to allow specific callers to call the Call Centre only at specific times of day.
This allows a Call Centre to be set up specifically to handle calls from existing customers and/or VIP customers only. It can help to guarantee service levels to these specific groups of callers
Selective Call Rejection
Using the incoming CLI of the caller and the Time Schedule, if one is applied, Selective Call Rejection performs a call screen function that determines which incoming numbers are not allowed to call the Auto Attendant.
Prevent your Auto Attendant users from receiving nuisance calls from known numbers ensuring that they are available for customers.
Numbers in the list will not be answered by the Auto Attendant users. Callers will be presented with a system announcement informing them that the number they are trying to reach is not accepting calls.
A Time Schedule can be applied to only reject calls during certain periods.
Combine CLI and Time Schedules to create granular rules to restrict specific callers from calling the Call Centre at specific times of day allowing your more important callers through.

Voicemail
Attach a voicemail box to an Auto Attendant and allow certain call types/conditions to be forwarded to a dedicated voicemail box and avoid missing customer calls.

Incoming calls to the Auto Attendant are sent to voicemail once they meet the criteria set by the administrator from within the Auto Attendant voicemail settings page on the Business Portal. The caller is then played a greeting, system or personal, and once they have left a message they can hang up the phone to leave the message. For further options they can press # to access the following options:
The maximum length for a single voicemail is 5 minutes.
Voicemails are stored on the WHC voicemail server and converted to an mp3 file if forwarded to an email address. Where a voicemail is elected to be sent to an email address, this is as a carbon copy, and the original will stay on the server until deleted by the administrator. Administrators can choose to delete messages by the following method:
The maximum storage capacity per voicemail box is 30 minutes.
When the administrator receives a new voicemail, they can be notified by the following means:
To turn on Voicemail, simply check the Turn on Voicemail box.

Feature settings from the Business Portal
To configure what happens when a call is placed into the Auto Attendant, select from the following:
Accessing Voicemails from the Business Portal
A Company or Group Administrator can use the visual voicemail service to manage the Auto Attendant voicemails via the Business Portal. Click on Voicemail from the right-hand side within the Auto Attendant Profile box.
From here they can see a list of all Voicemails along with:

The administrator can choose to do the following with the Business Portal audio file:
Accessing Voicemails from Email
If the setting is selected in the feature setting, then voicemails will be sent to a nominated email address/s. The user can choose to do the following with the MP3 audio file:
Call Analytics provides a business with a web-based reporting package that allows them to run and email reports on all aspects of calls made, attempted calls, received calls and missed calls. Likewise it enables this call data to be presented in live visual Wallboards for Call Centre operations.
WHC Call Analytics provides users with a mobile-optimised suite of call analytics that can be accessed via any web browser. There are 3 core modules available and only one can be used at a time, as you upgrade, you gain the functionality from the previous package.
For guidance on how to configure and use this feature please refer to the following application user guide available on the Document Centre:
Site or Company Administrators can view Call Capacity Groups created by the CP Administrator through the Business Portal Site Features page, under ‘Call Capacity Management’.
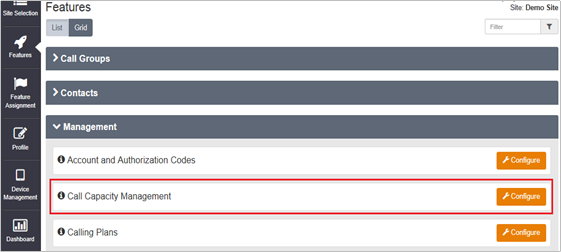
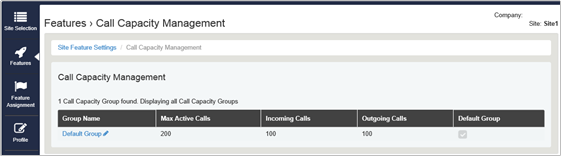
This page lists all of the Call Capacity Groups that the CP Administrator has created for the selected Site.
If no Call Capacity Groups are listed, no Call Capacity Groups have been created for this Site.
The ‘View Call Capacity Group’ page is displayed.
If the ‘Default’ Group is ticked, as Users are Registered/Activated in the selected Site, they are automatically added to this Call Capacity control group.
Use the Call Centres automatic call distribution (ACD) feature if you want to allow a Company’s Site/s to distribute incoming calls to multiple users from inbound calls received into a central phone number. Incoming calls to a Call Centre are presented to Agents according to a call distribution policy configured within the Business Portal. The Call Centre feature is useful for businesses who want to setup; Customer Support Lines, Sales Support lines.
With the Call Centre feature, agents can work from different geographic locations and/or be provisioned on different Sites within the Customer, but all form part of single or multiple call queues.
Each time you create a Call Centre you assign specific Users (Agents) to it. Incoming calls received through each Call Centre are assigned to available agents according to a specific call distribution policy. Users provisioned on different Sites or situated in different geographic locations can be agents of a single centralised Call Centre. The system will distribute calls according to the call distribution policy configured, regardless of the agent’s locations. In addition daily Call Centre reports are available and can be emailed in CSV format to two different email addresses.
The Call Centre provides the following functionality:
The following Call Distribution policies are supported:
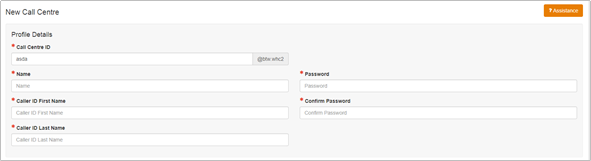
This section describes how a Group or Company Administrator can provision a Call Centre using the Business Portal. Once logged on Navigate to Sites (Select Site) > Features > Call Groups > Call Centres.


In the Profile Details section enter:
In the General Settings section enter:

In the Feature Packages section enter:

In the Agent Settings section enter:
In the Distinctive Ringing section enter:
Announcements
To add or manage the Announcements for the Call Centre click Announcements from the left hand menu. From here you can manage what announcements are played to callers including when to play and at what interval.
In the Entrance Message section:

In the Estimated Wait Message section:
In the Comfort Message section:
In the On Hold Message section:

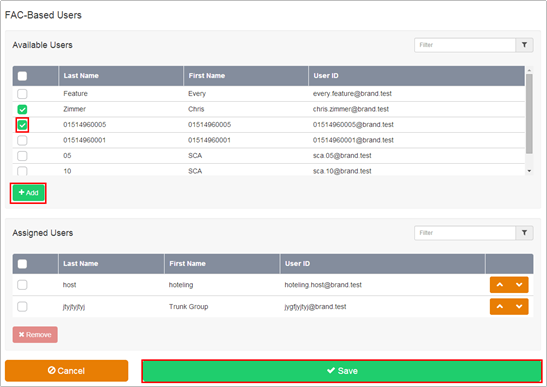
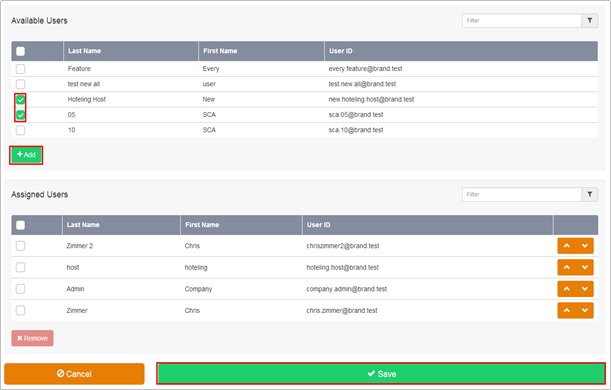
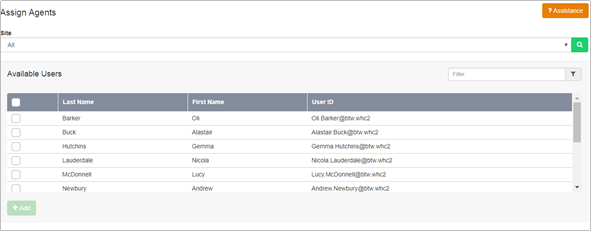
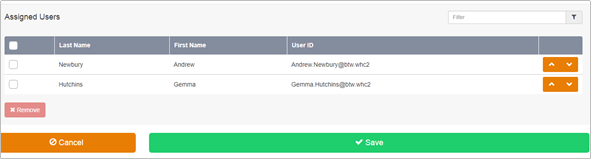
Assign Agents
To add users to the Call Centre, click Assign Agents from the left hand menu. The default setting is to display all agents in the Company, but this can be changed in the dropdown to a specific Site.
In the Available Users section:
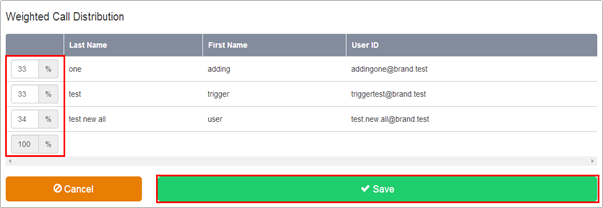
If Weighted call distribution was selected in the Call Centre Settings page then this menu option will now open up on the left-hand side. From here you can assign weights to the agents.
In the Weighted Call Distribution section:
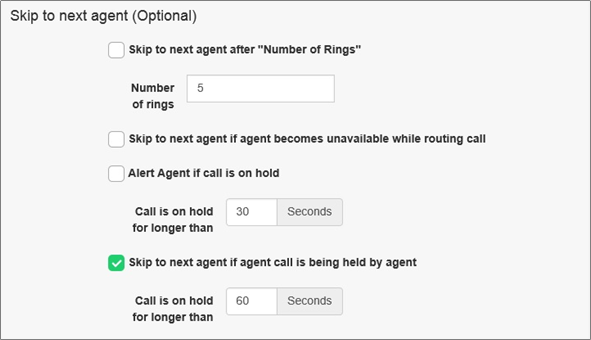
To configure advanced call routing for the Call Centre, click Routing Policies from the left hand menu. The default setting is to display all agents in the Company, but this can be changed in the dropdown to a specific Site.
In the Skip to next agent section:
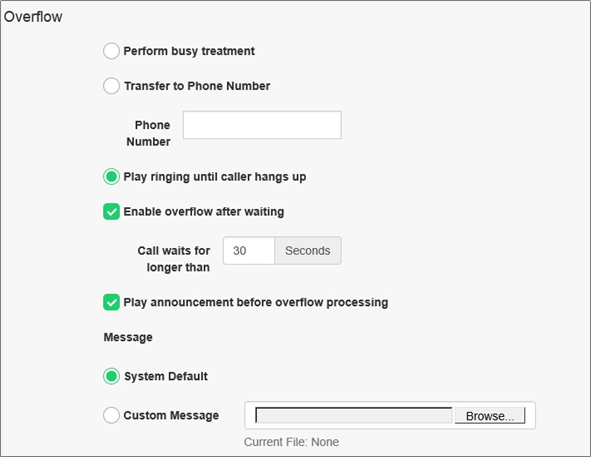
In the Overflow section:
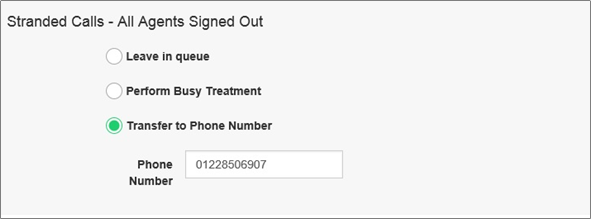
In the Stranded Calls – All Agents Signed Out section:
Feature Settings
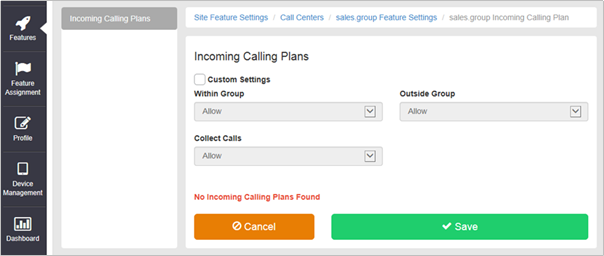
To configure Calling Plans specific to the Call Centre, and independent of the Site settings, click Feature Settings from the left hand menu. If you have added Call Centre Plus to the site then there will be more advanced options here, including Voicemail, please refer to Call Centre Plus in the next section of this guide.

In the Incoming Calling Plans section:
Voicemail
This option will only appear if you added Call Centre Plus, refer to Call Centre Plus in the next section of this guide.
Statistics
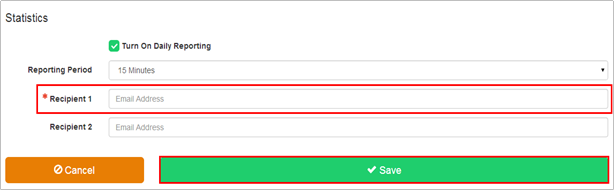
To enable daily delivery of Call Centre Statistics to up to 2 email addresses, via a CSV file, click Statistics from the left hand menu.
If you require real time call monitoring/reporting, please order our Call Analytics add-on to the service, see Call Analytics section in this guide for further information. The statistics generated for an Agent include:
The statistics generated for a Call Centre Group are presented as the number of calls that were in that particular state, answered, queued etc. during the reporting period configured. This means that it may be possible for the same call to appear twice as it may have been queued in one reporting period and answered in another.
The information that the statistics for a Call Centre Group include are:
In the Statistics section:
Call Centre Plus adds enhanced call forwarding functions when applied to the selected Call Centre through the Business Portal.
The enhanced functionality allows greater flexibility in how a Call Centre can be deployed.
Forwarding the Call Centre can be done from any location with internet access. You do not have to attend Site, or in the case of a customer administering these features themselves, they do not have to be in their offices.
Call Centre Plus –Features
NOTE: You can also navigate to an existing Call Centre from the Site Dashboard.


Alternate Numbers
Allows a single Call Centre to accept incoming calls from up to 10 additional incoming numbers not already assigned to a user or feature. Reduces complexity and costs where the same group of users will be answering the incoming calls the same way for different numbers. Calls to the Alternate Numbers will be seen the CDRs.
There is a choice of 4 distinctive ring patterns that can be assigned to each Alternate Number to assist Call Centre agents to distinguish between the Alternate Numbers.
Call Forwarding Always
Useful for important numbers where Disaster Recovery scenarios are important. The Reseller or a Group Administrator can access the business portal to divert the Call Centre to another number and/or location if the office is inaccessible to employees, (weather, traffic, building closures etc), seamlessly maintaining service.
Call Forwarding Busy
During high call volume periods when all Call Centre agents are on a call the Call Centre call can be forwarded to another destination when the Call Centre is busy.
Smaller Call Centres with fewer agents can be deployed as your callers can be forwarded to other users or to features such as an Auto Attendant or another Call Centre instead of hearing busy tone when the agents are on a call.
Agents have greater flexibility to make outbound calls as required without being concerned that their inbound callers will hear busy tone
Call Forwarding Selective
Allows granular call forwarding based on Time Schedules and incoming CLI. Forward VIPs based on their incoming CLI to another group or a supervisor. Forward calls based on a Time Schedule to another destination or directly to a user’s Voice Mail box. Very useful if your customer requires after hours calls to be handled by on call personnel or be sent to Voice Mail. Combine CLI and Time Schedules to create granular rules to call forward specific callers to specific destinations at specific times of day.

Calling Plans
Calling Plans can be used to block calls from pre-defined locations. It can be used with the ‘Site’ Calling Plan feature, where you can define dialling codes or individual numbers you wish to block from accessing the users in the Call Centre.

Do Not Disturb
Do Not Disturb can be set on the selected Call Centre. This feature will block all inbound calls and plays busy tone back to the inbound caller.
Do Not Disturb will override any other call forwarding feature or any other Call Centre settings.

Selective Call Acceptance
Using the incoming CLI of the caller and the Time Schedule, if one is applied, Selective Call Acceptance determines which incoming numbers are allowed to call the Call Centre.
Only numbers in the list will be answered by the Call Centre agents. Callers from all other numbers will be presented with a system announcement informing them that the number they are trying to reach is not accepting calls.
A Time Schedule can be applied to only accept calls during certain time periods.
Combine CLI and Time Schedules to create granular rules to allow specific callers to call the Call Centre only at specific times of day.
This allows a Call Centre to be set up specifically to handle calls from existing customers and/or VIP customers only. It can help to guarantee service levels to these specific groups of callers.

Selective Call Rejection
Using the incoming CLI of the caller and the Time Schedule, if one is applied, Selective Call Rejection performs a call screen function that determines which incoming numbers are not allowed to call the Call Centre.
Prevent your Call Centre agents from receiving nuisance calls from known numbers ensuring that they are available for your new and current customers.
Numbers in the list will not be answered by the Call Centre agents. Callers will be presented with a system announcement informing them that the number they are trying to reach is not accepting calls.
A Time Schedule can be applied to only reject calls during certain time periods.
Combine CLI and Time Schedules to create granular rules to restrict specific callers from calling the Call Centre at specific times of day allowing your more important callers through.

Voicemail
Attach a voicemail box to a Call Centre and allow certain call types/conditions to be forwarded to a dedicated voicemail box and avoid missing customer calls.

Incoming calls to the mailbox are sent to voicemail once they meet the criteria set by the administrator from within the Call Centre voicemail settings page on the Business Portal. The caller is then played a greeting, system or personal, and once they have left a message they can hang up the phone to leave the message. For further options they can press # to access the following options:
The maximum length for a single voicemail is 5 minutes.
Voicemails are stored on the WHC voicemail server and converted to an mp3 file if forwarded to an email address. Where a voicemail is elected to be sent to an email address, this is as a carbon copy, and the original will stay on the server until deleted by the administrator. Administrators can choose to delete messages by the following method:
The maximum storage capacity per voicemail box is 30 minutes.
When the administrator receives a new voicemail, they can be notified by the following means:
To turn on Voicemail, simply check the Turn on Voicemail box.

Feature settings from the Business Portal
To configure what happens when a call is placed into the Call Centre, select from the following:
Accessing Voicemails from the Business Portal
A Company or Group Administrator can use the visual voicemail service to manage the Call Centre voicemails via the Business Portal. Click on Voicemail from the right-hand side within the Call Centre settings box.

From here they can see a list of all Voicemails along with:
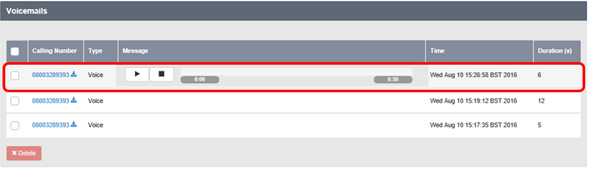
The administrator can choose to do the following with the Business Portal audio file:
Accessing Voicemails from Email
If the setting is selected in the feature setting, then voicemails will be sent to a nominated email address/s. The user can choose to do the following with the mp3 audio file:

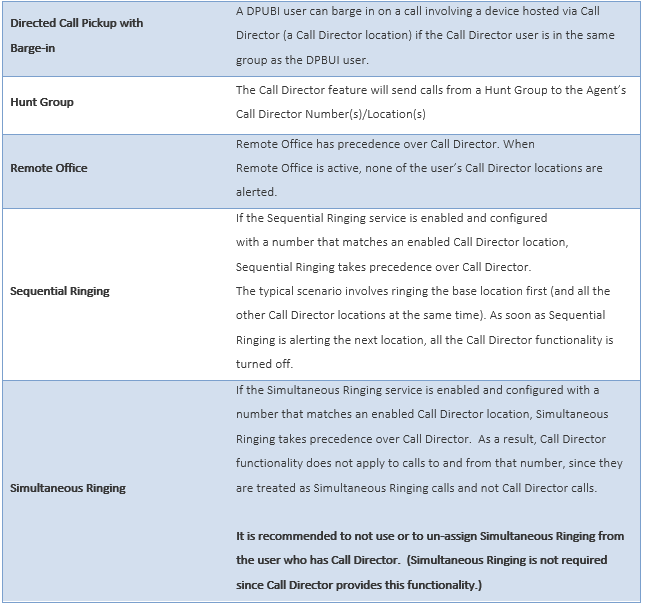
Call Director is a fixed-mobile convergence (FMC) solution that allows users to make and receive calls using one number on any device and move calls between devices.
The Call Director user feature allows the user to define one or more phone number locations e.g. a Mobile Phone (also referred as Call Director locations in this document) that can be used as extensions to the user’s account. These numbers are all alerted for inbound calls, similar to the Simultaneous Ring/Remote Office feature. Call Director supersedes the Simultaneous Ring feature.
There is also the Call Director portal, which is a Site level Feature that:
The Call Director portal allows Users to make outbound calls from any phone using their WHC service. Once the passcode and destination digits are collected by the Call Director Portal, the call proceeds as if the call originated from the user’s desk phone.
Call move/handover functionality is provided by a Call Director Call Move feature access code. When dialled from a User’s device the active call is moved to that device. This feature access code can also be dialled via the Call Director Portal to move the call to a Call Director Location.
For SIPT Users this feature will not work for internal inbound calls between PBX users that do not pass through the WHC platform.
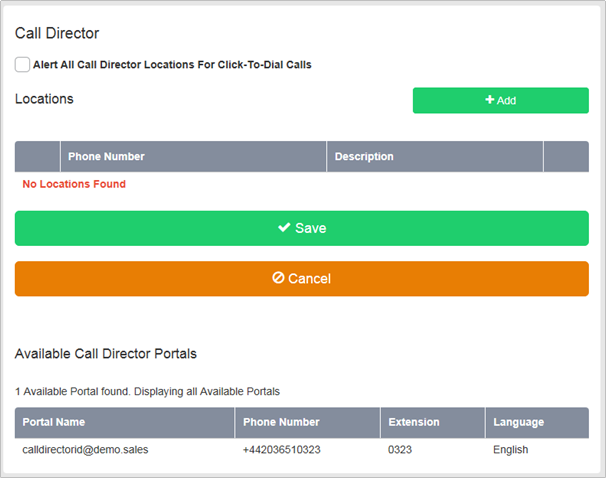
Call Director User Feature
The Call Director User Feature allows the user to configure Call Director locations. A Call Director location is a phone number in national format e.g. 07123456790. A Call Director location can be enabled or disabled from the Business Portal or by using the Location Control Feature Access Codes. The following attributes are also configurable for each Call Director location:
Require Answer confirmation – This attribute determines whether the user is prompted for answer confirmation when a call leg is extended to the Call Director location and is answered by the user.
In addition to these options, the user can configure Call Director locations to be alerted for Click-to-Dial calls. The Alert all locations for Click-to-Dial call attribute applies to all configured Call Director locations.
For more information regarding the configuration and use of the Call Director user feature, see the sections below.
Call Director Portal
The Call Director Portal is a Site Feature that handles incoming calls from the Call Director locations and ultimately prompts for the destination address (the number to be dialled).
The CP, Customer or Group administrator creates the Call Director portal instances at the Site level in the Business Portal. A Site may consist of one or more Call Director portals, each with their own characteristics.
A Call Director portal instance is configured similarly to other Site features. The following options are also available specifically for Call Director portals:
Scope – This attribute determines the scope of the Call Director Portal.
Depending on the type of Call Director deployment, an administrator may need to provide multiple access points to Call Director users. For example, if the service is meant to be uniquely available in different Sites, then the administrator may want to provide an access point in each Site to increase the likelihood that the calling address will be available to the Call Director Portal.
There are two mechanisms that can be used by an administrator for creating the access points.
Define a distinct Call Director Portal instance for each access point. Each Call Director Portal instance has a distinct phone number and distinct attributes (for example, scope is limited to Group).
Assign the Alternate Numbers to a Call Director Portal instance and define an access number for each access point. In this case, all access points share the same Call Director Portal instance configuration.
For more information regarding the configuration and use of Call Director Portal instances, see the sections below.
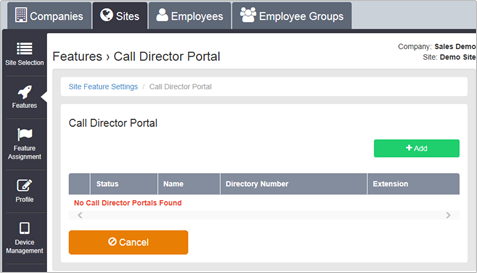
Call Director Portal-Site Feature
The Call Director Portal Site Feature is available to configure in the Business Portal under:
Multiple Call Director Portals can be created under a Site. Each of these Call Director Portals has its own Profile and Settings pages.
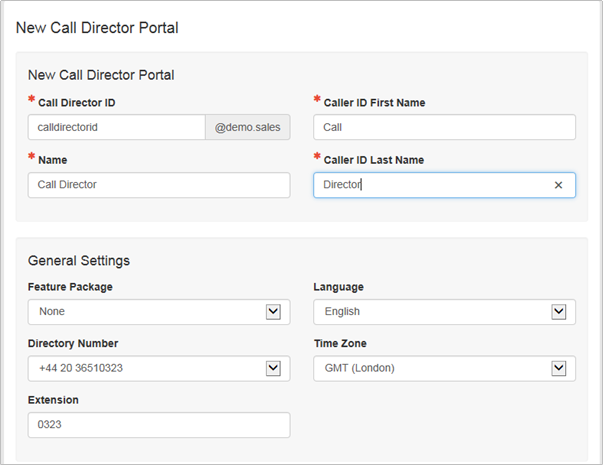
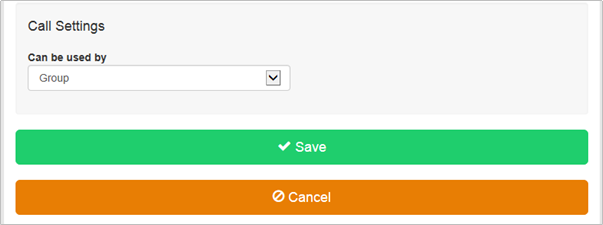
Enter the required details and select a Directory Number to assign to the Call Director Portal. This will be the number that Users will dial to access the Call Director Portal to make calls or use Call Move from their Call Director Locations. Select whether the Portal will be available to the whole Customer or just the Site by selecting ‘Can Be Used By’ Enterprise or Group respectively.
Call Director –User Feature
The Call Director User Feature is available to configure in the Business Portal under:
Employees > Feature Settings > Call Director
A new Call Director Number / Location can be added by clicking the add button.
Multiple Call Director Numbers can be added and configured separately. All Call Director Numbers are alerted simultaneously, when enabled, for inbound calls. Call Director Numbers can use the Call Director Portal to make calls and use the Call Director Call Move Feature and Feature Access Codes.
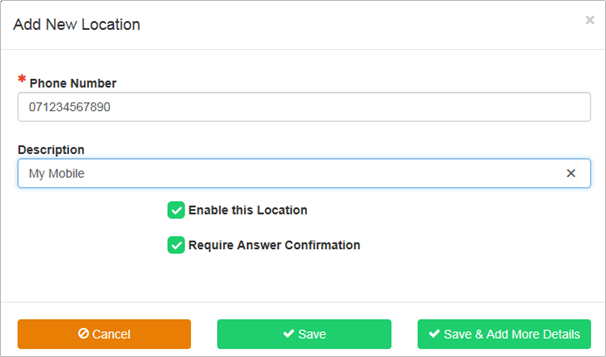
Once a Call Director Number is added Selective Criteria or ‘Rules’ can be added to the Number to specify when the Call Director Number should be active and the Number alerted for inbound calls.
Call Director Numbers can be modified e.g. Enabled/Disabled, Answer Confirmation Enabled/Disabled as required.
Disabled Call Director Numbers are not alerted for inbound calls, Click-to-Dial originations etc.
Call Director Numbers can be deleted by selecting the Number and clicking the Delete button.
Once a Number has been added to the Call Director User Feature, other Users will be forbidden from using the same number.
Call Director Inbound
Inbound calls are forked to the user’s Call Director locations. The user may have multiple Call Director locations configured. Each Call Director location is configured individually with optional selective criteria that determine whether a Call Director location can be alerted for a given call termination.
Each Call Director location can also be enabled or disabled for call terminations in the Business Portal or by using the Location Control Activation or Deactivation (default *12 and *13 respectively) Feature Access Codes.
Enabled Call Director locations are alerted in parallel to the user’s primary location and the alternate locations configured via the Shared Call Appearance feature. To alert a Call Director location, the platform uses the Call Director phone number configured for the location.
If the user answers from a Call Director location that has the Answer Confirmation Required attribute enabled, then the platform connects the Call Director location to an Interactive Voice Response (IVR) session and prompts for confirmation. This capability of requiring answer confirmation is introduced in Release SDAB of the Service Delivery Platform in the context of the Simultaneous Ringing and Sequential Ring services. This capability is extended to Call Director locations through a configuration option of the Call Director user feature. The behaviour of this capability is the same as it is for the other forking services. If the user confirms by dialling a key, then the Call Director location is connected to the calling party; otherwise the Call Director location is released. Note that the Answer Confirmation Required attribute may be configured for more than one Call Director location. In this case, the first Call Director location to confirm on answer always gets connected, while the other locations are released.
Call Director Outbound
The user originates a call from a Call Director location through a Call Director Portal or using a call client (that is, Click-to-Dial). Click-to-Dial originations are processed in a similar way as call terminations (Call Director Inbound) and are described in the above section.
This section describes the behaviour when the user originates calls from the Call Director location by dialling through a Call Director Portal.
The user dials into the Call Director Portal, which is primarily responsible for collecting the destination digits. Once the User’s passcode (same as Voice Mail PIN) have been entered and the destination digits are collected, the Call Director portal resumes the call origination through a redirection mechanism, as described in the sub-section that follows. The call origination is resumed as if the call was originated from the user’s desk.
The process is as follows:
If the user is already active on a call from a different location and attempts to originate a call from a Call Director location, then the call origination is rejected unless the destination number is for the Call Director Call Move FAC. In the latter case, the Call Director Call Move FAC is handled as described in the section Call Director Call Move and Location Control below.
Click-to-Dial Calls
Call Director locations are alerted for Click-to-Dial originations if the Alert All Locations for Click-to-Dial Call attribute is set. A call leg is created for each Call Director location similar to an inbound call termination, and Auto-Answer is disabled for the call leg to the primary location. Auto-Answer is a function that allows a Click-to-Dial origination to proceed from the primary location without ringing the phone.
The Call Director location’s optional time-based selective criteria are considered for Call Director locations are alerted for Click-to-Dial originations if the Alert All Locations for Click-to-Dial Call attribute is set. A call leg is created for each Call Director location similar to an inbound call termination, and Auto-Answer is disabled for the call leg to the primary location. Auto-Answer is a function that allows a Click-to-Dial origination to proceed from the primary location without ringing the phone.
The Call Director location’s optional time-based selective criteria are considered for Click-to-Dial originations. In addition, if the Call Director location is disabled, then that Call Director location is not alerted. The Request Answer Confirmation attribute operates in the same way as an inbound call termination to the Call Director location.
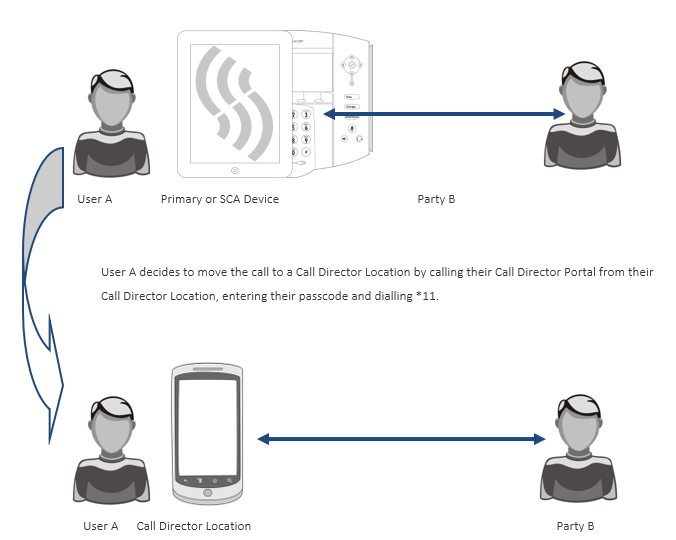
Call Director Call Move is performed by dialling the Call Director Call Move Feature Access Code (FAC). The default FAC is *11.
The Call Move FAC can be dialled from a User’s Primary or Shared Call Appearance device to move the call to the device. The User can also dial the FAC through the Call Director Portal to move the call to a Call Director Location.
An example of each scenario is shown below
Moving a call from a Call Director Location to a User’s Primary or SCA Device
User A is on a call with Party B using a Call Director Location and the call was made via the Call Director Portal.

Moving a call from a User’s Primary or SCA Device to a Call Director Location
User A is on a call with Party B using their primary or shared call appearance device
If the user dials the Location Activation FAC via the Call Director Portal, then the Call Director location is activated for inbound call terminations and an activation message is played to the user. From that point, the user may hang up or wait to be disconnected.
If the user dials the Location Deactivation FAC via the Call Director Portal, then the Call Director location is deactivated for inbound call terminations and a deactivation message is played to the user. From that point, the user may hang up or wait to be disconnected.
Example Uses
Outbound Calling through Call Director Portal
The user has a mobile phone configured as a Call Director location. The user dials in to the Call Director portal from the mobile phone. The Call Director portal recognizes the calling number and identifies the user. The Call Director portal prompts the user for a passcode and destination digits. The user enters the passcode and the destination digits.
The call origination is resumed using the destination digits collected by the Call Director Portal. The called party receives and answers the incoming call. The user is connected to the called party.
The user has a mobile phone configured as a Call Director location and receives a call. The user’s desk phone and mobile phone start ringing. The user answers from the mobile phone and gets connected to the calling party.
Inbound Call with Answer Confirmation
The user has a mobile phone configured as a Call Director location and the mobile phone is turned off. The user receives a call and the desk phone start ringing. The incoming call is extended to the user’s mobile phone and is connected to a treatment provided by the user’s mobile phone provider. There is a prompt for confirmation, which never occurs because the call is connected to treatment. The call leg to the mobile phone is released and the incoming call is eventually answered from the user’s desk phone.
The user has a mobile phone configured as a Call Director location and uses a call client (e.g. Toolbar) to originate a call. The option to alert Call Director locations for Click-to-
Dial is enabled so the user’s desk phone and the mobile phone both start ringing. The user answers from the mobile phone and the call origination proceeds to the called party. The user hears ring back until the called party answers, at which point the user is connected to the called party.
The user has a mobile phone configured as a Call Director location and is already active on a call from the desk phone. The user dials in to the Call Director Portal from the mobile phone and dials the Call Director Call Move FAC. The user is connected to the remote party on the mobile phone, and the desk phone is released.
The user has a mobile phone configured as a Call Director location and wishes to disable the location temporarily. The user dials in to the Call Director portal from the mobile phone, and dials the Location Control Deactivation FAC. The user hears confirmation that the location is disabled and hangs up.
Incoming calls to the user are presented to the user’s desk phone, but not the mobile phone.
Later, the user wants to re-enable the Call Director location. The user dials in to the Call Director portal from the mobile phone and dials the Location Control Activation FAC. The user hears confirmation that the location is enabled and hangs up.
Incoming calls to the user are now presented to the user’s desk phone and mobile phone.
This section provides details regarding specific feature/service interactions. Note that when the user originates a call through the Call Director portal, the user’s originating services are executed as if the call had been dialled from one of the user’s primary or shared call appearance location.
If the user attempts to originate a call from a primary or shared call appearance location while already active on a call from/to a Call Director location, then the call origination is rejected.
The user’s primary and shared call appearance locations are alerted in parallel to the user’s Call Director locations. When a user answers the incoming call from any location, then the other locations are simply released.
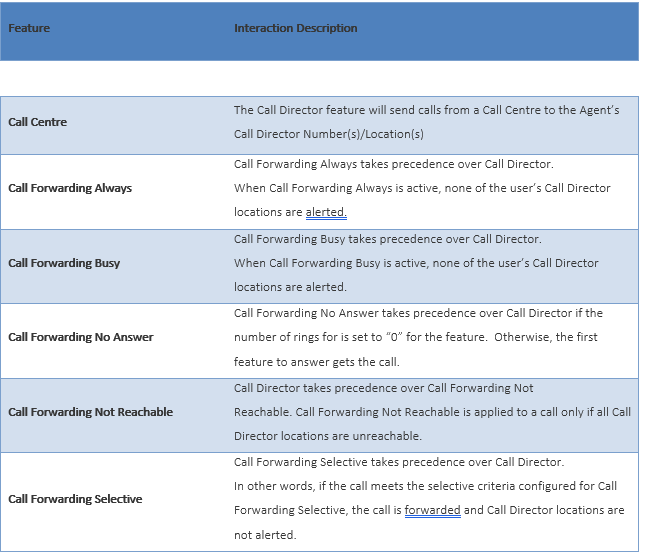
The following table lists the service interactions between the Call Director User feature and other user features. (Note that if a service is not listed, it means that there are no specific interactions between Call Director and that feature.)
Call Logging is a set of call analysis features in the Business Portal that allow CPs, Company Administrators and Site/Group Administrators to view and analyse call logging information.
This document details how Call Logging is accessed and used in the Business Portal from a Partner and Administrator perspective.
Call Logging is a free of charge (FOC) service enhancement to the Business Portal. And there is no configuration required and is visible to all user types. Please refer to the appropriate portal user guides for further details about the display for each user type:
Please note that for SIPT users, logs will not contain any internal calls between PBX users that do not pass through the WHC platform.
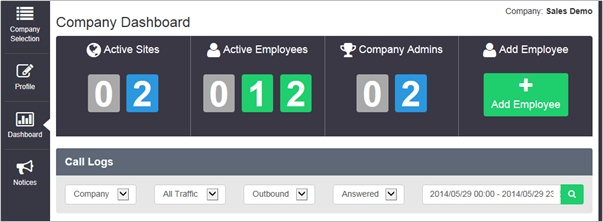
Call Logging is accessed in the Business Portal using the ‘Dashboard‘ option. The Dashboard used will depend on the level of login, Company Administrator – ‘Companies’ Dashboard, End-User – ‘Employees’ Dashboard etc.
CP Administrator access is for a BTW customer only; this provides access to all of your Customers in the Business Portal (BP). A CP Administrator login is able to access Call Logging in the Business Portal under any Customer and all Call Logging search criteria and features are available to CP Administrators.
Company Administrator access is for End Customer Administrators. This role allows access to an entire company, all of its Sites, Users and Features etc.
Both the CP Administrator and Company Administrator will access Call Logging via the Company Dashboard and have access to all Call Logging search criteria, data and features across the whole Customer.
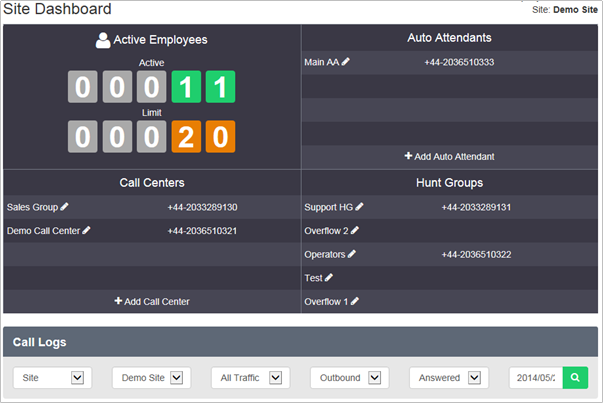
Site Administrator Access
Group Administrators that are configured to administer a customer’s Site or Sites only have access to Call Logging for the Sites that they have been assigned Admin Privileges for.
Group Administrators (Employee Groups) Access
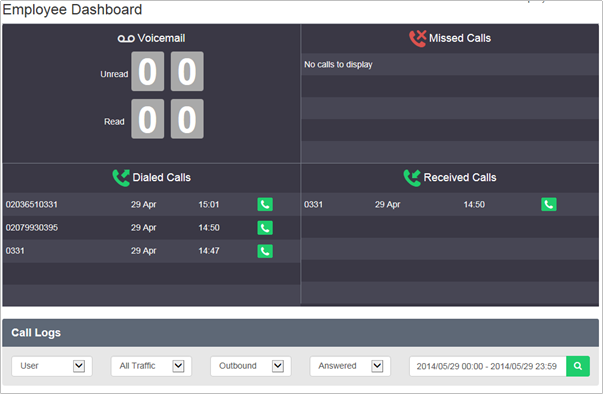
Employee Group Administrators can only access call logging via the individual Employee Dashboards that they have been assigned Admin Privileges for.
See Employee dashboard below
Employees can access their own Call Logging Data via the Dashboard option on the Business Portal Employee login.
Call Logging Features
Please see the Call Logs section of the appropriate portal user guide for each user type for further information on how to use the features and some example popular searches and analysis.
Please note that there is a maximum delay of approximately 15 minutes for new calls to be displayed in the Call Logging service.
A high level description of the features are as follows:
Flexible Access and Search
Company Administrators can access Call Logging for their entire communications estate and Group Administrators can access just the information that is relevant to them.
Contextual search criteria allow you to quickly focus on specific teams, numbers or types of call traffic or view information for the whole company.
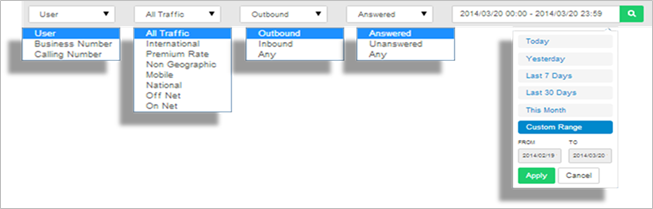
By default the search criteria is set to Company, all outbound and answered traffic:

Build your search by selecting your criteria from the options boxes and then click the magnifying glass to submit the search and view the results.
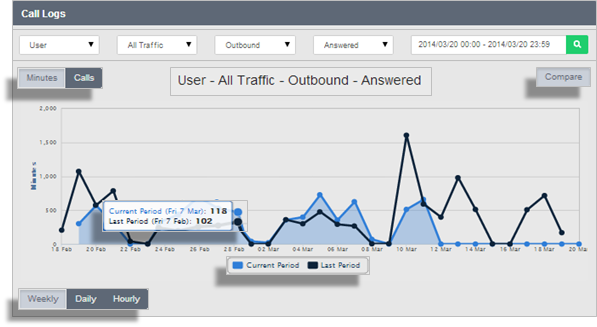
The Graph and Compare Views, List View, Type View and Top 10 Views (detailed below) will display the results based on your chosen search. There is a maximum delay of approximately 15 minutes for new calls to be displayed.
The search criteria available to are:
Company, Site, User (by Username), Business Number (by full or partial telephone number), Calling Number (by full or partial telephone number)
All Traffic, International, Premium Rate, Non-Geographic, Mobile, National, Off-Net, On-Net
Outbound, Inbound, Any
Answered, Unanswered, Any
Graphical View and Compare
When your results are returned, the Graphical View displays total calls or minutes for the current monthly period by hour, day, week or month. You can zoom into the graph for monthly down to hourly views and pan across the graph to move to the previous or next period of time. You can hover over each data point dot on the graph to display the values.
List View
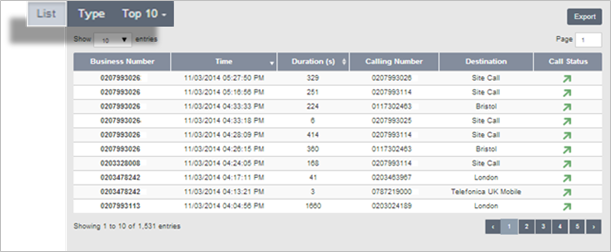
The List View provides individual call information on the results of your search including the Business Number, Time, Duration, Calling Number, Destination and Call Status.
You can order the List View results by ascending or descending Time or Duration by clicking on the corresponding column title. Browse the data by selecting the number of entries to display and/or by navigating through the result pages.
Type View
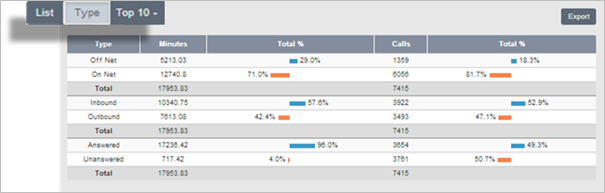
The Type View allows you to instantly compare different types of calls to provide key information including the amount of Off-Net calls versus On-Net calls, Inbound vs. Outbound and Answered vs. Unanswered. The Type View displays the percentage split of total minutes and total calls for each call type.
This is a useful feature to instantly view how many of your calls are On-Net (often within the Company or between Sites) versus Off-Net calls to people outside of your Company.
Top 10 View
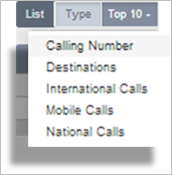
The Top 10 View provides the 10 highest results based on your search and top 10 category selection. For example, this allows you to see the top 10 destinations or numbers involved in calls across your whole Company, individual users or Groups.
The top 10 view allows you to see what the most popular calls are being made and received.
Export Tool

The export tool allows you to export the current data in the chosen search and view to a CSV file. Click the Export button this will automatically download all of the data in the current view in comma-separated values format.
The Call Park feature allows a User to suspend, or ‘park’, a call for an extended period of time. During this time, the User can freely make and receive other calls and invoke other features without limitation. When ready, the User can retrieve the parked call from any extension.
Function-General
The Call Park feature allows Users to park a call against an extension so that any member of the group can retrieve it with the Call Park Retrieve function.
A call can be parked against any User of the Site, including the User who parks the call.
However, a User can only have one call parked at a time. To park a call, the User, depending on the device being used, presses the flash hook or hold key, during an active call. They then dial the Call Park Feature Access Code, after which the User is prompted to enter an extension number and then the call is parked. If no number is entered and the User hangs up immediately after dialling the Feature Access Code, the call is parked against the User’s extension. Once a call is parked, it no longer appears on the User’s device or Toolbar and the User can hang up and/or perform other telephone tasks. While parked, the parked caller hears the Music on Hold configured for that Site.
To retrieve a parked call, from any phone within the Site, a User dials the Call Park Retrieve Feature Access Code. The User is prompted to enter the extension number where the call to be retrieved is parked, followed by #. On entering the number, the User is reconnected to the parked caller. If no number is dialled after the Feature Access Code, the User is reconnected to the call parked against their own extension.
To retrieve calls parked against their own extension, a User will enter the Call Park Retrieve Feature Access Code followed by the #, or wait for the inter-digit timeout, or enter their own extension. A 45-second timer is started when a User parks a call. If the timer expires before the parked call is retrieved, WHC determines if the User who parked the call is idle. If so, the User who parked the call is alerted and the call appears on the parking party’s Toolbar as a held call and the User’s phone is rung (if on-hook). The behaviour is similar to hold recall.
If the User who parked the call is not idle, the timer is restarted for 10 seconds and the call remains parked. This procedure is repeated until the User who parked the call can be alerted or the parked call is retrieved or disconnected.
Calls can be parked and retrieved through the Toolbar. To park an active call, (Place call on hold first) the User enters the Call Park Feature Access Code in the Dial window of the Toolbar and then presses enter to dial. This results in connecting the User to the Call Park extension number prompt. The User can then resume the Call Park interactions on the phone itself.
Similarly, a User retrieves calls by entering the Call Park Retrieve feature Access Code in the Toolbar Dial window and presses enter to dial either while idle, or in another call.
This will result in connecting the user to the Call Park Retrieve prompt. The User can then resume the Call Park interactions on the phone itself.
If no Music On Hold is configured for the Site of the User parking the call, the parked caller will hear silence. When a call is parked against an extension there is no visual indication on the device or Toolbar.
If the Call Park Feature is included in your Feature Package there is no further configuration required. Please refer to the Configurable Feature Access Codes section of this document for more information on Feature Access Codes.
The Call Pickup feature allows Users to answer any ringing call within their Call-Pickup Group. A Call-Pickup Group is defined by the Group or Company Administrator and is defined as a subset of the Users in the Site that can pick up each other’s calls. Each Site can have multiple Call-Pickup Groups but any User can only be a member of a single Call Pick-Up Group.
To pick up a call ringing on another User’s device in the Call Pick-Up Group, Users go off-hook and dial the Call Pickup Feature Access Code, which will connect them to the ringing party.
If more than one line in the Call Pick-Up Group is ringing, the call that has been ringing the longest is picked up first.
Users already engaged in a two-way call can hold their current call, and dial the Call Pickup Feature Access Code to answer an incoming call ringing on a User’s phone within the Call Pickup Group. Users then select and hold/unhold either party and to toggle between the two parties.
The Toolbar can also be used to control the two calls. Users can pick up a call through the Toolbar, either when idle or busy on one other call. They simply enter the Call Pickup Feature Access Code in the Toolbar Dial window, and then press enter to dial. This results in ringing the phone or placing the other party on hold, and connecting to the ringing party.
The Call Pick-Up Group(s) are configured by the Group or Company Administrator through the Business Portal Site Feature Settings page.
At the Site level the configuration is the same regardless of the type of Call Pick-Up User Feature being used.
Configuration on a User level is not required except to have the feature included in the User Feature Pack.
Users can have one of the following 2 Call Pick-Up Features in their Feature Pack.
To configure a Call Pick Up Group, navigate to:-

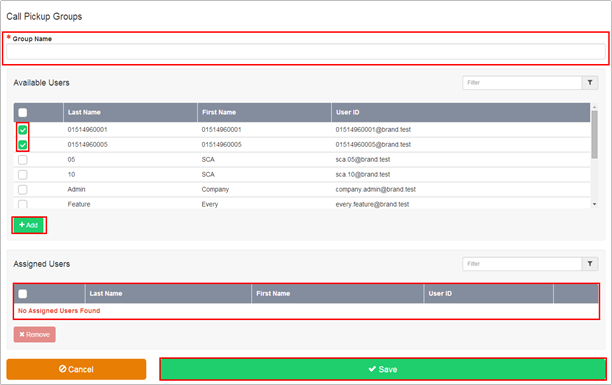
The Call Pick-Up Groups page is displayed again with the new Call Pick-Up Group added to the Call Pick-Up Groups list. You can edit the available Users in a Call Pick-Up Group at any time by clicking its group name in the Call Pick-Up Groups list.
The Calling Plan feature allows the Group or Company Administrator to restrict the type of calls Users can make and/or receive. Calling Plans can be applied to both incoming and outgoing calls.
The Calling Plan service offers basic and enhanced screening options. The enhanced screening options apply only to the outgoing call screening templates. The incoming and transfer/forward call screening templates remain the same with either option. The enhanced screening options are only available to a Site that has ‘Enhanced Outgoing Calling Plan’ in its service offering, Sites with a service offering of ‘Outgoing Calling Plan’ will not have these options available.
The Calling Plan feature allows the Group or Company Administrator to control the type of calls made, received, transferred, and forwarded by Users in a Site. The restrictions are applied by means of sets of call screening templates assigned to a Site, or to single Users. The templates specify various screening methods that should be applied to calls according to the call type or the digits dialled.
With the basic screening option, ‘Outgoing Calling Plan, any outgoing call that is intercepted by the Calling Plan service is sent to an announcement, informing the caller that the call is not allowed.
Otherwise, the call is allowed to go through as usual.
With the ‘Enhanced Outgoing Calling Plan’ the screening options available allow the administrator to select how to process the calls that are intercepted by the service.
The following interception options are offered for each call type or digit string:
For SIPT Users, Calling Plans will not work for calls between PBX users that do not pass through the WHC platform.
NOTE: Calling Plan features customized for individual Users take precedence over Calling Plan features configured for the Site.
The Calling Plan includes:
The Group or Company Administrator can define different screening templates for outgoing, incoming, and redirected calls. The following sub- sections describe these capabilities in more detail.
The Group or Company Administrator can define different screening templates for the following:
The outgoing call screening template allows the Group or Company Administrator to define how calls originated from the Site by any User or by particular Users should be restricted.
The forwarding/transferring call screening template allows the Group or Company Administrator to define how calls that are redirected by User features from any User or from particular Users should be restricted.
This call screening template can prevent particular Users or any User on the Site from being forwarded or transferred to external parties offering ‘Originating Fully Restricted’ functionality
The incoming call screening template allows the Group or Company Administrator to define how calls received by any User or by particular Users on the Site should be restricted.
The call screening templates apply independently to different legs of the call. For instance, when a call is transferred by the User, both the incoming and transferred call screening templates are applied to the call sequentially.
Function - Call Types Incoming Call Screening
The Incoming Calling Plan option allows the Group or Company Administrator to screen incoming calls to a given Site or to an individual User.
The Incoming Call Screening template can screen the following call types:
When this option is selected, Users are allowed to receive calls from other members of the Site.
When this option is selected, Users are allowed to receive collect (reverse charges) calls. When an incoming collect call is blocked, the incoming caller is played an announcement stating the called party is not authorized to receive collect calls.
WHC relies on the Calling Party Category (CPC) parameter of the Generic Transparency Descriptor (GTD) parameter received in the incoming SIP INVITE message to identify collect calls. When the CPC value is not related to an operator call or when the GTD parameter is not present, it is assumed that the call is not a collect call.
The “calls from outside group” screening criterion of the Incoming Calling Plan feature provides a distinction between:
For a User, setting the “call from outside group” option to N, (block), disallows incoming calls from callers outside of the Site, independently of how the call gets to the User.
When an incoming call is denied by this function, the incoming caller receives the standard Incoming Calling Plan denial announcement.
NOTE: Where multiple Sites exist for a Customer, the “Calls from within the Site” and “Calls from outside the Site” screening criteria refers only to calls from outside the Enterprise. Calls from outside the Site but within the same Enterprise do not trigger the “Calls from within the Site” and “Calls from outside the Site” screening criteria.
‘Enterprise’ refers to a Customer with more than one Site where ‘Location Codes’ for extension level dialling between Sites have been configured.
A Group or Company Administrator can use the Outgoing Calling Plan to control, or “screen”, the types of calls that can be made, transferred and forwarded by Users within a Site. You can configure default settings that apply to the Site as a whole and, if required, configure custom settings for particular Users.
NOTE: Calling Plan features customized for individual Users take precedence over Calling Plan features configured for the Site.
The Outgoing Calling Plan allows screening for certain types of outgoing calls so that these calls are automatically redirected to an announcement that informs the User that the call is not allowed. Calls that do not match screening criteria are processed normally.
The Outgoing Call Screening template can screen the following call types:
To specify whether Site members are permitted to make calls to other Site members. If Location Codes are configured between Sites within an Enterprise to allow ‘extension dialling’, these calls are processed as ‘Within Group’.
To specify whether Site members are permitted to make local calls. Calls are usually within the same geographic region, and are determined to be local when they have the same NDC or ‘area code’ as the originating User.
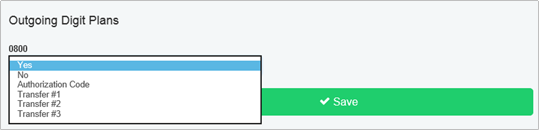
To specify whether Site members are permitted to make Freephone calls to numbers beginning 0800
To specify whether Site members are permitted to make chargeable calls, (long distance), within their geographic region but with a different NDC or ‘area code’. Chargeable calls within the UK beginning with 01 or 02
To specify whether Site members are permitted to make chargeable international calls, (long distance), outside of their geographic region. Calls are determined to be ‘international calls’ when the International Access Code (00) is required to reach other countries.
To specify whether Site members are permitted to make calls requiring the chargeable assistance of an operator.
To specify whether Site members are permitted to make chargeable calls to directory assistance, for example 118 118, 118 247
This allows you to specify whether Site members are permitted to make calls to mobile numbers starting with 07. Personal Numbering, that is numbers starting with 070, are blocked on the WHC platform.
To specify whether Site members are permitted to make calls to numbers starting with 0844, 0845, 0870 and 03. Varying call charges may apply.
Chargeable calls to 09 numbers are blocked on the WHC platform.
To specify whether Site members are permitted to make calls to numbers starting with 0871. High call Charges apply.
Casual dialling (US) is not supported on the WHC platform.
URL dialling is not supported on the WHC platform.
Unknown numbers (US) are not supported on the WHC platform
To screen calls to numbers that include specific digit strings
The same call types can be screened by the Forward/Transfer and the Being Forwarded/Transferred Call Screening templates.
WHC defines a digit map for the platform that defines fixed digit strings that should be mapped to each call type. For example, this digit map assigns 999 and 112 to the emergency operator in the UK, and blocks calls to Premium Rate numbers starting with 09.
In addition to fixed call types, the Calling Plan service allows the Site or Company Administrator to screen calls against configurable digit strings at the Site and User level.
The Site or Company Administrator can define as many digit strings as required, and selectively assign them to the Site, or particular Users. The digit strings can be used to complement the Outgoing and Forward/Transfer Call Screening templates.
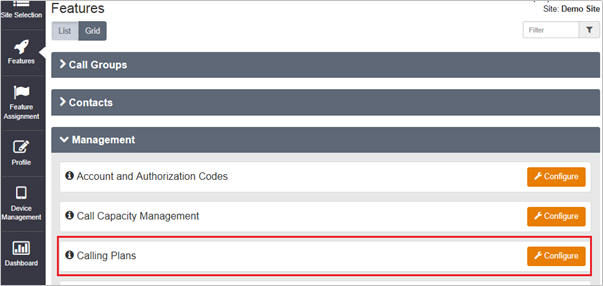
The Site or Company Administrator can configure the Incoming and Outgoing Calling Plans and required Digit Strings through the Business Portal from the Site Feature Settings page under ‘Calling Plans’.
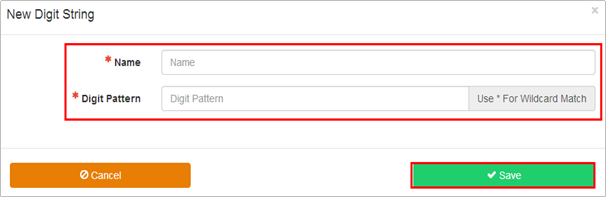
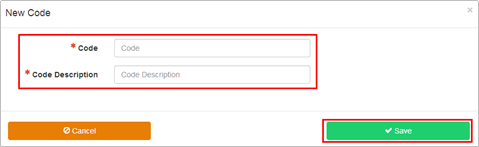
This is a pattern of digits to that you want to allow or deny outgoing calls to by all Users at the selected Site or particular users at the selected Site.
The new digit string is added to the Outgoing Calling Plan. When you access the Outgoing Digit Plans page, the new digit string is available for you to configure.
Configuration – Outgoing Calling Plan
When Site members attempt to place calls of this type, they receive a message informing them that the call is not allowed.
Configuration – Outgoing Calling Plan - Calls Forwarded by Site Employee
The Calls Forwarded by Site Employee page allows the Group or Company Administrator to configure the way calls that are forwarded or transferred by members of the selected Site are handled.

Allow or block each specific type of forwarded call by selecting or clearing the corresponding check boxes.

For example, if you enable the International option, you allow members of the Site to forward calls to international numbers. If you disable the International option, Users who attempt to forward calls to international numbers receive a message that indicates that the call is not allowed.
Configuration - Outgoing Calling Plan – Site Employee Calls Forwarded by Another Party
This feature allows the Group or Company Administrator to specify whether members of the selected Site can transfer or forward intra-group calls to external numbers.

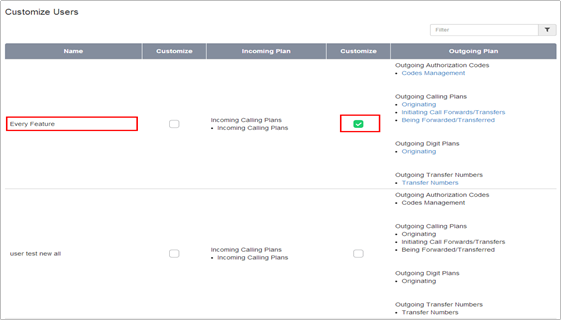
Configuration – Outgoing Calling Plan for an Individual User
By default, the Outgoing Calling Plan you configure for a Site applies to all of the Users who are members of the Site.
If required, you can apply custom outgoing calling plans to particular Users.
NOTE: Custom outgoing calling plans applied to individual Users take precedence over the default outgoing calling plan applied to the parent Site.
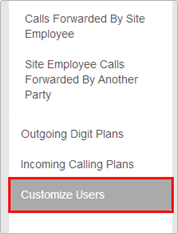
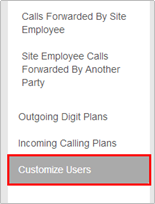
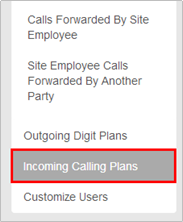
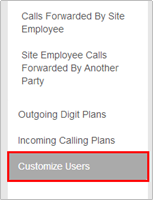
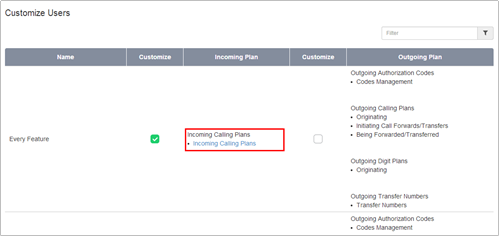
From the Site Feature Settings, Calling Plans page, click ‘Customize Users’ in box on the left

The list of functions in the ‘Outgoing Plan’ column will now be available as hyperlinks.
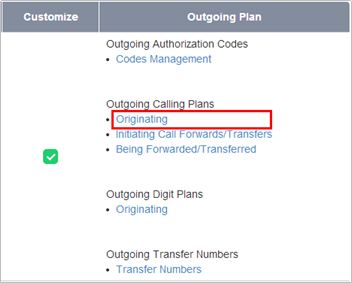
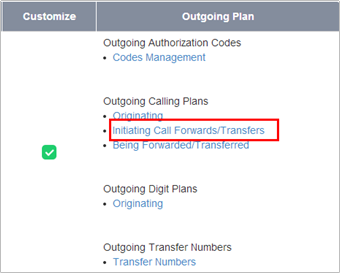
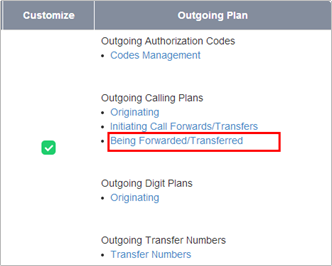
To customize whether the User can forward calls to certain types of numbers, click the ‘Initiating Call Forwards/Transfers’ hyperlink in the Outgoing Calling Plans section.
To customize whether the User’s calls can be forwarded or transferred to outside of the Site,
NOTE: When customizing a User’s outgoing calling plan this box is automatically un-ticked. If a user is required to forward or transfer calls outside the Site, please remember to manually re-enable this box.
Configuration – Digit Plans for an Outgoing Calling Plan – Site Level
Once Digit Strings have been added, (refer to ‘Configuration – Digit Strings’ above), they be can configured into a Digit Plan for an Outgoing Calling Plan.
From the Site Feature Settings, Calling Plans page,


Configuration – Digit Plans for an Outgoing Calling Plan – User Level
Once Digit Strings have been added, (refer to ‘Configuration – Digit Strings’ above), they be can configured into a Digit Plan for an Outgoing Calling Plan.
NOTE: The individual User Digit Plan settings take precedence over the Digit Plans settings for the Site.
From the Site Feature Settings, Calling Plans page,
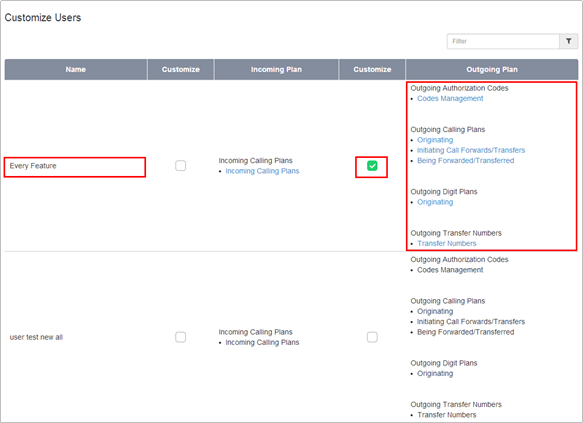
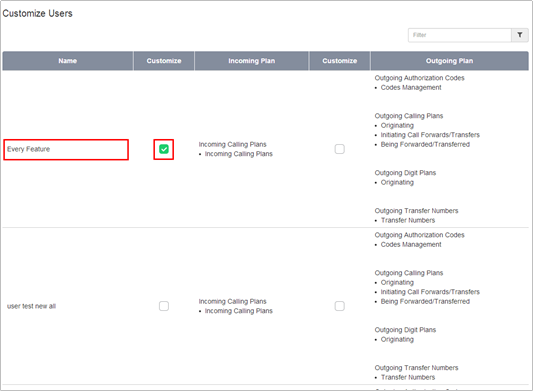
The Customize Settings per Activated Employee page will be displayed.
This page shows all Users that are members of the Site.
The list of functions in the ‘Outgoing Plan’ column will now be available as hyperlinks.
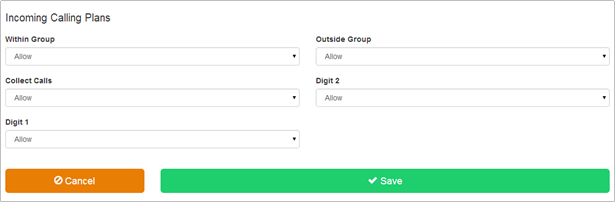
Configuration – Incoming Calling Plan – Site Level
The Incoming Calling Plan option allows the Group or Company Administrator to screen incoming calls to a given Site or to an individual User. By default, the settings you apply to a Site apply to all Users who are members of the Site.
If required, you can apply custom incoming calling plans to specific Users.
From the Site Feature Settings, Calling Plans page,
Configuration – Incoming Calling Plan – User Level
By default, the Incoming Calling Plan that the Group or Company Administrator configures for a given Site applies to all of the Users who are members of the Site. If required, you can apply custom Incoming Calling Plans to individual Users.
NOTE: Custom Incoming Calling Plans applied to individual Users take precedence over the default Incoming Calling Plan applied to their parent Site.
From the Site Feature Settings, Calling Plans page,
The functions in the ‘Incoming Plan’ column will now be available as a hyperlink.
The Incoming Calling Plan page is displayed.

Configure the options as required. The available choices are:-
Configuration – Incoming Calling Plan – User Level
By default, the Incoming Calling Plan that the Group or Company Administrator configures for a given Site applies to all of the Users who are members of the Site. If required, you can apply custom Incoming Calling Plans to individual Users.
NOTE: Custom Incoming Calling Plans applied to individual Users take precedence over the default Incoming Calling Plan applied to their parent Site.
From the Site Feature Settings, Calling Plans page,

The Customize Settings per Activated Employee page will be displayed.

The functions in the ‘Incoming Plan’ column will now be available as a hyperlink.

The Incoming Calling Plan page is displayed.
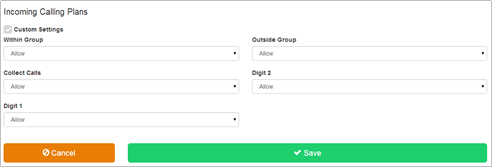
Configure the options as required.
The available choices are:-
Configuration Example – Allow specific 09 number
The default calling plan has the routing of 09 numbers (premium numbers) set to ‘No’.
On occasion a Customer may need to dial a specific 09 number for valid business reasons. This can be enabled by simply setting 09 numbers to ‘Yes’ in the Outgoing Calling Plan for the Site. However this will allow all Users on Site to dial any 09 number, including those that may not be for valid business reasons.
It is considered ‘best practice’ to only allow the specific 09 number the Customer requires for valid business reasons.
To allow all Users on Site to dial the required 09 number:-
If only 1 or 2 users on Site are required access to the 09 number, steps 2 and 3 can be performed at the ‘Customize User’ level.
This is also a useful method for restricting access to ‘approved’ international destinations.
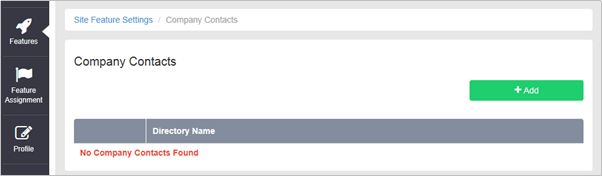
The Company Contacts Feature provides the ability to create custom companywide internal contact directories.
Customer Administrators can use this feature to create custom Company Contact Directories. You can include users and virtual users (Hunt Groups, Call Centres etc.) in the Customer in a custom directory.
Multiple Company Contacts Directories can be created under each Site. Each of these directories can be edited or deleted. A directory can contain a maximum of 1,000 users.
For SIPT users, contacts can be created, but won’t be sync’d to the PBX phone. Contacts can however be used in UC apps.
NOTE:
The Company Contacts Feature is available to configure in the Business Portal


Select the add symbol
|
Steps |
Details |
|
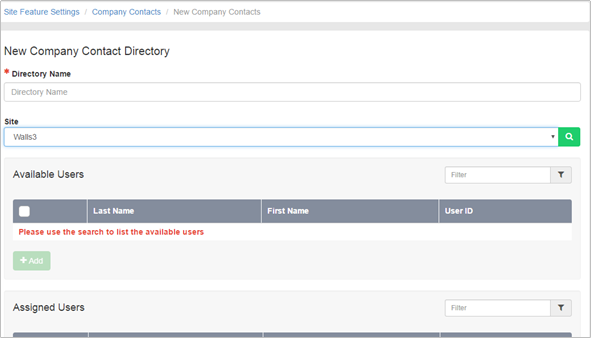
Specify a custom contact directory name. |
In the * Directory Name text box, type the name of the directory. This is a required field. |
|
Specify the Site |
Select whether you want search all users from a particular Site or from all sites. |
|
Select the users to add to the directory by adding them to the Assigned Users box. |
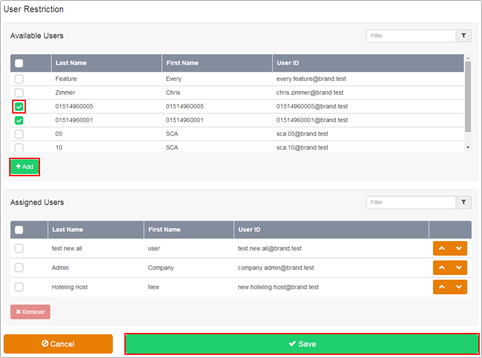
To add users: (Select sites from dropdown) To select users to add to the directory, you move users from the Available Users box to the Assigned Users box. In the Available Users box, select the users. You can select each user individually or select all of the users in the box by selecting the tick box in the header bar. To add the selected users, click Add. To remove users: Select the users you wish to remove in the Assigned Users box. As with adding users you can select each user individually or select all of the users in the box by selecting the tick box in the header bar. To remove the selected users, click Remove |
|
Save your changes or exit without saving. |
Click Save to save the changes To exit without saving, select another page or click Cancel to display the previous page. |
The Company (also referred to as Customer or Enterprise) Contact Directory has been created. The Company Contact Directories will now be available to integrate with supported devices using the Phone Services feature. See the sections below on how to provision and use the Phone Services integration features.
Follow the above steps to create subsequent directories e.g. a Sales Department directory.
Configurable Extension Dialling
The Configurable Extension Dialling feature provides the ability to map a User’s DDI or public directory number to a unique extension to allow abbreviated extension only dialling between the Users of a Site
The Configurable Extension Dialling feature allows the Users of a Site to call one another using abbreviated dialling instead of requiring their whole public number to be dialled.
The Configurable Extension can range between two to six digits in length, depending on what length the CP Administrator has configured when creating the Company and Site on Business Zone. By default it set to 4 digits for the Company unless this is changed when creating the Site on Business Zone. When users are created they will automatically be provided with an extension number which takes the last x digits of the number, where x is based on the site policy selection, i.e. if site is 4 digit extension and user takes a number of 0203 328 1162, extension will default to 1162. The Site or Company Administrator can change the default extension to any other value of the required length that is not already in use by another User or Feature in the Site.
Once assigned, Users’ extensions can be used for dialling and for other intra-Site routing features that require a phone number. For example, call forwarding, simultaneous ringing, speed dial, etc.
Extensions can also be assigned, if required, to routable Site Features like Hunt Groups, Call Centres, and Auto Attendants.
The Configurable Extension length can only be configured at the Site level on Business Zone by a CP Administrator.
The Configurable Extension Dialling feature requires no specific configuration. The Group or Company Administrator assigns the extension of the required length when Activating a User or configuring a Site Feature.
ADD IN RULES
Configurable Feature Access Codes
WHC allows the Group or Company Administrator to select the Feature Access Codes (FAC) used to activate, deactivate, and configure various features. This may be required to duplicate functions Users are familiar with from legacy systems or to avoid conflicts with a Customer’s required numbering plan.
A Group or Company Administrator can configure a main and alternate access code for each Business VoIP feature that Users can access through their phones. Each is configured with a default access code which you can change if required. Each feature or function must have at least one access code. If no feature access code is associated with a specific feature, Users cannot interact with this feature through their phones.
The system has default values for Feature Access Codes. The table below indicates the default Feature Access Codes (FAC) available.
NOTE: For User level features, individual Users will only be able to use the Feature Access Codes for features that are contained in their assigned Feature Pack.
|
FAC
|
Name |
Description |
|
#8 |
Automatic Callback Deactivation |
Allows Users to deactivate all current automatic callback sessions. Automatic Callback is a User feature that retries a busy line automatically, with callback notification as soon as the called line becomes free. The busy called party must be in the User’s Site.
|
|
*15 |
Call Bridge |
Allows a user with the Shared Call Appearance/Call Director service to join a bridge. |
|
*14 |
Call Director E164 Dialling |
Allows the user to dial an E.164 number. The user dials the feature access code as an alias to the "+" sign. The system replaces the feature access code digits with the "+" sign and resumes the call origination with an E.164 number |
|
*72 |
Call Forwarding Always Activation |
Allows Users to redirect incoming phone calls to another number, such as a mobile phone or PA. After dialling the assigned FAC, Users dial the destination phone number to which calls will be redirected followed by the hash key (#).
|
|
*73 |
Call Forwarding Always Deactivation |
Allows Users to turn Call Forwarding Always off. After deactivation, calls ring to the User’s phone unless the user has set up another feature such as Call Forwarding Busy, Call Forwarding No Answer, or Do Not Disturb. |
|
*21* |
Call Forwarding Always Interrogation |
Informs the user whether the Call Forwarding Always service is activated or deactivated. If the service is activated, the user also hears the forwarding destination, which can be a phone number or voice mail. Call Forwarding Always Interrogation is available only when one or more of the following services are authorized (for a service provider or group) or assigned (for a user): Call Forwarding Always, Voice Messaging User. |
|
*21 |
Call Forwarding Always to Voice Mail Activation |
Allows Users to send all calls directly to voice mail. |
|
#21 |
Call Forwarding Always to Voice Mail Deactivation |
Allows Users to deactivate Call Forwarding Always To Voice Mail. |
|
*90 |
Call Forwarding Busy Activation |
Allows Users to redirect their incoming phone calls to another number when they are on the phone, such as a mobile phone or PA. After dialling the assigned FAC, Users dial the destination phone number where they want their calls to be redirected. |
|
*91 |
Call Forwarding Busy Deactivation |
Allows Users to turn Call Forwarding Busy off. After deactivation, calls ring on the User’s phone unless the User has set up another feature such as Call Forwarding Always, Call Forwarding No Answer, or Do Not Disturb. |
|
*67* |
Call Forwarding Busy Interrogation |
Tells the user whether their Call Forwarding Busy service is activated or deactivated. If the service is activated, the user also hears the forwarding destination, which can be a phone number or voice mail. Call Forwarding Busy Interrogation is available only when one or more of the following services are authorized (for a service provider or group) or assigned (for a user): Call Forwarding Busy, Voice Messaging User. |
|
*40 |
Call Forwarding Busy To Voice Mail Activation |
Allows Users to send calls to voice mail when they are busy on an active call. |
|
#40 |
Call Forwarding Busy To Voice Mail Deactivation |
Allows Users to deactivate Call Forwarding Busy To Voice Mail. |
|
*92 |
Call Forwarding No Answer Activation |
Allows Users to redirect their incoming phone calls to another destination number when they do not answer their phone, such as a mobile phone or PA. After dialling the assigned FAC, the Users dial the destination phone number where they want their calls to be redirected. |
|
*93 |
Call Forwarding No Answer Deactivation |
Allows Users to turn Call Forwarding No Answer off. After deactivation, calls ring on the User’s phone unless the user has set up another feature such as Call Forwarding Busy, Call Forwarding Always, or Do Not Disturb. |
|
*61* |
Call Forwarding No Answer Interrogation |
Informs the user whether their Call Forwarding No Answer service is activated or deactivated. If the service is activated, the user also hears the forwarding destination, which can be a phone number or voice mail. Call Forwarding No Answer Interrogation is available only when one or more of the following services are authorized (for a service provider or group) or assigned (for a user): Call Forwarding No Answer, Voice Messaging User.
|
|
*41 |
Call Forwarding No Answer to Voice Mail Activation |
Allows Users to send calls to voice mail when calls are presented to their phone but are not answered. |
|
#41 |
Call Forwarding No Answer to Voice Mail Deactivation |
Allows Users to deactivate Call Forwarding No Answer To Voice Mail. |
|
*94 |
Call Forwarding Not Reachable Activation |
Allows Users to have their incoming calls forwarded to a different destination number when their device is not registered on the platform. After dialling the assigned FAC, Users dial the destination phone number where they want their calls to be redirected. |
|
*95 |
Call Forwarding Not Reachable Deactivation |
Allows Users to disable Call Forwarding Not Reachable. After deactivation, if the user’s phone becomes unregistered, calls are no longer routed to the alternate destination phone number by the Call Forwarding Not Reachable feature. |
|
*63* |
Call Forwarding Not Reachable Interrogation |
Informs the user whether their Call Forwarding Not Reachable service is activated or deactivated. If the service is activated, the user also hears the forwarding destination. Call Forwarding Not Reachable Interrogation is available only when the user has the Call Forwarding Not Reachable service assigned. |
|
*68 |
Call Park |
Allows Users to “park” a call. Users can park calls only on devices that belong to Users that have this feature is their assigned Feature Pack. |
|
*88 |
Call Park Retrieve |
Allows Users to retrieve a call that was previously parked. |
|
*98 |
Call Pickup |
Allows Users that are a member of a Call Pickup Group to pick up calls ringing for other Users belonging to the same Call Pickup Group. The Call Pickup Group is created by a Company or Site Administrator and may or may not contain all Users belonging to the Site. When Users dial the Call Pickup FAC, the longest ringing phone in the Call Pickup Group is answered. |
|
*77 |
Call Rejection Activation |
Activates the Anonymous Call Rejection service. After the user dials the feature access code, an announcement informs the user that the service has been successfully activated. If the service was already active, the user still receives the announcement |
|
*87 |
Call Rejection Deactivation |
Deactivates the Anonymous Call Rejection service. After the user dials the feature access code, an announcement informs the user that the service has been successfully deactivated, even if the service was never activated. |
|
*11 |
Call Retrieve and Call Director Move |
Retrieves an existing active call from another endpoint. The user dials the Call Retrieve feature access code from the location where they want to retrieve the call. Calls can be retrieved from the primary location, from a Shared Call Appearance alternate location, or from a Call Director location.
|
|
*69 |
Call Return |
Allows Users to return a call to the phone number of the last call answered. Users will be allowed to return calls only to call types allowed in the Outgoing Calling Plan. |
|
#92# |
Call Return Number Deletion |
Deletes the last calling number.
|
|
*43 |
Call Waiting Persistent Activation |
Allows Users to activate Call Waiting Persistent (for all calls) |
|
#43 |
Call Waiting Persistent Deactivation |
Allows Users to deactivate Call Waiting Persistent (for all calls) |
|
#9 |
Callback Menu Access |
Provides access to an interactive voice response (IVR) menu, which lists the current pending callback requests and allows the user to cancel individual callback requests. |
|
*67 or 141 |
Calling Line ID Delivery Blocking per Call |
Allows Users to prevent display of their Calling Line ID for the next call only. Before placing a call, the User dials the assigned FAC, and then places the call as usual. Please note if a user has an extension number of 141 or starting with 141, then changes will need to be made to allow the user to receive extension calls. Either the user should be created with an alternate extension number, or the alternative 141 code should be removed from the Site feature.
|
|
*31 |
Calling Line ID Delivery Blocking Persistence Activation |
Allows Users to activate Calling Line ID Delivery Blocking for all calls |
|
#31 |
Calling Line ID Delivery Blocking Persistence Deactivation |
Allows Users to deactivate Calling Line ID Delivery Blocking for all calls |
|
*65 |
Calling Line ID Delivery per Call |
Allows Users to display their Calling Line ID for the next call. Before placing a call, the User dials the assigned FAC, and then places the call as usual. Note that this feature is active only for one phone call. |
|
*70 |
Cancel Call Waiting |
Allows Users to dial the assigned FAC to turn off Call Waiting for the next call. |
|
*57 |
Customer Originated Trace |
Not Supported. |
|
*55 |
Direct Voice Mail Transfer |
Allows Users to transfer a held call directly to a User’s voice mail, if the destination User is on the same Site. The Voice Messaging feature must be assigned and configured on the User’s Site. |
|
*33 |
Directed Call Pickup with Barge-In |
Allows Users to ‘Barge In’ on calls to or from another User in the same group, by entering the assigned FAC followed by the extension of the User whose call is to be ‘Barged-In’ on. Barge-In is successful only when the destination User has only a single call, (that is, no calls on hold or call waiting). When a User ‘barges in’ on an answered call, the call becomes a three-way call and the User who ‘barged in’ becomes the controller of the three- way call. |
|
*78 |
Do Not Disturb Activation |
Allows Users to activate the Do Not Disturb feature by dialling the assigned FAC. When Do Not Disturb is active, a User’s phone will not ring and all incoming calls will receive ‘busy’. If the User has Voice Mail, by default the call will be forwarded to Voice Mail. If a User has set Call Forwarding Busy, calls will be forwarded to the destination number configured. |
|
*79 |
Do Not Disturb Deactivation |
Allows Users to deactivate Do Not Disturb. |
|
#83 |
Escalated Call to Supervisor |
Allows a call Centre agent to escalate calls to their supervisor |
|
*22 |
Flash Call Hold
|
Allows Users to put a call on hold on a device that does not have a Hold button. Typically these are analogue devices. On this type of device, a User presses the ‘R’ button or presses and releases the Hang up button, (hookswitch) on the phone cradle.
|
|
#58 |
Group Call Park |
Parks the call on the user’s Call Park group. When the user dials the feature access code, the service hunts for the first available user in the Call Park group and parks the call there. This feature access code cannot be used until the Call Park service is assigned and a user can only be in one Call Park group at a time. |
|
*66 |
Last Number Redial |
Allows Users to redial the last number dialled. Users can only redial calls where the call type is allowed in the Outgoing Calling Plan |
|
*12 |
Location Control Activation |
Activates a Shared Call Appearance alternate location, or a BroadWorks Anywhere location. The user must dial the Location Control Activation feature access code from the location that needs to be activated. |
|
*13 |
Location Control Deactivation |
Deactivates a Shared Call Appearance alternate location, or a BroadWorks Anywhere location. The user must dial the Location Control Deactivation feature access code from the location that needs to be deactivated. |
|
*60 |
Music On Hold Per-Call Activation |
Allows Users to deactivate the Music On Hold feature for the next calls |
|
*610 |
No Answer Timer |
Allows Users to change the number of rings a caller hears before Call Forwarding No Answer redirects the call |
|
*71 |
Per-Call Account Code |
Allows Users to provide an account code before attempting a call, or, during an ongoing call, to apply the account code by placing the call on hold. |
|
*50 |
Push To Talk |
Provides an intercom-like functionality where you can call another user and be connected. |
|
#76 |
Selective Call Forwarding Activation |
Activates the Selective Call Forwarding service, which sends incoming calls to another number, such as a mobile phone or administrative assistant, based on pre-defined criteria. The service must be configured through the web portal with the default forwarding number and at least one active selective criterion before it can be activated. |
|
#77 |
Selective Call Forwarding Deactivation |
Deactivates the Selective Call Forwarding service. |
|
*74 |
Speed Dial 8 |
Allows Users to program an assigned one-digit (2 through 9) speed dial code to commonly called numbers. |
|
*75 |
Speed Dial 100 |
Allows Users to program an assigned two-digit (00 through 99) speed dial code to commonly called numbers. |
|
*99 |
Clear Voice Message Waiting Indicator |
Allows Users to clear the audible (and visible for some devices) Message Waiting Indicator on their phone. |
|
*86 |
Voice Mail Retrieval |
Allows the user to retrieve their voice mail. Upon dialling this feature access code, the user is automatically connected to their voice mail retrieval menu. |
|
*56* |
Connected Line Identification Restriction Interrogation |
Allows a user to query the status of this feature to see if it is enabled or disabled. |
Function
Configurable Feature Codes allow the Group or Company Administrator to configure the Feature Access Codes used by Users in the Site to activate, deactivate, and configure various WHC features.
A Feature Access Code is defined as a string of two digits with a standard one or two character prefix composed of special characters like star (*) or hash (#). The default prefix is a single star (*). This code can be dialled by the Users in the Site to interact with those features.
Feature Access Codes must be unique within a Site. It is possible to configure an alternate Feature Access Code for each feature access code-based feature. When you add or change a feature access code, the WHC service validates the code to ensure that:
A second validation is applied when adding an extension to a User, or modifying a User’s extension. If a conflict/collision occurs when either a Feature Access Code or an extension is modified, an error message appears.
Limiting Conditions
When there is a conflict/collision between a Feature Access Code and an Extension or a Speed Dial Code, the Feature Access Code has priority.
Feature Access Codes must be unique within the Site.
When no Feature Access Code is associated with a feature, Users in the Site cannot interact with that feature through their phone
Feature Access Codes are configurable by the Group or Company Administrator through the Business Portal Site Feature Settings page, under ‘Feature Access Codes’.
To configure the customizable Feature Access Codes,
The values in the ‘Main’ column are the default Feature Access Codes and should not be changed.
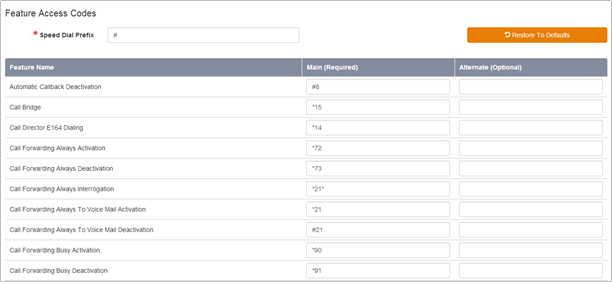
In the ‘Alternate’ column key in the required changes to the Feature Access Codes for this Site keeping to the following rules.
Please refer to the Configurable Feature Access Codes section of this document for more information on Feature Access Codes.
This feature allows a Site to play alternative audio to all calls made to the Sites Users and Hunt Groups. This replaces the traditional ringing audio that the user would hear.
This feature is useful when a Site administrator wants to play alternative media to their callers, so perhaps play an announcement, advertising, or music.
This feature is available to configure in the Business Portal by navigating to:
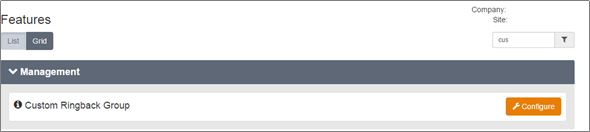
To configure Custom Ringback Group, follow these steps:
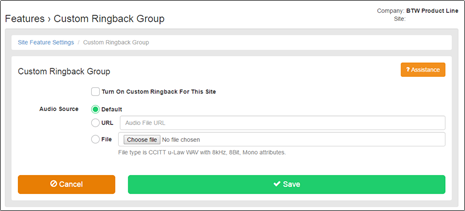
Device Management (Information)
The Device Management feature provides the Group or Company Administrator with an inventory of all Devices in a Site and the ability to manage and customize these devices.
These Devices may include integrated access devices (IAD), Softphones and IP phones for Centrex services. For SIP Trunking sites, SIP Devices such as PBXs, Media Gateways and SBCs will be listed along with any Enterprise Trunks configured.
In addition, this feature provides the capability to assign Users directly to an existing device without the need for de-provisioning the User. The Group or Company Administrator can use the Device Inventory to create, modify, and delete the IP telephones that are used within a given Site.
This feature allows the Group or Company Administrator to keep track of the Devices (gateways, IP phones, PBXs etc), used by the Site. By default, the Device Inventory page automatically lists all devices that are currently in use within the selected Site.
This allows the Group or Company Administrator to add new devices to be used in conjunction with User features such as ‘Shared Call Appearance’ or Delete devices no longer in use at one Site for re-use on another Site.
Deleting a Device that is no longer assigned to a User will reopen the MAC address of the device for re-use elsewhere.
The Device Inventory shows the following information:
The default device name created when a User is activated and assigned a device is the Enterprise ID plus the Username.
This shows the device that was selected from the drop down list when the User was activated.
This shows the number of ports that are not yet used on that particular device. For example a Polycom SoundPoint IP 500 has 4 available lines. If this assigned to a User, one line will be Used and the ‘Available Lines/Ports’ column will show 3. If this User has Additional Lines or Shared Call Appearances assigned to their device, the ‘Available Line/Ports’ column will drop accordingly.
The Group or Company Administrator can use the Device Inventory to Add a new Device to a Site.
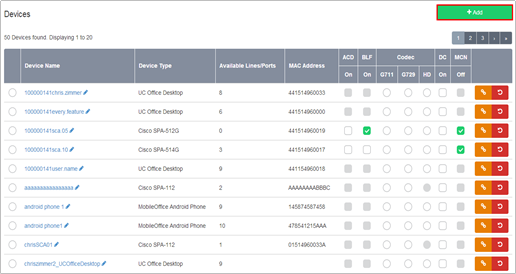
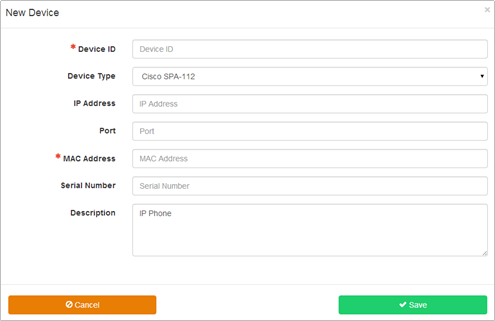
Other fields are optional on the WHC platform. Enter information as required.
The Devices page is displayed with the New Device added to the list
Configuration – Modify a Device
Navigate to: Sites (select Site) > Device Management > Devices
Click on the name of the device you want to modify
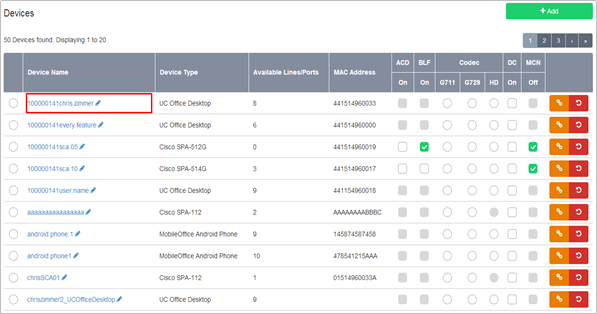
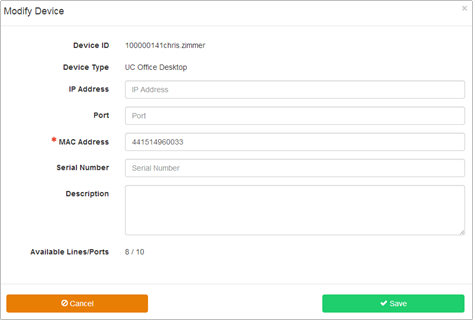
Modify the fields as required.
You cannot modify the Device ID, Device Type, Assigned Lines, Lines, or Available Lines fields.
Configuration – Delete a Device
You cannot delete a Device with a port that is in use or has been assigned for use.
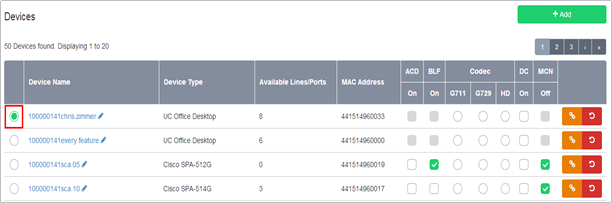
This feature allows you to turn an IP phone into a virtual handset, i.e. a Hot Desking phone. Any user with the Flexible Seating Guest feature can then temporally associate with this phone, and the phone will download their phone number and some of their existing feature settings.
This functionality is available as a Site Feature and does not incur any additional licensing fees.
This feature is useful for organizations looking to create Hot Desking environments. Alternatively it can be used in retail environments where a company operates a shift policy and does not need to provide their staff with individual phones, instead they can share a device, whilst still maintaining their own User license.
The following handsets can be used with the Hot Desking Host feature:
The following steps, listed in the recommended order, need to be followed in order to configure a Host device:
The first step is to ensure you are in a possession or have access to the device that you wish to convert into a Flexible Seating Host.
Log into the Business Portal as an administrator and locate the Site you want to create the Host device on, then follow the steps below:

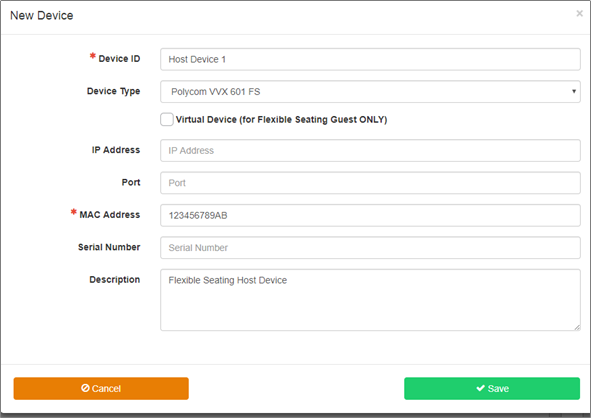
At this time we do not offer a service that automatically pre-configures the URL on the phone for Flexible Seating Guest, this will need some direct manual manipulation of the provisioning string on the phone.
Configuring a Polycom for Flexible Seating Guest
Use the handset menu to enter the Flexible Seating Provisioning Server Address:
Please note that on successful retrieval of the configuration, the Web Configuration Utility will no longer be available and the default password will be changed.
Configuring a Yealink for Flexible Seating Guest
Use the handset menu to enter the Flexible Seating Provisioning Server Address:
Please note that on successful retrieval of the configuration, the Web Configuration Utility will no longer be available.
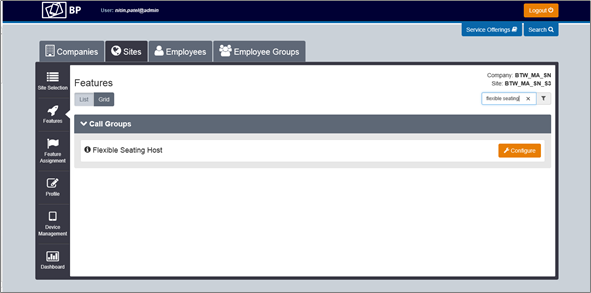
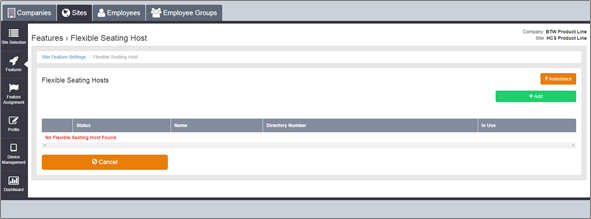
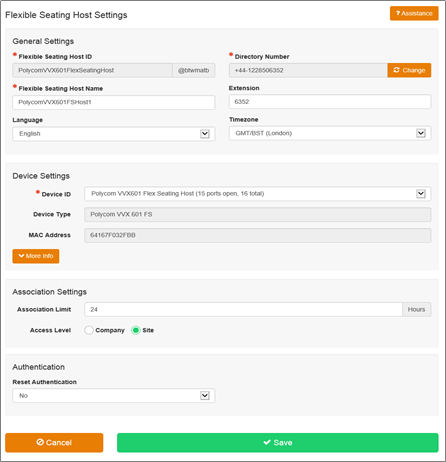
A Host device until logged into, is only capable of making emergency services calls and Voice Portal calls. To be able to use the Host, a user will need to be using one of the Centrex Hosted Mobile User licenses which will contain the Flexible Seating Guest feature. Please refer to the User Features guide to find out how to use this.
Use the Group Calling Line ID feature if you want to use a single default Calling Line Identity for:-
If you assign a Calling Line Identity to a Site or Group of users, the identity will be displayed to external parties who receive calls from Users at the Site or from the Group. It provides a similar end user experience to the traditional ISDN ‘Bearer Number’. A Group Calling Line Identity is composed of a valid public phone number that is authorized for use by all or groups of Users within the Site.
A Group or Company Administrator can set a group phone number, referred to as the ‘Group Calling Line ID’, for any number added to the Site through the Add New Numbers or Number Import journey. Where the number to be used is a free text presentation number, such as a Non-Geographic number or International number, then only the CP Administrator can add this to the Site.
By default, all Uses on a Site will display their own personal number assigned to them as part of the order journey. Where this feature is used, then the default Calling Line Identity number is overridden with a number selected or entered into the configuration of this feature. External parties see the default Group Calling Line Identity, not the identity, (the DDI), of the User. For calls between Users within the Site, each User will see the other User’s personal Calling Line Identity information, even when a default Group Calling Line ID exists.
This feature allows the Group or Company Administrator to:
This feature allows the CP Administrator to:
The default group CLID is made up of:-
The public number used as a default Group Calling Line ID must be assigned to a User or Feature in the Site, or created as a Presentation number by a CP Administrator.
In all cases, if the User making a call has blocked the delivery of their Calling Line ID, either for a single call or for all calls, the presentation of the Group Calling Line ID is also blocked.
Please note that Class 4 and Class 5 CLI is not supported.
The Group or Company Administrator can configure most of the Group calling Line ID feature through the Business Portal on the Site Feature Settings page under ‘Group Calling Line ID’. However, only a CP Administrator can create a custom number and group, but a Company/Group Administrator can add or remove people from this group.
To configure the Group Calling Line ID navigate to:
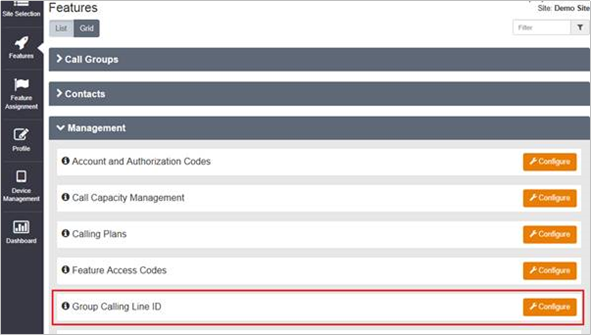
To enable the Group Calling Line ID as the default group number for ALL Users on a Site:
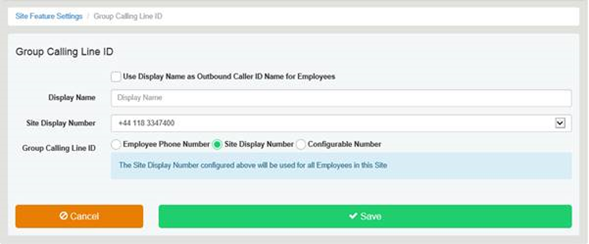
To enable a Group Calling Line ID as the default group number for SOME Users on a Site, you will need to use the Configurable Number option

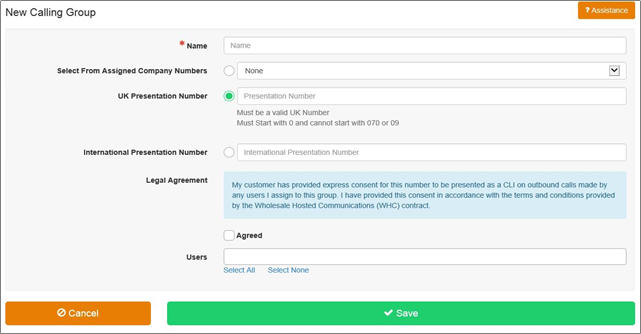
Add users to the group by:
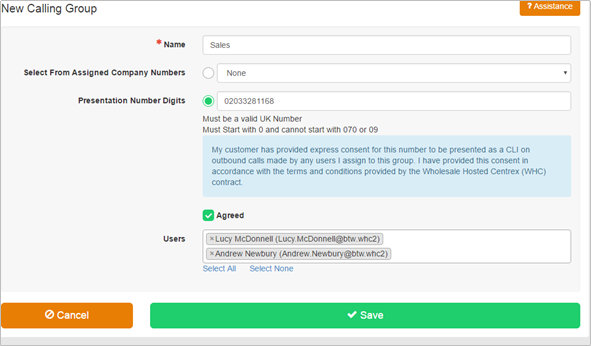
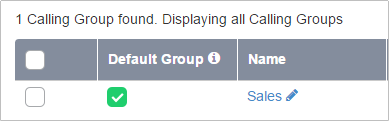
To Delete a Group select the group individually or select all Groups and click Delete. However please note, deleting a Call Group (i.e. Hunt Group, Auto Attendant etc) containing a number that is also in use as a Group Calling Line ID may permanently remove the number from the system. Please ensure you remove the number from the group calling line ID before making changes to that number’.
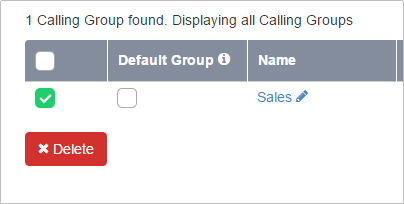

NOTE: to meet our 999 obligations, where Group Calling Line ID is used the following will occur:
The Group Contacts Feature provides the ability to create custom contact directories for use by a Customer’s Site or an Employee Group.
Supported Characters
The Business Portal supports the use of Alpha Numeric characters A to Z, both upper and lower case, and 0 to 9. Special Characters Hyphen (-) and Apostrophe (‘) are also supported.
All other Special Characters are not supported in the Business Portal and any entry containing these characters will be rejected.
NOTE: We would advise against the use of Apostrophe in Group Contacts as some handsets may not support this character. This may lead to issues when trying to access the contacts from the handset.
Administrators can use this feature to create a custom Group Contact Directory that contains numbers frequently called by the Site or an Employee Group such as a security company, company caterer, or a company supplier. You can also quickly add numbers to this list by importing a phone list and loading the numbers from a CSV file. Hover over the information (i) icon for the file format.
A directory can contain a maximum of 1000 users.
For SIPT users, contacts can be created, but won’t be sync’d to the PBX phone. Contacts can however be used in UC apps.
The Group Contacts Feature is available to configure in the Business Portal
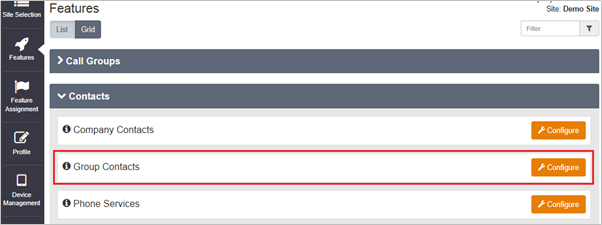
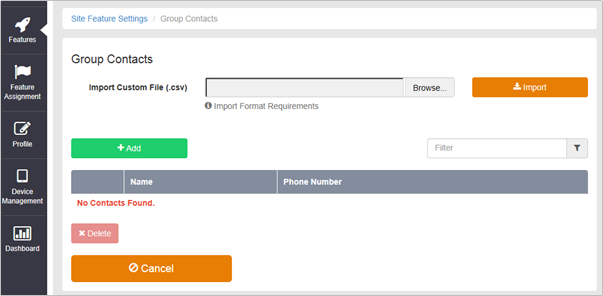
From this page you can:
|
Tasks |
Steps |
|
To delete Contacts: |
Check the Delete check box for the Contact, Contacts or all Contacts. Save your changes: Click Delete. To exit without saving, select another page or click Cancel to display the previous page. |
|
To add Contacts: |
Click on the +Add button. Type a Name and Phone Number in the corresponding fields. Click the Save> button. |
|
To import a file of Contacts: |
Click Browse… and select a correctly formatted CSV file. Then click the Import button. |
|
To modify Contacts : |
To modify a Contact, click on the Name and edit the entry. Click Save to save the changes. |
|
Exit the page: |
Select another page or click Cancel to display the previous page. |
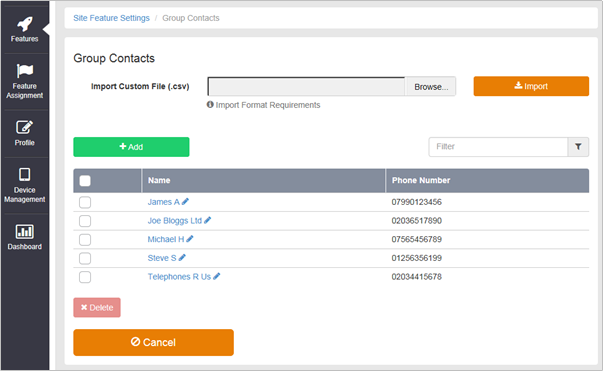
The Group (also referred to as Site) Contact Directory has been created.
The Group Contacts Directory will now be available to integrate with supported devices using the Phone Services feature. See the sections below on how to provision and use the Phone Services integration features.
Group Paging is effectively a tannoy type service that enables a message to be sent/paged to multiple users/devices. This is different to Push-to-Talk which is a one to one paging service only.
With Group Paging site administrators are able to configure Paging Groups with a telephone number and assign users as Originators and Targets to be a part of the service. The Originator users have the ability to send a Page to the group, the target users are the recipients of the Page. A user can be both an originator and a target.
When the originator dials the Paging Group number the feature alerts users assigned as targets and connects them into a muted multi-way conference with the originator. The originator can then make an announcement to all the targets.
To configure the feature, navigate to the Business Portal as a site Administrator or higher and select Sites>Features>Call Groups>Group Paging.
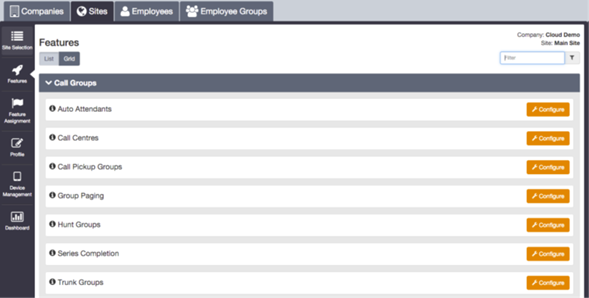
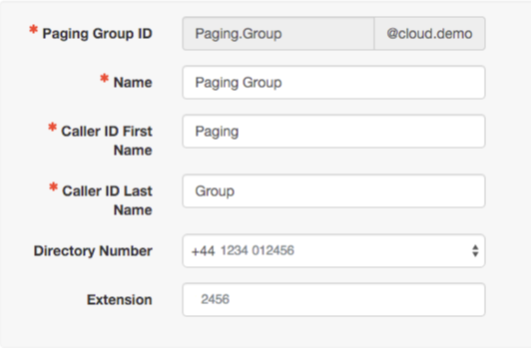

The site administrator has the ability to define the list of users who can originate the page to the targets.
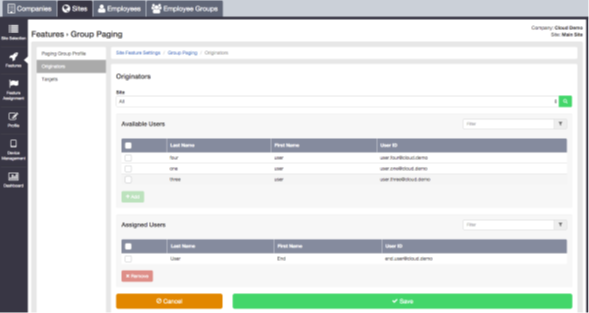
Any user within the site or customer of the paging group is allowed to be an originator. In addition, the user can be assigned as an allowed originator for multiple paging groups. A user can be both an originator and a target in the same Paging Group. If the originator is also included in the paging group as a target, the originator is excluded from the list of targets to be paged when they initiate a page.
An originator user can be deactivated even though this user is part of a paging group. Once deactivated, the originator is removed as the allowed originator from all associated paging groups.
The list of users that will receive the page is referred to as ‘targets’.
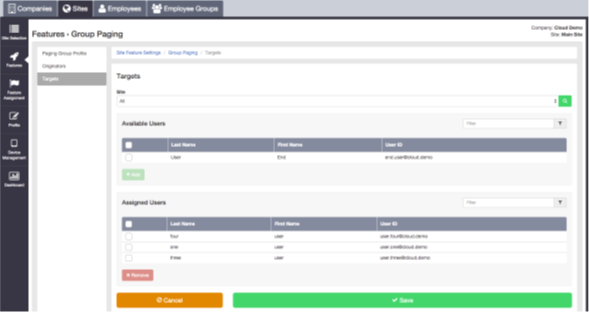
Any user or paging group within a site or customer can be defined as a target in a paging group. If a paging group is assigned as a target within another paging group this is called a nested paging group, see Nested Paging Groups section below.
When an originator sends a page to a device, the target device will immediately auto answer the page, if supported. If the device does not support auto-answer the target handset must manually answer the call within the ‘confirmation tone sending timeout’ as described above.
A target user can be deactivated even though this user is part of a paging group. Once a target is deactivated, the user is removed from all the associated paging groups.
A paging group can be defined as a target in another paging group, thus creating a nested paging group. The nested paging group will need to be configured as a stand-alone paging group with its own unique configuration and number/extension. This paging group can be directly activated by dialling its assigned telephone number or extension independently. If the number of a paging group is dialled by an originator, all targets are paged, including those in the nested paging groups. The total numbers of users in the nested paging group must comply with the maximum number of targets which is 100.
Please note the nesting of paging groups is limited to a single level of nesting. For instance, Paging Group A can contain Paging Group B and C as nested paging groups. However, Paging Group B cannot contain Paging Group D as a nested paging group. Similarly, Paging Group A cannot be included in any other paging group since it already contains one level of nesting. A paging group cannot be deleted from the system if it is nested inside another paging group.
Auto Answer Handset Requirements
The paging group will always requests the target devices to auto-answer the page. To support this, the handset must be able to interpret the supportAnswerAfter SIP parameter in order to auto answer the page. The supportAnswerAfter SIP parameter is supported by the major IP Phone devices which includes the devices we sell from Polycom and Yealink. Therefore, with the standard default configuration these phones will auto answer Group Pages using the speakerphone. Target devices that do not have the ability to auto-answer can manually answer the page within the confirmation tone timeout.
The following conditions must be adhered to in order for the feature to work successfully:
Using the Group Paging Feature
Please note, only one group page attempt is permitted to be active for a paging group at any point in time. If one attempt is initiated and a then second attempt is initiated before the first attempt is completed, the second attempt is rejected.
As a Group or Company Administrator, you can define Holiday Schedules that can be associated with the Auto Attendant feature, or use the default ones we have created. Create a Holiday Schedule if you intend to configure an Auto Attendant so that it behaves differently during business hours/ after hours and you if you want the Auto Attendant to use its “after hours” behaviour during designated holiday periods.
The feature automatically has the following Holiday Schedules which can be used by certain features:
If these default schedules do not meet your needs then you can create your own and designate up to twenty different date ranges as holiday periods. However please note you can only apply one Holiday Schedule to a feature, and you can apply this if the Holiday Schedule parameter appears within the feature, i.e. Auto Attendants.
The Site or Company Administrator can configure a Holiday Schedule through the Business Portal Site Feature Settings page, under ‘Holiday Schedule’.

Please note the existing Holiday Schedules created on the system cannot be edited as these are controlled by BTW, but they can be used within features.
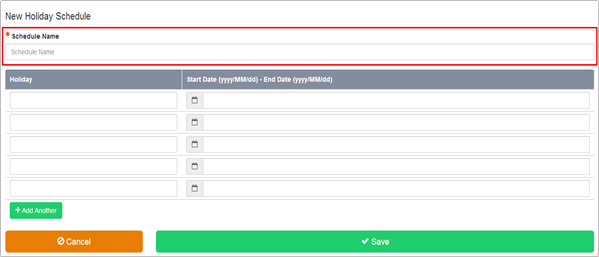
You can designate up to twenty different date ranges as holiday periods. Each line in the list represents a specific holiday period. Only 5 rows are immediately visible. To add more rows simply use the button labelled Add Another.
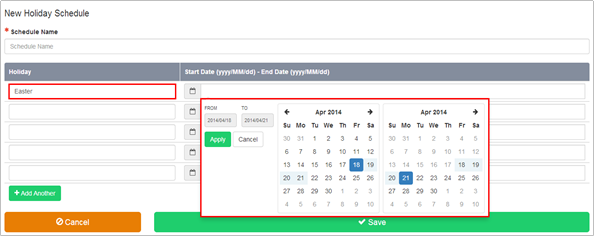
The Holiday Schedules page is displayed with a link to your new Holiday Schedule.
The Hunt Group feature processes high volumes of incoming calls received by a single phone number by distributing them among a specific set of Users assigned to the Hunt Group.
Based on the configured call distribution (hunting) policy, an incoming call hunts for an idle User in the hunt group to terminate the call.
Hunt Groups are built against a specific Site, but any Users you assign to these Hunt Groups can be members of any Site within the Company.
Function- Hunting Policies
When a Group or Company Administrator creates a Hunt Group, the Users are added as Members to the Hunt Group in an ordered list. By default a Hunt Group will search the list in a particular pre-determined order, skipping over all the Users detected as ‘busy’, until it finds an ‘idle’ User to present the call to with ringing.
The call distribution (hunting) policy configured essentially determines the order in which the list will be processed to find an idle User where the call can be presented to that User with ringing.
WHC supports the following Multiple Call Distribution policies:
The incoming calls to the group always start seeking an available Member on the first User in the list and sequentially seek all the provisioned Users, until an idle User is found to present the call to, or the end of the list is reached.
The incoming calls to the group start seeking an available Member with the User following the last User to receive a call. When the end of the list is reached, the hunting circles back to the first User in the list. The Hunt Group stops seeking an available Member when an idle user is found to present the call as well or all the Users have been searched.
For example, the 1st incoming call starts searching for an available Member with the 1st Member in the list, and stops at the end on the list. The 2nd incoming call starts searching for an available Member with the 2nd Member in the list, continues to the end of the list then returns to the being of the list and stops at the 1st Member in the list. The 3rd incoming call starts searching for an available Member with the 3rd Member in the list, continues to the end of the list, and returns to the beginning of the list and stops searching at the 2nd Member in the list.
The incoming calls to the group are presented to the User that has been idle, (available), for the longest time.
The incoming call rings all idle Members in the Hunt Group at the same time. The call is connected to the first Member to answer the call and the ringing is automatically cancelled on all the other Members. All Members are considered ‘busy’ whilst the phones are ringing. If a 2nd calls presents at the same time that all Members are ringing, the Hunt Group is considered busy and the caller will be presented with busy tone by default.
The incoming call rings Members in a pseudo-random fashion according to their relative weight. Members with a higher weight are assigned more incoming calls than members with lower weights. Weights for individual Members are configured as relative percentage values in the Business Portal. Call presentation is determined by the system based of the relative weights assigned.
Function - Hunt Group Features
WHC Hunt Groups must be configured with a DDI/public phone numberi.e. a Pilot Number. If members of the Hunt Group do not answer an incoming call the following ‘no answer’ settings are available:-
When a call is presented to a member’s phone and the Member does not answer the ringing call, the ‘Skip to next agent after x rings’ will forward the call to the next available member after the number of rings configured.
For consistent operation of the ‘Simultaneous Ringing’ call distribution policy this option should be un-ticked.
When a call has been ringing on available members(s) phones for the configured number of seconds, this function will forward the call to the configured destination.
When all the Members of a Hunt Group are busy the ‘Call Waiting’ functionality will allow one call to ‘call wait’ for the duration of the default call forwarding no answer timer.
Call waiting is not a ‘queuing’ function.
Users who are Members of a Hunt Group will have their own DDI/public phone number and receive calls independently of the Hunt Group. The User can configure their own features on their DDI number independent of the Hunt Group feature.
NOTE: It is important to note that any feature a User may have configured on their DDI number will not affect calls delivered from the Hunt Group.
To maintain consistency of the configured call distribution policy when hunting through the list of Members, the calls presented to the Members by the Hunt Group may include, but are not limited to, the following feature interactions:
Where HuntGroupPlus is in use, the ‘optional short ring burst’ is not applicable to Do Not Disturb configured for Virtual Users such as Hunt Groups etc. The ‘optional short ring burst’ is only applicable to Do Not Disturb when configured for an Individual User.
Configuration
A Group or Company Administrator can configure the Hunt Group feature using the Business Portal through the Site Feature Settings page under ‘Hunt Groups’. There is no limit to the number of Hunt Groups that can be created in a Site, and a particular User can be a Member of more than one Hunt Group.
The following attributes can be configured when creating a Hunt Group:-
Configuration – Add a New Hunt Group
Hunt Groups are a Site level feature. Before you add a Hunt Group, the Group or Company Administrator will need to select the Site you want to create the Hunt Group under.
To create and configure a Hunt Group,
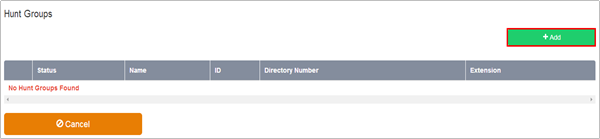

On the Add a New Hunt Group page under General Settings enter:-
NOTE: Call Waiting in a hunt group is not a ‘queuing function
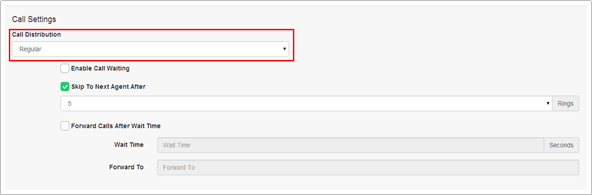
The Call Distribution specifies how incoming calls are to be distributed within the hunt group.
The options are:-
The incoming calls to the Hunt Group start hunting with the first member in the list and hunts all the provisioned members sequentially until an idle agent is found or the end of the list is reached.
The incoming calls to the Hunt Group start hunting with the member following the last member to receive a call. When the end of the list is reached, the hunting circles back to the first agent in the list. The hunting ends when an idle agent is found or all the agents have been visited.
The incoming calls to the Hunt Group are presented to the member that has been idle for the longest time.
The incoming calls ring all idle members in the Hunt Group. The call is connected to the first member to answer the call.
The incoming calls ring members in a pseudo-random fashion according to their relative weight. Members with a higher weight are assigned more incoming calls than members with lower weights.
If Weighted Call Distribution is selected the option ‘Call Distribution Settings’ becomes available in the Hunt Group Activities box on the left.
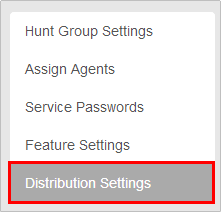
The weighted Call Distribution page is displayed. The Members assigned to this Hunt Group are listed.
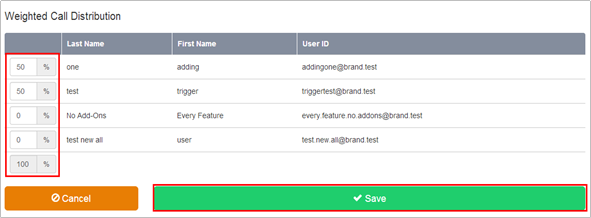
If required select and configure the Call Forwarding No Answer settings.
Options are:-
In the event the Hunt Group or Users are not available due to a network issue, then you can route to an alternative destination by selecting the following options:

Click ‘Save’
The supported scenarios for Call Forwarding Not Reachable in the Hunt Group is as per the image below.
Configuration – Add Members to a Hunt Group
Once you create a Hunt Group, you can assign Users or “members”, or “agents” to it. Calls received on the Hunt Group number are distributed among these Users based on the call distribution policy that has been set for the Hunt Group.

Hunt Group Plus adds enhanced call forwarding functions when applied to the selected Hunt Group through the Business Portal.
The enhanced functionality allows greater flexibility in how a Hunt Group can be deployed by providing the following advanced call forwarding functionality:
NOTE: You can also navigate to an existing Hunt Group from the Site Dashboard.
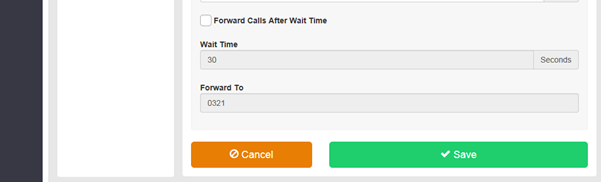
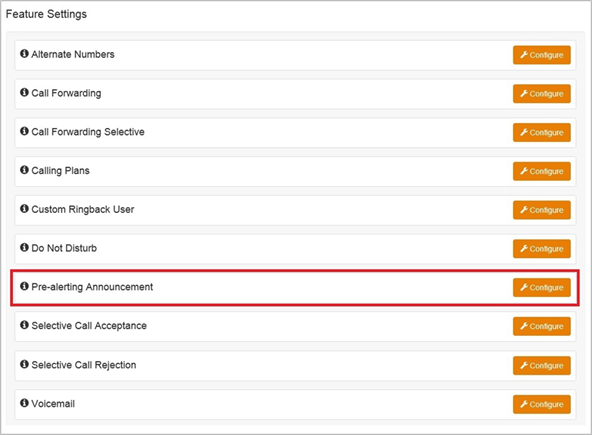
Alternate Numbers
Allows a single Hunt Group to accept incoming calls from up to 10 other incoming numbers not already assigned to a user or feature, ideal for when a single group of people are to manage multiple call presences. All calls made to an Alternate Number will be seen in the CDR’s. There is a choice of 4 Distinctive Ring Patterns that can be assigned to each Alternate Number to assist Hunt Group Users in distinguishing audibly between the Alternate Numbers being dialled.
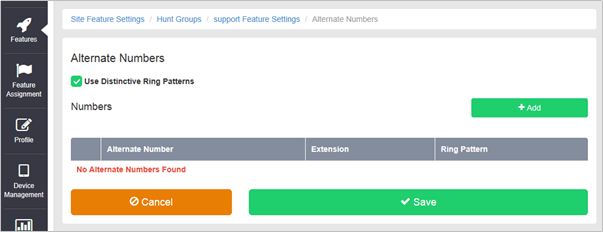
Call Forwarding Always
Useful for important numbers where Disaster Recovery scenarios are important. The Reseller or a Group Administrator can access the Business Portal to divert the Hunt Group to another number and/or location if the office is inaccessible to employees, (weather, traffic, building closures etc), seamlessly maintaining service.
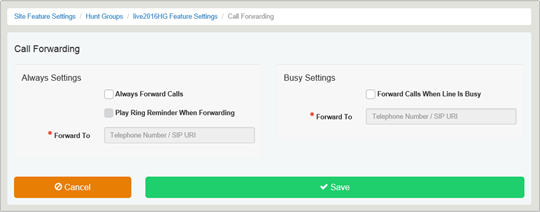
Call Forwarding Busy
During high call volume periods when all Hunt Group users are on a call the Hunt Group call can be forwarded to another destination.

Call Forwarding Selective
Allows granular call forwarding based on Time Schedules and incoming CLI. Forward VIPs based on their incoming CLI to another group or a supervisor. Forward calls based on a Time Schedule to another destination which is very useful if your customer requires after hours calls to be handled by on call personnel.
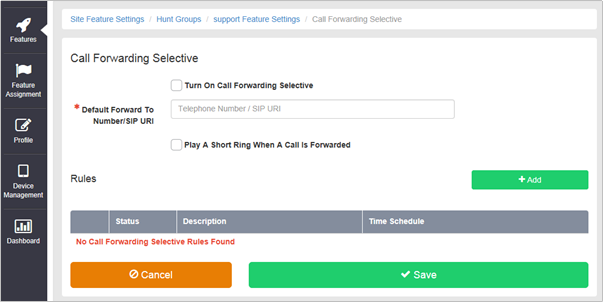
Calling Plans
Calling Plans can be used to block calls from pre-defined locations. It can be used with the ‘Site’ Calling Plan feature, where you can define dialling codes or individual numbers you wish to block from accessing the users in the Hunt Group.
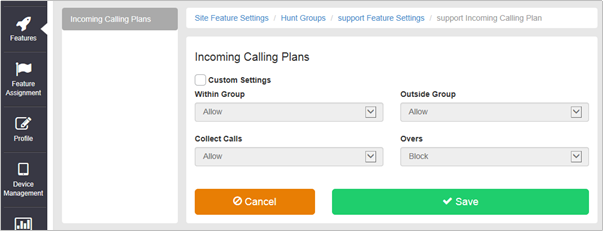
Custom Ringback User
This feature allows a Hunt Group to play alternative audio to all calls made to the Hunt Group. This replaces the traditional ringing audio that the user would hear.
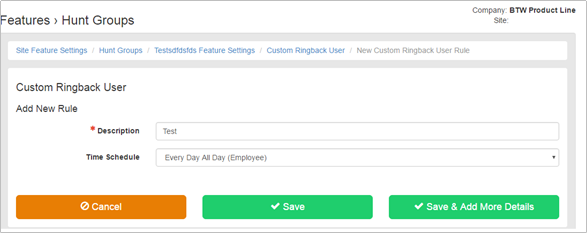
To configure Custom Ringback User, follow these steps:
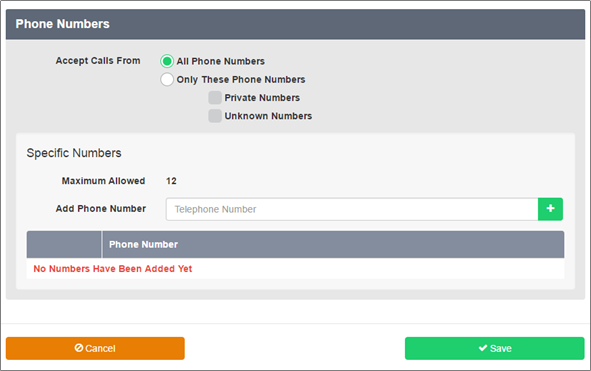
Do Not Disturb
Do Not Disturb can be set on the selected Hunt Group which will block all inbound calls and play a busy tone back to the caller. Do Not Disturb will take precedence and override any other call forwarding feature or any other Hunt Group settings.
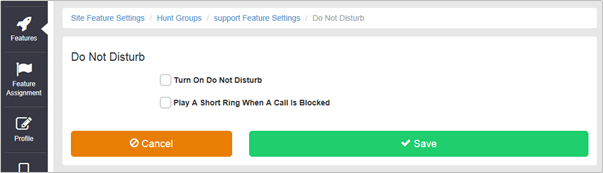
NOTE: The ‘Play A Short Ring When A Call Is Blocked’ feature is not active within a Hunt Group so please do not select.
Pre-alerting Announcement
This feature allows a Hunt Group to play a pre-recorded announcement to callers, ahead of any of the Hunt Group users being alerted (ringing). Pre-alerting can be created with a defined Time Schedule and optional Holiday Schedule, so that it only plays the alert at set times and days. In addition the administrator can choose to play the alert to select number/number types.
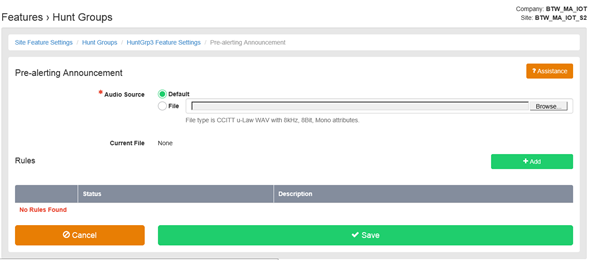
To configure follow these steps:
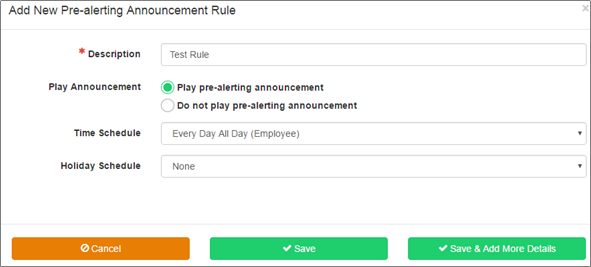

In addition if there are Hunt Groups already built, and using Hunt Group Plus, you will need to set Hunt Group Plus to none followed by save. You will then need to go back into the Hunt Group, add Hunt Group Plus, and Pre-Alerting Announcement will now appear. However please be aware that you will need to rebuild any Hunt Group Plus settings as the process of setting these to none will remove them.
New Company’s, associated Sites and Users created post this release will automatically get these features from Monday 13th February 2017.
Selective Call Acceptance
Using the incoming CLI of the caller and the Time Schedule, if one is applied, Selective Call Acceptance determines which incoming numbers are allowed to call the Hunt Group. Only numbers in the list will be answered by the Hunt Group users. Callers from all other numbers will be presented with a system announcement informing them that the number they are trying to reach is not accepting calls. A Time Schedule can be applied to only accept calls during certain time periods

Selective Call Rejection
Using the incoming CLI of the caller and the Time Schedule, if one is applied, Selective Call Rejection performs a call screen function that determines which incoming numbers are not allowed to call the Hunt Group. Prevent your Hunt Group users from receiving nuisance calls from known numbers ensuring that they are available for customers. Numbers in the list will not be answered by the Hunt Group users. Callers will be presented with a system announcement informing them that the number they are trying to reach is not accepting calls. A Time Schedule can be applied to only reject calls during certain time periods.

Voicemail
Attach a voicemail box to a Hunt Group and allow certain call types/conditions to be forwarded to a dedicated voicemail box and avoid missing customer calls.
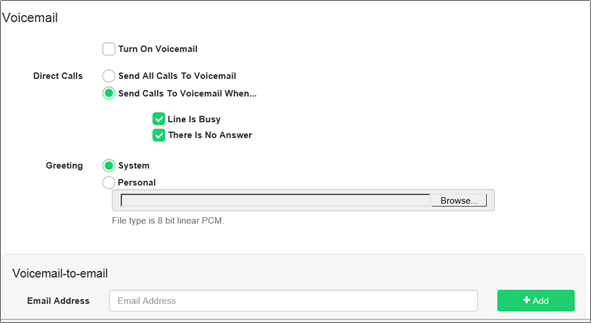
Incoming calls to the mailbox are sent to voicemail once they meet the criteria set by the administrator from within the Hunt Group voicemail settings page on the Business Portal. The caller is then played a greeting, system or personal, and once they have left a message they can hang up the phone to leave the message. For further options they can press # to access the following options:
The maximum length for a single voicemail is 5 minutes.
Voicemails are stored on the WHC voicemail server and converted to an mp3 file if forwarded to an email address. Where a voicemail is elected to be sent to an email address, this is as a carbon copy, and the original will stay on the server until deleted by the administrator. Administrators can choose to delete messages by the following method:
The maximum storage capacity per voicemail box is 30 minutes.
When the administrator receives a new voicemail, they can be notified by the following means:
To turn on Voicemail, simply check the Turn on Voicemail box.

Feature settings from the Business Portal
To configure what happens when a call is placed into the Hunt Group, select from the following:
Accessing Voicemails from the Business Portal
A Company or Group Administrator can use the visual voicemail service to manage the Hunt Group voicemails via the Business Portal. Click on Voicemail from the right-hand side within the Hunt Group settings box.
From here they can see a list of all Voicemails along with:

The administrator can choose to do the following with the Business Portal audio file:
Accessing Voicemails from Email
If the setting is selected in the feature setting, then voicemails will be sent to a nominated email address/s. The user can choose to do the following with the MP3 audio file:
The Music On Hold Feature allows a Group or Company Administrator to set up and maintain an audio source that can be broadcast to held callers in various scenarios. For example, Call Park and Call Hold etc.
You can use the Music On Hold feature to broadcast music, (or any other specific audio message, such as advertising, to callers who are put on hold using the Call Hold and Call Park features.
Music On Hold is a Site feature that allows the Group or Company Administrator to set up an audio media source that can be broadcast to held callers in various scenarios.
The Music On Hold feature is made up of two components:
The following services can be enabled to use the Music On Hold feature:
When no Music On Hold media file is specified or if Music On Hold is turned off for one of these features, the held or parked caller hears silence.
Function - Call Hold and Call Park
The Call Hold and Call Park features use the audio source specified through the group Music On Hold feature page on the Business Portal. The page also allows for selectively activating and deactivating Music On Hold for either Call Hold or Call Park.
The music source can be the WHC system-provided audio file, or a custom audio file selected by the Group or Company Administrator and uploaded to the system.
The music file uploaded by the Group or Company Administrator must be µ- law .wav files that are:
Each Call Centre can define and use its own custom Music Source. As for Call Hold and Call Park, the Music Source for each Call Centre can be the WHC default system source, or a custom Music Source uploaded by the Group or Company Administrator.
The same format requirements apply for the Call Centre Music On Hold:-
Configuration – Call Hold and/or Call Park
You can use the Music On Hold Configuration page to enable or disable the feature and to specify the source for the music.
You can choose to enable or disable the feature for calls that are put on Hold using the Call Hold and/or Call Park features. You can specify whether you want to use the music that the WHC service provides by default or to upload a custom Waveform Audio, (WAV), file that contains your own music or message.
The Group or Company Administrator can activate and deactivate the Music On Hold feature through the Business Portal Site Feature Settings page under ‘Music On Hold’.

The file you select must be a CCITT-compliant, µ-Law-encoded, 8-bit WAV file with mono sound, a maximum sample rate of 8 kHz, and a maximum file size of 5Mb.
Configuration – Call Centre
To select the Music On Hold source for a Call Centre the Group or Company Administrator can choose either the System or Custom Music On Hold through the Business Portal Site Feature Settings page under ‘Call Centre – Announcements’. If a Custom source is selected the file can be uploaded here.
To enable or disable Music on Hold for a Call Centre please refer to the Call Centre configuration documentation.
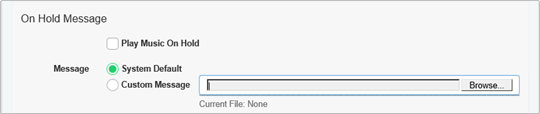
The length of the audio file for the On Hold Message is limited to 11 minutes and its maximum size when uploaded through the Business Portal is 5 Mb.
My Room Audio Conferencing provides Personal Audio Conferencing for up to 8 attendees per conference. It is a reservation-less audio conferencing service that can be accessed from any phone, anywhere. You conduct the conference as the Chairperson.
The UC Team Add-On includes the My Room Conferencing 8 feature, which provides each User with a feature rich, personal Audio Conferencing service for up to 8 participants. In order for Users with the UC Team Add-On to access the Audio Conferencing service via a Conference Bridge, a My Room Bridge needs to be configured at the Site level:


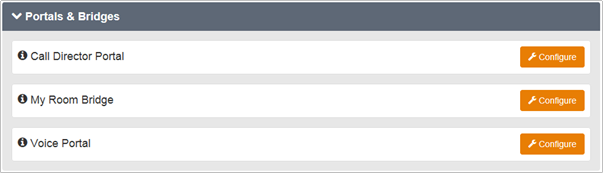

The My Room Bridge has now been created under the Site. This will be the Audio Conferencing Bridge for all Users that have the UC Team Add-On, which includes the My Room Conferencing 8 feature. Users and external parties can dial into the My Room Bridge from any phone, on any network to participate in an Audio Conference. The My Room Conferencing 8 feature is highly integrated with the WHC Platform as a Personal Audio Conferencing solution.
This feature provides a method of pushing down common contacts (in Company and/or Group Directories) to the devices of one or many Users under a Site.
NOTE:
Administrators can use this feature to select which Company Contact Directory and/or the Group Contact Directory is integrated with the Users under the Site. In order for this to apply the Users must have Phone Services enabled and the Phone Directory tuned On.
The Site Level Phone Services feature is available to configure in the Business Portal under:
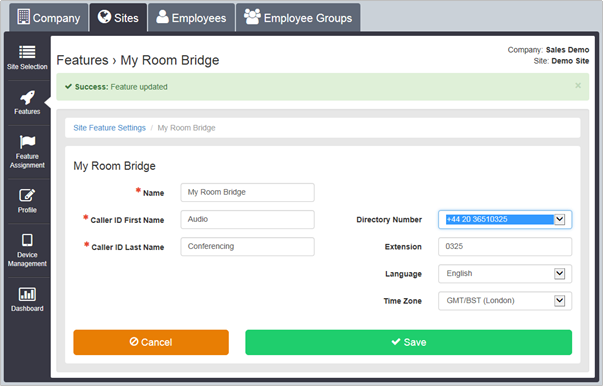
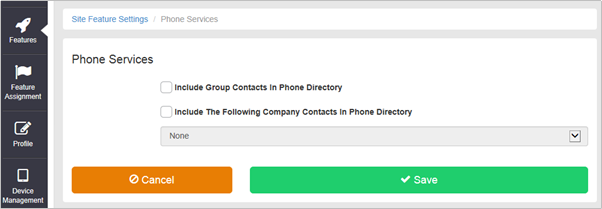
|
Tasks |
Details |
|
Configure which Directories are integrated: |
Select from the following:
And/or
NOTE: The list of company contact directories may be empty if none are configured for the Site, in which case the only valid option in the drop-down is "None”. |
|
Save your changes or exit without saving. |
To save your changes, click Save To exit without saving, select another page or click Cancel to display the previous page. |
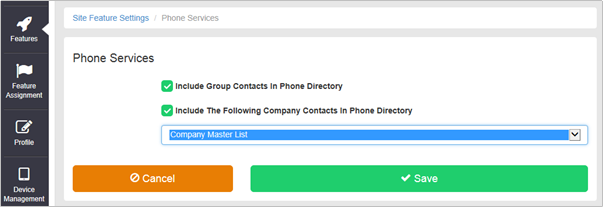
The Series Completion feature allows you to create a “call forward busy chain” that handles calls to lines that are busy by hunting for a free line using a specified, ordered list of Users. When it encounters a call to a User whose line is busy, it uses the order of names in the list to hunt for a User whose line is idle.
When a call attempts to terminate on one of these Users and finds a User busy, the call overflows to the next User on the list, until an idle User is found or the end of the list is reached.
The Series Completion feature provides a special hunting capability that is well suited to support a key telephone system (KTS).
Unlike Hunt Groups that use separate phone numbers to distribute calls, all calls to any number in the list will trigger the hunting capability. Series Completion is initiated for any call terminating on a member of the Series Completion Group.
A Series Completion group can be viewed as a call forward busy chain, among selected members of a group.
If you are using Series Completion to support a key telephone system, other complementary services can also be assigned to Users in the Series Completion Group, since Series Completion uses User features.
For each list, you need to specify a set of Users and the order in which the feature is to alert their respective lines if a call is placed to a User in the list whose line is busy.
Calls to Users who are not included in Series Completion lists are not handled by the Series Completion feature.
The Series Completion configuration page allows the Group or Company Administrator to add, edit, and delete Series Completion lists of Users that make up the Series Completion Group.
The Group or Company Administrator can configure the Series Completion feature through the Business Portal Site Feature settings page under ‘Series Completion’.
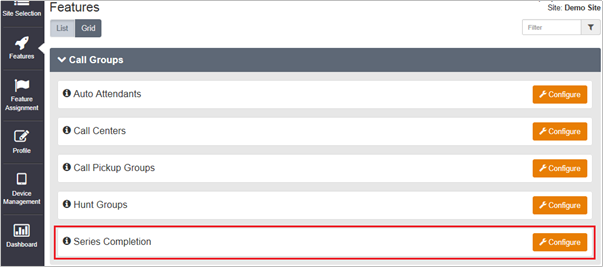
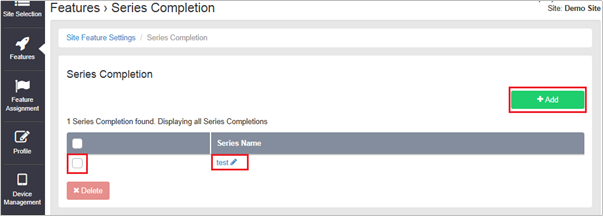

Typically this feature allows calls routed to a line that has been decommissioned to be intercepted with an informative announcement and alternate routing options (for example, “This number is no longer in service. To talk to an operator, press 0”). This feature can only be configured by CP Administrators.
The feature may be used to decommission a single User, or an entire Site. Please refer to ‘User Intercept’ section in the WHC User Features Guide.
For SIPT users, this will not work for calls between PBX users that do not pass through the WHC platform.
If the Site Intercept feature is assigned to a Site and configured, then incoming calls to the Site are intercepted and played an announcement. If configured, this announcement plays back a new destination number to the caller and offers the caller to connect to this new number or to simply transfer to an alternate destination.
Outgoing calls are prohibited from a User when the Site Intercept feature is configured. Only emergency and repair calls are permitted. All other outgoing call attempts are rejected and the User is played an announcement.
The Site Intercept feature allows three types of incoming call interception:
Site Intercept feature can only be configured by:
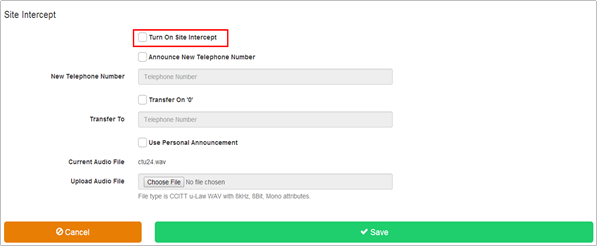
If you want your new phone number to be provided to callers, select the Announce New Telephone Number check box and enter the required phone number into the New Phone Number field.
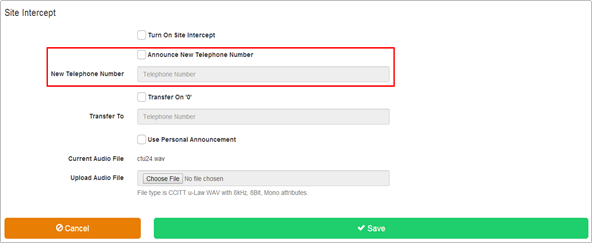
If you want callers to be given the option to be transferred to another phone number when they press the ’0’ key, select the Transfer on ’0’ check box and enter the number to which callers are to be transferred in the Transfer To box.
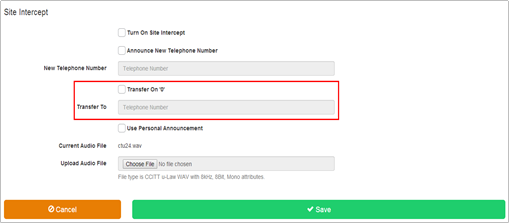
If you want callers to hear a personal announcement that you have recorded and stored in a WAV format file rather than a standard system announcement, select the ‘Use Personal Announcement’ check box and click Browse to select the file.
The file you select must be a CCITT-compliant, µ-Law-encoded, 8-bit WAV file with mono sound, a maximum sample rate of 8 kHz, and a maximum file size uploaded through the Business Portal of 1 MB.
NOTE: The maximum recording length for the Site Intercept and User Intercept announcements is five minutes and file size must be less than 1MB.
Limiting Conditions
On a Site that has the Site Intercept feature enabled, Users cannot place outgoing calls, with the exception of emergency calls.
If a User has User Intercept enabled and configured this will override the Site Intercept announcement and the configured destination.
The Trunk feature enables a SIP device, such as an IP enabled PBX or media gateway to be connected to the platform. Channels are configured on the Trunk to define the number of concurrent calls that can be made. Users are assigned to the Trunk and can use channels assigned to it to make and receive external calls. Any numbers that need to be presented out from the PBX must be assigned to a User.
Trunks are initially created in the Business Zone portal and can configured and modified using the Trunk feature in Business Portal.
For more complex deployments where multiple Trunks have been created for a Company, the ‘Enterprise Trunks’ feature can be used utilised to link Trunks together to create resilient call patterns. Please refer to the WHC Company Features Guide for configuration details.
This section will describe the hosted features available as part of the Trunk feature. For device configuration requirements, please refer to the individual device configuration guide available from the document centre.
Forwarding calls to the Trunk can be done from any location with internet access. You do not have to attend Site, or in the case of a customer administering these features themselves, they do not have to be in their offices.
The following configuration options are available
NOTE: Where a Trunk is part of an Enterprise Trunk we recommend that the Admin does not apply forwarding or re-routing policies on the Trunk as it may interfere with the Enterprise Trunk configuration. The Enterprise Trunk can have capacity exceeded or unreachable conditions for all of Trunks it is configured for.
This section describes how a Group or Company Administrator can amend and configure Trunk features using the Business Portal.
View and amend Trunk settings:
Once logged on Navigate to: - Sites (Select Site) > Features > Trunks
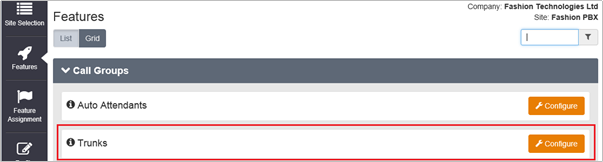
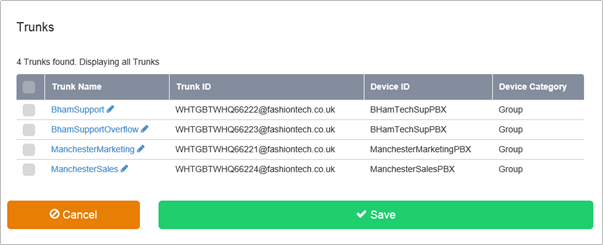
Amend Trunk Settings
In the General Settings section: -
Details in this section will be pre populated based on the information supplied in the Business Zone order but can be amended if required.
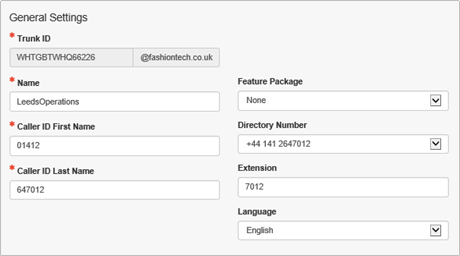
NOTE: changing the Directory Number will also require a PBX update
In the Call Settings section: -
Details in this section will be pre populated based on the information supplied in the Business Zone order but can be amended if you wish.
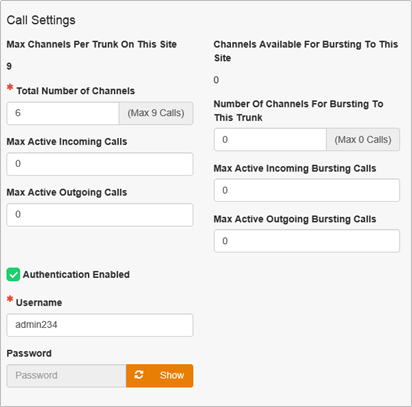
Call Settings – Trunk Channel Limits
NOTE: If Call Capacity Management feature is also used at the site, ensure Trunk channel capacity settings do not conflict.
Call Settings – Trunk Authentication
NOTE: changing the Trunk username and or password will also require a PBX update
In the Device Settings section: -
Device settings are configured in Business Zone and are displayed in Business Portal for information only.
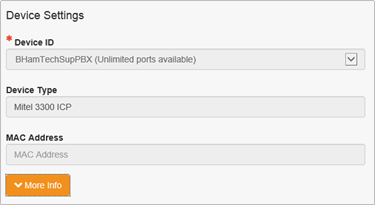
Configure Trunk features that apply to the entire trunk and all users
Once logged on Navigate to: - Sites (Select Site) > Features > Trunks

Capacity Exceeded Settings
Use this feature to direct calls to another location if all of the available channels on the Trunk are in use. This setting applies to:
When this is configured, it will take precedence over any conflicting Individual User or Trunk Main Number setting (Feature Settings list on left hand menu).
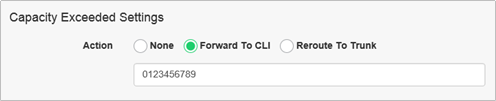
Settings:
Unreachable Destination Settings
Use this feature to direct calls to another location if the Trunk is unreachable. This setting applies to:
When this is configured, it will take precedence over any conflicting Individual User or Trunk Main Number setting (Feature Settings list on left hand menu).
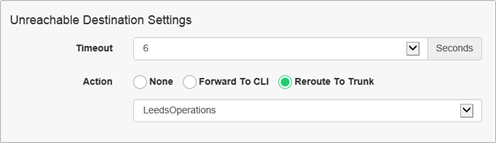
Settings:
Call Forwarding Always Settings
Use this feature if all calls need to be diverted. This setting applies to:
When this is configured, it will take precedence over any conflicting Individual User or Trunk Main Number setting (Feature Settings list on left hand menu).
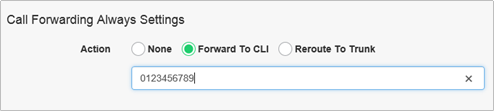
Settings:
Change Voicemail Password
This enables a voice portal password to be set that can be used to access voicemail for the Trunk number if configured.

Configure Trunk features that apply to the Trunk number only
This section will describe each of the features available for configuration under the Trunk ‘Feature Settings’ section. Note that these features apply only to the main Trunk number and not to the users also assigned to the Trunk.
From the Trunk Setting section, navigate to Feature Settings on the left menu.

Calling Line ID Blocking
Calling Line ID Blocking is used to block or allow the delivery of a caller’s identity (both name and number), on an outgoing call to the called party.
When active, calls made with the Trunk number to parties outside of the Company have the presentation of their identity, both name and number blocked. The blocking is achieved by setting the presentation indicator associated with the calling party number to “private”, which prevents the caller’s identity from being revealed to the called party’s device.
The use of Calling Line Identity Blocking on a Trunk will block the User’s Calling Line Identity for all outgoing calls outside of the Site using the Trunk number.
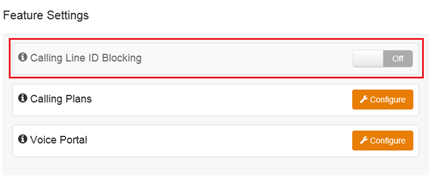
To Activate Calling Line ID Blocking on a Trunk:
Calling Plans
Calling Plans can be used to block calls from pre-defined locations. It can be used with the ‘Site’ Calling Plan feature, where you can define dialling codes or individual numbers you wish to block from accessing the users of the Trunk.
Voice Portal
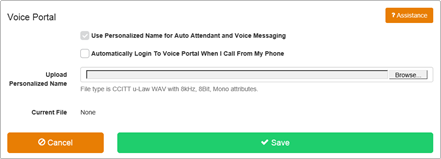
Add additional extension only or Trunking Users to a Trunk. There must be unallocated numbers available at the site to create new Trunking Users.
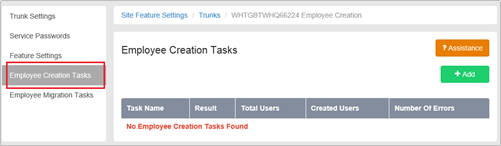
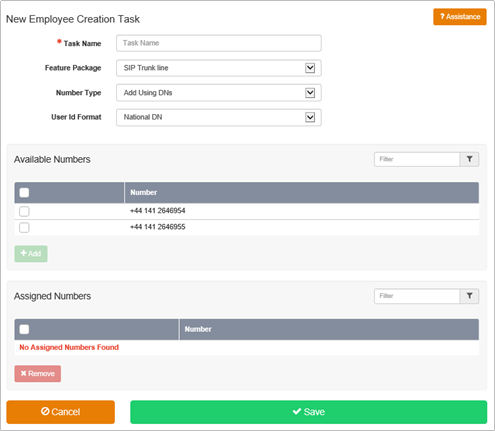 #
#
Move users to be moved from one Trunk to another at the same site.
The Trunk Group Plus adds enhanced call forwarding functions when applied to the selected Trunk through the Business Portal. The enhanced functionality allows greater flexibility in how a Trunk can be deployed.
Additional Trunk configuration features that apply to the Trunk number (and Alternate Numbers if configured) and not to any users associated to the Trunk:
Configuration
This section describes how a Group or Company Administrator can add and configure Trunk Group features using the Business Portal.
Once logged on Navigate to: - Sites (Select Site) > Features > Trunks
Select a Trunk to open up the General Settings section.
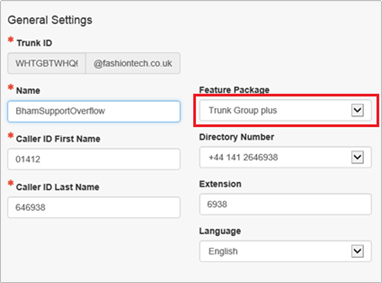
Feature Settings
This section will describe each of the additional Trunk Group Plus features available for configuration under the Trunk ‘Feature Settings’ section. Note that these features apply only to the main Trunk number but not to the users also assigned to the Trunk.
From the Trunk Setting section, navigate to Feature Settings on the left menu.
Alternate Numbers
Allows a single Trunk to accept incoming calls from up to 10 other incoming numbers not already assigned to a user or feature, ideal for when a single group of people are to manage multiple call presences. All calls made to an Alternate Number will be seen in the CDR’s.
Call Forwarding Always
Useful for important numbers where Disaster Recovery scenarios are important. The Reseller or a Group Administrator can access the Business Portal to divert the Trunk to another number and/or location if the office is inaccessible to employees, (weather, traffic, building closures etc), seamlessly maintaining service.
This setting applies to:
Call Forwarding Busy
During high call volume periods when all Trunk users are on a call the Trunk call can be forwarded to another destination. This setting applies to:

Call Forward Selective
Allows granular call forwarding based on Time Schedules and incoming CLI. Forward VIPs based on their incoming CLI to another group or a supervisor. Forward calls based on a Time Schedule to another destination which is very useful if your customer requires after hours calls to be handled by on call personnel.
This setting applies to:
Do Not Disturb
Do Not Disturb can be set on the selected Trunk which will block all inbound calls and play a busy tone back to the caller. Do Not Disturb will take precedence and override any other call forwarding feature or any other Trunk settings.
This setting applies to:
Note: The ‘Play A Short Ring When A Call Is Blocked’ feature is not active within a Trunk so please do not select.
Selective Call Acceptance
Using the incoming CLI of the caller and the Time Schedule, if one is applied, Selective Call Acceptance determines which incoming numbers are allowed to call the Trunk. Only numbers in the list will be answered by the Trunk users. Callers from all other numbers will be presented with a system announcement informing them that the number they are trying to reach is not accepting calls. A Time Schedule can be applied to only accept calls during certain time periods.
This setting applies to:

Selective Call Rejection
Using the incoming CLI of the caller and the Time Schedule, if one is applied, Selective Call Rejection performs a call screen function that determines which incoming numbers are not allowed to call the Trunk. Prevent your Trunk users from receiving nuisance calls from known numbers ensuring that they are available for customers. Numbers in the list will not be answered by the Trunk users. Callers will be presented with a system announcement informing them that the number they are trying to reach is not accepting calls. A Time Schedule can be applied to only reject calls during certain time periods.
This setting applies to:
Voicemail
Attach a voicemail box to a Trunk and allow certain call types/conditions to be forwarded to a dedicated voicemail box and avoid missing customer calls.
Incoming calls to the mailbox are sent to voicemail once they meet the criteria set by the administrator from within the Trunk voicemail settings page on the Business Portal. The caller is then played a greeting, system or personal, and once they have left a message they can hang up the phone to leave the message. For further options they can press # to access the following options:
The maximum length for a single voicemail is 5 minutes.
Voicemails are stored on the WHC voicemail server and converted to an mp3 file if forwarded to an email address. Where a voicemail is elected to be sent to an email address, this is as a carbon copy, and the original will stay on the server until deleted by the administrator. Administrators can choose to delete messages by the following method:
The maximum storage capacity per voicemail box is 30 minutes.
When the administrator receives a new voicemail, they can be notified by the following means:
To turn on Voicemail, simply check the Turn on Voicemail box.
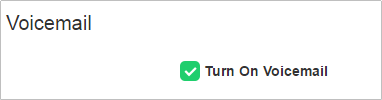
Feature settings from the Business Portal
To configure what happens when a call is placed into the Trunk, select from the following:
Accessing Voicemails from the Business Portal
A Company or Group Administrator can use the visual voicemail service to manage the Hunt Group voicemails via the Business Portal. Click on Voicemail from the right-hand side within the Hunt Group settings box.
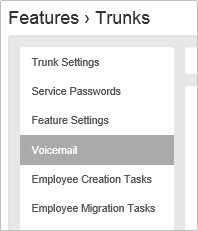
From here they can see a list of all Voicemails along with:

The administrator can choose to do the following with the Business Portal audio file:
Accessing Voicemails from Email
If the setting is selected in the feature setting, then voicemails will be sent to a nominated email address/s. The user can choose to do the following with the MP3 audio file:

The Time Schedule feature can be used to define Time Schedules that can be applied to the features used by the Site. The Time Schedules you create for a Site are visible to and can be used by its Site features and End Users.
Create a Time Schedule if you want a feature to use different behaviour during business and non-business hours, or at different times during the day to handle calls during peak times, or times where Users are routinely unavailable, differently.
For example, if you apply a Time Schedule to an Auto Attendant you can present different menu options or capabilities to incoming callers based on what day and/or time of day they called.
Time Schedules you define can be used for the following features:
Each Time Schedule consists of up to 20 date or time ranges for a week. Depending on the feature to which you intend to apply it, you can use Time Schedules to perform tasks like distinguishing between business hours and after hours for an Auto Attendant or for identifying Call Centre hours.
By default, all undefined periods are designated as non-business hours or “after hours”. If you apply a Time Schedule to an Auto Attendant that has different behaviour defined for handling calls during business hours and after hours, the Auto Attendant uses the appropriate behaviour based on the selected Time Schedule.
A Time Schedule will only apply to a feature if you select it from the Time Schedule list when you create or edit that particular feature.
The Group or Company Administrator can create and edit Time Schedules for use by Auto Attendants, Call Notify, Selective Call Acceptance/Rejection and Priority ringing through the Business Portal Site Feature Settings page, under ‘Time Schedules’.

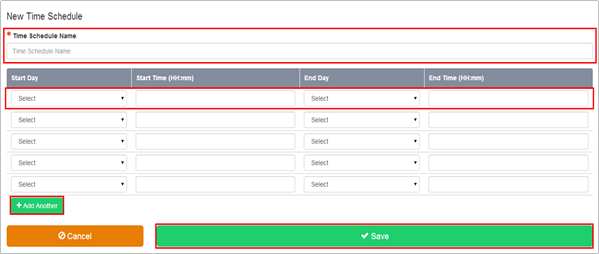
Use the fields provided to specify up to 20 time ranges over the course of a given week. Please note that only 5 rows are visible in the table by default. To add more, simply use the ‘Add Another’ button.
The Time Schedules page is displayed on the Time Schedules page with a link to your new Time Schedule.
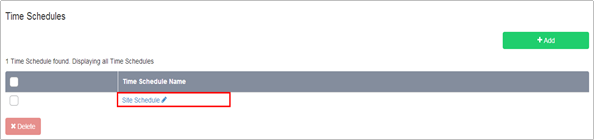
Description
The Voicemail Site feature allows the CP Administrator to configure whether Voicemail is enabled or disabled for each Site, regardless of whether the User has this feature in their license pack.
By default this is set to on and needs to stay on if there are users with Fixed and Mobile user licenses on the system, expecting to use the voicemail contained in their packs
However if a Company has a need for their users to be on the Fixed or Mobile User License, in order to access advanced features, but do not want them to use Voicemail, then turning this off simply disables Voicemail for all.
For SIPT users, this feature may conflict with a PBX mailbox if also configured as calls may hit the PBX RTNR (ring tone no reply) or Busy condition and will always go to PBX voicemail. If a SIPT user is configured without a PBX mailbox or is using divert services then this feature may be used (see PBX config guide for unified mailbox support details).
The CP Admin should select the site where they want to disable this, locate the Voicemail feature followed by the Configure button.
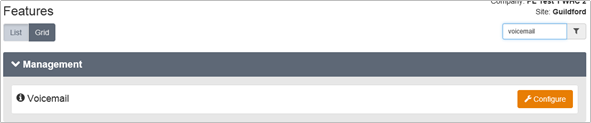
Once inside the feature, simply untick the box followed by Save.
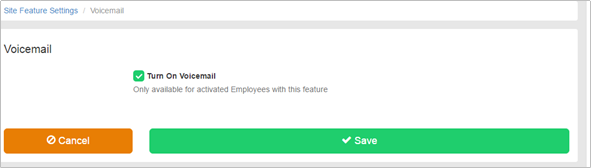
The Voice Portal provides a facility for a Company or Group Administrator to manage Auto Attendant greetings. It also provides User Administrators with a facility to manage CommPilot Express profiles and Hot Desking Guest logins via a central phone number.
Voice Portal should not be confused with Voicemail as it has no interworking (it did on WHC 1.0, but not on WHC 2.0).
The Voice Portal provides a convenient way for Company/Group Administrators and users to manage some of their features from any phone. To access the Voice Portal menu a user will dial either the number of their Site Voice Portal or a configurable Feature Access Code.
The Voice Portal allows a Company or Site Administrator to assign a telephone number to a central IVR function which when phoned will allow them to:
The Voice Portal allows a user to phone a central IVR function which will allow them to:
To configure this feature the CP or Company Administrator should navigate to:
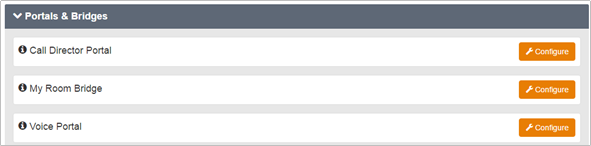
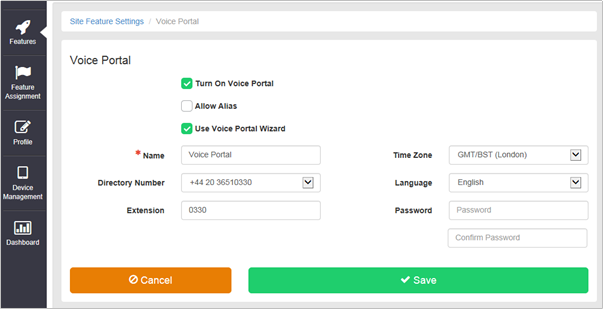
An administrator can now dial into the Voice Portal from:
They then need to:
Once a user passes security, they are presented with the following options:
Please note, the Voice Portal telephone number, for personal use by users, is not sent so you will need to arrange to pass this to any users that require it. We also recommend that you change the personal greeting.
The Voice Recording Site setting enables an administrator to bulk disable User/s from changing/over-riding their Voice Recording controls.
An administrator is able to select a recording policy from one of the options below. Likewise Users can also change the setting to whatever they desire. In some instances an administrator may not want their Users to be able to change these settings. Using this Site feature, an administrator can use a bulk function to restrict some or all users from changing this setting.
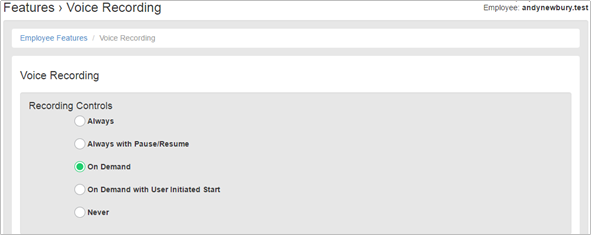
In addition, an Administrator can also disable this directly under the Employees page as per the screenshot below.
SIPT users using "Always" will work for external PSTN calls, but not for internal calls between PBX users that do not pass through the WHC platform. For SIPT users, the other three variants "Always with Pause/Resume", "On Demand", "On Demand with User Initiated Start" are dependent on PBX support as codes may not be passed through to the WHC platform by the PBX (see PBX config guide for details). These variants can however be controlled via the BP
This feature is available to configure in the Business Portal by navigating to:
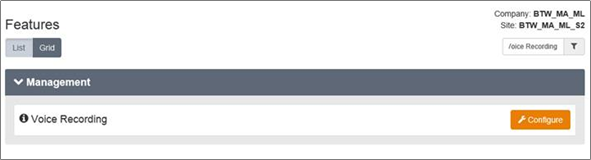
To configure, follow these steps:
Click into the field and start typing the name of the user, then click on one to add
To remove Users from the restriction, click into the users field and click x on the user to be removed.
Click Select None to remove all users from the group
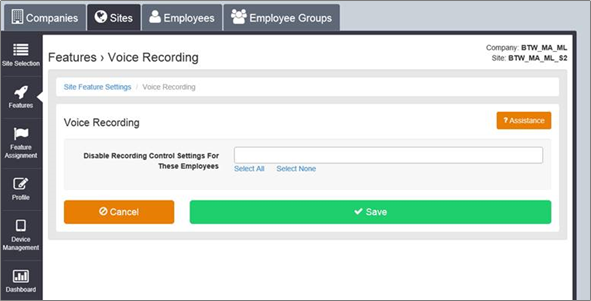
Alternatively if you just want to restrict one user whilst you are administering features against a User, navigate to:
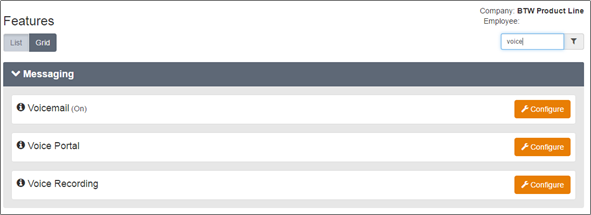
To configure, follow these steps:
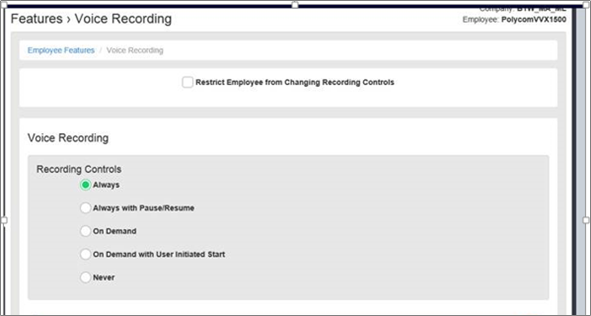
Article ID: 243
Created: Mon, May 27, 2019
Last Updated: Mon, May 27, 2019
Author: Keira Tait
Online URL: https://kb2.ic.uk/article.php?id=243