
The Appointment Reminder module is a unique way to automate Appointment Reminders. By simply specifying names and numbers to be called, the PBX will automatically call at specified times and allow recipients to confirm, cancel, and reschedule appointments. The module gives you the flexibility to control all details of the calls, from concurrent rates to retry attempts to how many days ahead to notify. You have the ability to load a CSV list of numbers to call, or even add numbers and names manually. On the fly modifications can be made to any Appointment Reminder list.
To navigate to the Appointment Reminder module:
The home screen ( Overview tab) will show any reminders that have been created.
Click on the Global Settings tab.
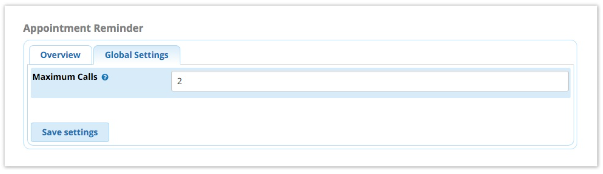
The number of maximum simultaneous calls the system will make.
Click the Save settings button to save global settings.
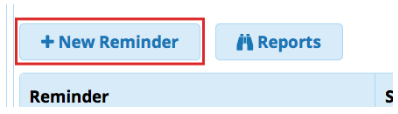
Click on the + New Reminder option at the top.
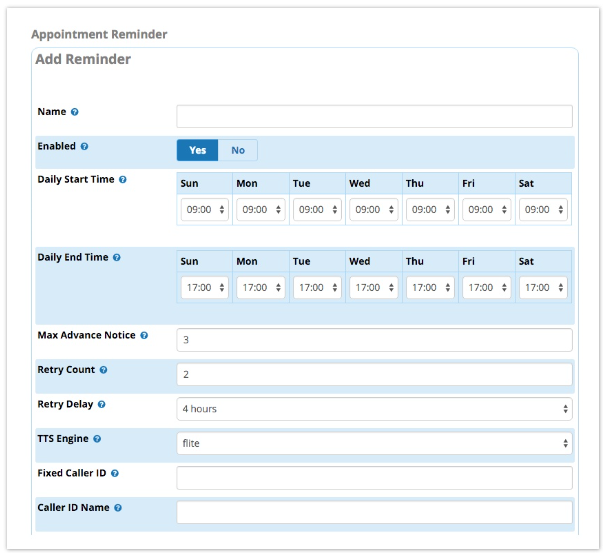
This is the unique name for our Appointment Reminder.
Yes/No: Whether the appointment reminder will run. You can easily enable/disable the appointment reminder by toggling this switch.
The time of day the appointment reminder will start. (In 24-hour format HH:MM).
The time of day the appointment reminder will stop. (In 24-hour format HH:MM).
How many days ahead of the scheduled appointment to place the reminder call.
How many times to retry calling recipient if the system is unable to reach them on the first call.
How long, in hours, to wait after a failed attempt before retrying the recipient. Note that if the delay amount causes a retry to land after the appointment reminder’s daily end time, the reminder will be attempted again the following day instead.
This is the text to speech engine used to say the recipient’s name. Unless you are an advanced user, this should be set to the default of flite .
The outbound caller ID that the call should appear to come from. Outbound CID Mode must be set to fixed below in order for this setting to be used.
(Optional) The caller ID name to display on calls to internal extensions.
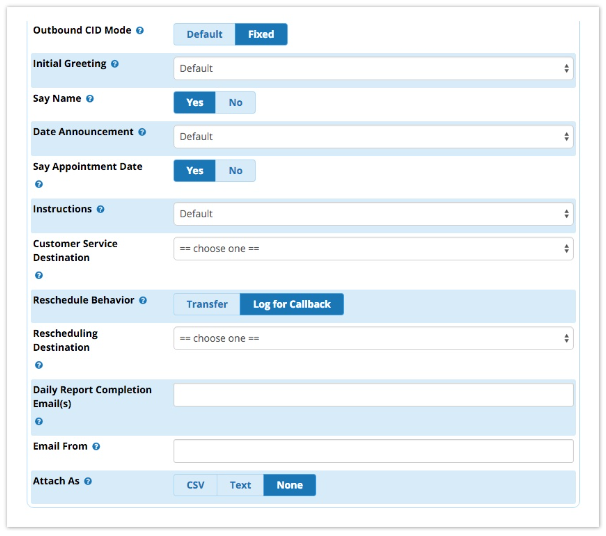
Default/Fixed: Whether to use the system default caller ID or the fixed caller ID set above.
The first message played to the recipient. You can record a custom greeting or use the default. Additional recordings can be made in the System Recordings module. Be sure to include a message similar to, "This is an appointment reminder..."
Yes/No: Whether to say the recipient’s name. If yes , the system will use text to speech to read the name of the person associated with the reminder.
The message played to the recipient prior to saying the date. Default = "You have an appointment scheduled on..." Additional recordings can be made in the System Recordings module.
Yes/No: Whether to say the date announcement selected above, followed by the date of the appointment.
Default or custom instructions to play to the recipient. Default = "To confirm this appointment, press ONE. To cancel, press TWO. To request your appointment be rescheduled, press THREE." You can record a custom message in System Recordings ; however, it must match the pattern above.
Where to send callers if they press ZERO.
How to handle calls when the recipient presses THREE to request rescheduling.
(Only used if Reschedule Behaviour = Transfer ) Where to send callers who select THREE to request rescheduling.
One or more e-mail addresses to send daily reports to upon completion of Appointment Reminder calling for the day. Separate multiple e-mail addresses with commas.
Provide the e-mail address that the completion report e-mails will be sent from.
CSV/Text/None: Whether to attach the report as a CSV or plain text file (or not include it at all).
Press the Submit button when done.
A Manage Recipients button will now appear alongside the Submit button.
When viewing an appointment reminder, click the Manage Recipients button. Alternatively, from the Appointment Reminder home screen, click on the users button  .
.
You will be taken to the Recipient List screen as shown below:
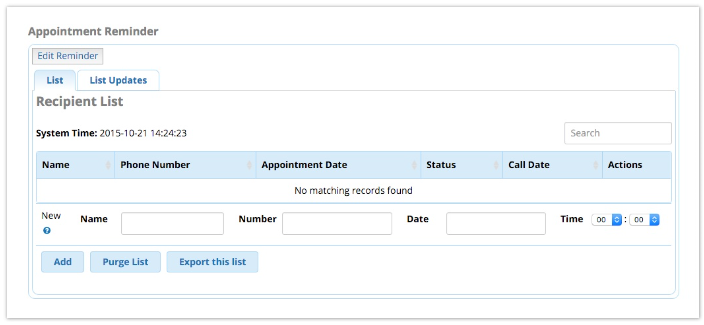
From here, you can choose whether to manage recipients directly via the GUI, set up automatic downloads of a CSV file, or upload a CSV file on a one-time basis.
Click on the List tab if not already there.
Enter the recipient’s Name , phone Number , and appointment Date & Time .

Click the Add button.
Repeat for each recipient.
The list of recipients, phone numbers, dates/times, reminder status, and call dates will be shown.
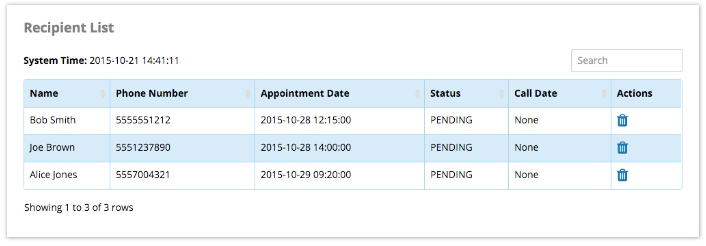
When viewing the recipient list, click the trash icon  to delete a single reminder.
To remove all of the reminders, click the Purge List button and confirm the deletion in the pop-up window that appears.
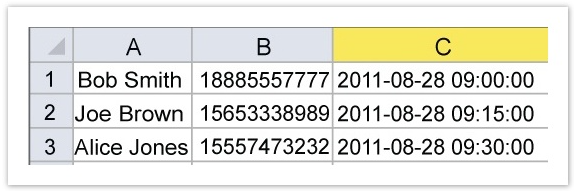
You can create a CSV file of appointment reminder recipients using Excel or a similar editor.
This should be a basic CSV with the following columns: Name, Phone Number, Date (YYYY-MM-DD HH:MM:SS).
Note: There is an optional fourth column not shown below. If used, this is considered the "command" column, and you can choose to enter "delete" "add" or "update" depending upon what you’d like the system to do with the entry.
Create a CSV file as described above, and upload it to a server.
In an existing appointment reminder, click Manage Recipients .
Click the List Updates tab.
Complete the Automatic Updates section:
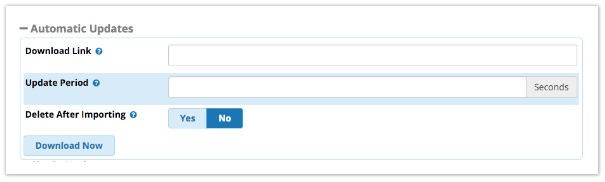
Enter the URI to download the report from, such as:
ftp://username:password@192.168.1.1/reminder.csv
or
http://myserver.remote.com/downloadfile/file.csv
Currently, only http and ftp are supported .
The update period, in seconds. This is how often the system will attempt to download the file. Minimum of 300 seconds (5 minutes).
(FTP ONLY!) Yes/No : Whether to delete the source file after the CSV has successfully been imported.
Click the Download Now button and the system will download the data. Additional downloads will proceed based on the update period set above.
If the CSV file has been created properly, you will now see the new data populate under the List tab.
Create a CSV file as described above.
In an existing appointment reminder, click Manage Recipients .
Click the List Updates tab.
Complete the Single Update section:
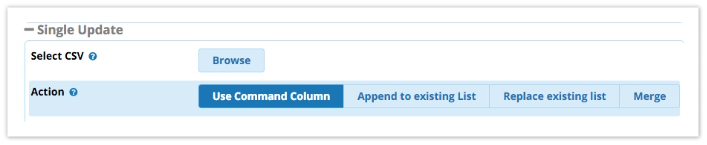
Click the Browse button.
Select the CSV file from your computer.
Use Command Column: Handle each entry according to the fourth ("command") column in the CSV file. ("delete" "add" or "update") See Appointment Reminder - CSV Format .
Append to existing List: Add all CSV file entries to the existing list.
Replace existing List: Delete the entries in the existing list, and replace them with the entries in the CSV file.
Merge: Merge the entries.
Click the Save button to perform the selected action.
If the CSV file has been created properly, you will now see the new data populate under the List tab.
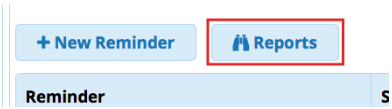
Click Reports from the options at the top.
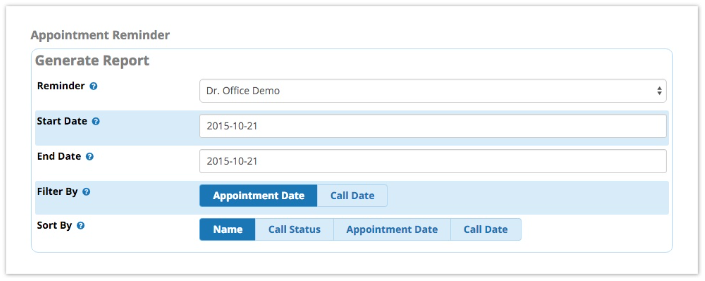
Select which appointment reminder you would like to run the report for.
Start date to run this report from.
End date to run this report to.
Appointment Date / Call Date: Whether the system should look for the appointment date or call date when filtering by the date range above.
How to sort the data. Options:
C lick the Generate button if you would like to generate a report that will be shown on the screen.
Click the Download CSV button if you’d like to download a report in CSV format.
When creating a CSV file for import into Appointment reminder, the format of the file must be this:
"Display Name","+1-234-555-1234","2015-01-01 01:02:03"
"Display Name 2","+1-234-555-1235","2015-01-01 01:02:03"
"Display Name 3","+1-234-555-1236","2015-01-01 01:02:03"
There is an optional 4th column:
"Display Name 4","+1-234-555-1236","2015-01-01 01:02:03","delete"
"Display Name 5","+1-234-555-1237","2015-01-01 01:02:03","add"
"Display Name 6","+1-234-555-1238","2015-01-01 01:02:03","update"
This removes appointments that exactly match the Name, Number and Date. If you specify "*" for the date, it will remove all appointments that match the name and number
"Display Name 4","+1-234-555-1236","2015-01-01 01:02:03","delete"
"Display Name 5","+1-234-555-1237","*","delete"
This updates an existing name/number with a new appointment time, removing any previous appointments with the same name and number. The following csv will result in one appointment for "Display Name 4" at 2015-01-01 01:02:05.
"Display Name 4","+1-234-555-1236","2015-01-01 01:02:03","update"
"Display Name 4","+1-234-555-1236","2015-01-01 01:02:04","update"
"Display Name 4","+1-234-555-1236","2015-01-01 01:02:05","update"
This inserts a new appointment, but will not create an exact duplicate. The following csv will result in three appointments, as the last two are duplicates of each other.
"Display Name 4","+1-234-555-1236","2015-01-01 01:02:03","add"
"Display Name 4","+1-234-555-1236","2015-01-01 01:02:04","add"
"Display Name 4","+1-234-555-1236","2015-01-01 01:02:05","add"
"Display Name 4","+1-234-555-1236","2015-01-01 01:02:05","add"
Article ID: 95
Created: Mon, Jul 31, 2017
Last Updated: Tue, Aug 1, 2017
Author: Mark Simcoe
Online URL: https://kb2.ic.uk/article.php?id=95